Pass DIY Addict
Joined 2000
Paid Member
Woodworking tips
Brian: Since the outer material for the Thors is red oak, you might want to consider using a red oak grain filler (wood putty). There was an extensive article about this in a recent AudioXpress that I wish I had read before I stained and polyurethaned my fireplace mantle piece.
The general idea is that red oak has a very deep and pourus grain. It will take many, many, many coats of polyurethane with lots and lots of sanding between coats to fill in the grain so that you get a smooth-as-glass finish. I'm up to 5 coats now and still have pits in the surface from the grain. The article basically says to apply the grain filler prior to staining. Use a putty knife to apply it and to scrape off the excess before its completely dry. Then sand the entire surface after its dry. Use the putty knife before its completely dry because sanding the wood filler smooth will take forever otherwise. Then apply your stain and final coatings.
Eric,
Thanks for the advice on finishing. Do you remember what month of AudioXpress that it is in? I will see if I can get some from HD, and try it on a scrap piece.
I did a search for filler and found this:
from http://www.thewoodbox.com/data/wood/redoakinfo.htm
"
Finishing:
Red Oak finishes and stains easily. It has none of the blotching problems that are associated with birch or maple. The open pores absorb more stain, so the grain pattern becomes quite evident when a dark stain is applied to red oak. If you hope to achieve a near glass like appearance with the top coat, it is almost always necessary to use a pore filler. For effect, try top coating a couple of times and then tint the pore filler a contrasting colour, fill the pores, sand and then top coat again. The effect is quite fascinating.
"
Does that similar to what AudioXpress stated?
--
Brian
Filling oak
There are easier ways of filling the pores than using multiple coats of polyurethane -- there are fillers (made of extremely fine particles like pumice or rottenstone, one trade name is Silex) which you combine with a resin to fill in the cellular structure. There are off-the-shelf products which are both water-base and oil (and other) base, with a variety of colorations.
There are easier ways of filling the pores than using multiple coats of polyurethane -- there are fillers (made of extremely fine particles like pumice or rottenstone, one trade name is Silex) which you combine with a resin to fill in the cellular structure. There are off-the-shelf products which are both water-base and oil (and other) base, with a variety of colorations.
Pass DIY Addict
Joined 2000
Paid Member
Brian: yes, that is essentially what they stated, but the article you have quoted is looking for a very different type of result using contrasting colors in the filler. The stuff I bought came from the local hardware store and cost about $4 for a 3-4 can of red oak filler.
Some other tips I learned (mostly the hard way) about finishing fine wood:
1) use a pre-stain treater (like that from Minwax). It helps the stain absorb more evenly and avoids contrasting darker and lighter spots due to uneven absorbtion rates. Wipe off the pre-stain treater after about 10 minutes.
2) Use the best (most expensive) brush for staining you can find. Look for a boar's hair brush 2-3" wide, should cost $10-15. Cheaper brushes leave bristles behind, especially while using polyurethane. Sponges don't work well at all.
3) Apply stain after wiping off the pre-stain treatment. Gently and evenly wipe off the stain after about 5-10 minutes. Use a cotton cloth and use smooth, even strokes across the entire length of the wook. This will also help it to dry evenly. Let dry for 24 hours before applying the next coat of stain.
4) Use 0000 steel wool to lightly rub down the wood between coats of stain, but not after the final coat of stain. This will remove any grain that raises up off the suface - this happens more with soft woods (pine) than with hard woods (oak).
5) Use a tack rag to get the steel wool particles off the wood. Use latex gloves to keep stain, steel wool, and the tack rag off of your hands.
6) If your stain is oil-based, be sure to use an oil-based polyurethane. Same goes for water. Each is fine, but don't mix an oil stain with a water based polyurethane.
7) lightly sand each coat of polyurethane with 300 grit paper before applying the next coat. Use a tack rag again to remove dust. Let each coat dry for 24 hours before repeating.
8) Do ALL staining, steel wooling, and polyurethaning INSIDE your house where you can control the humidity with air conditioning. High humidity will cause a white milky appearance in the polyurethane that you will be unable to remove.
9) Don't use small cans (1/2 pint) of stain or polyurethane. They tend not to sell as quickly as the larger cans (quart or half-gallon size), so they sit longer on the self. When the sit, they separate. After separation, they don't stir back together well at all. Never shake, always stir! Shaking makes bubbles that stay in your finish.
I'll look for the AudioXpress issue when I go home tonight. Its from June or July I think.
Eric
FYI, for future builders of this kind of thing.
If you will be rounding the front and back corners
at 0.75" or more with a router you can just
use MDF and wrap it with a hardwood veneer
of your choice (oak, cherry, etc.) since veneer
is so bendable. This will save a bit of money on
the solid and ply hardwoods.
I did the veneer thing with my Ariels.
There is only one veneer seam running down the back of the speaker.
btw, these Ariels are for sale!
Brad Baker - bbaker2002@hotmail.com
Btw Brian,
I noticed allot of burning on the sides of the wood you cut.
It's likely that your table saw is out of adjustment. This
happens most often when the fence is not completely parallel to the blade - it happened to me. It went away after I adjusted
my fence and made allot of trial cuts until I got it right. Now
it cuts much more easily and accurate without the burning.
FYI, -Brad-
I really appreciate the finishing advice. I can't wait to finish them and listen to them.
Eric:
How many coats of polyurethane should I use if I follow that procedure?
Brad:
It is my friend's old craftsman tablesaw. I will have him look at it.
--
Brian
Eric:
How many coats of polyurethane should I use if I follow that procedure?
Brad:
It is my friend's old craftsman tablesaw. I will have him look at it.
--
Brian
Pass DIY Addict
Joined 2000
Paid Member
The number of coats depends upon how it looks to you when you are finished, but I would do at least 3 coats to help protect from light scratches and little dings. Granted, nothing will protect your wood from all scratches, but the greater the number of coats you use, the better off you will be.
You also have to choose the finish of the polyurethane: satin, semi-gloss, or glossy. I tend to lean toward satin myself, sometimes I think the gloss can be too shiny...
You also have to choose the finish of the polyurethane: satin, semi-gloss, or glossy. I tend to lean toward satin myself, sometimes I think the gloss can be too shiny...
Brian
Another option I have used is Aniline stain, its a water based product. You mix the color, depending on the amount of water you can go light or dark, add more coats to darken. I like it because dyes the wood. What ever color you decide on you get, a gel stain can't penetrate oak and it can take a lot of coats to get the color you want. The dye also lets more of the grain show through. It's available a Lee Valley Tools.
Bob2
Hi.
Is anyone able to put up a .PDF or scan of Part 2 of the article
from Audioexpress magazine about THOR construction ?
Where I live this magazine is not available (I assume it is published in the USA ??)
Thanks🙂
Is anyone able to put up a .PDF or scan of Part 2 of the article
from Audioexpress magazine about THOR construction ?
Where I live this magazine is not available (I assume it is published in the USA ??)
Thanks🙂
OK .... Now you've got my attention !!!!!!!
I've been looking at the Thor for some time now and have asked previously if anyone had built a pair to give an independent "honest" review.
They should be quite good, but some experienced people on this forum expressed concern, so I was put-off given the high cost of the drivers.
I for one will be very interested in what you think at the completion of these.
cheers, mark
mefinnis:
I felt the same thing at first, that Thor was just propaganda by Seas to sell their expensive drivers, but I decided to give it a try. I will post my listening experiences as soon as I finish.
andrew:
Part 2 of the article just goes over the building process. I will see if I can find access to a scanner, as I did for the first part.
--
Brian
Pass DIY Addict
Joined 2000
Paid Member
Brian: The issue of AudioXpress that has the article I was talking about is August 2002, "Furniture Grade Finishes for Your Speakers". Do you need a copy of it?
I have been subscribed to the magazine for the past year, so I most likely have it laying around some place. I will look for it. Thanks for finding out the issue that it was in.
I appreciate your advice.
--
Brian
I appreciate your advice.
--
Brian
Peter,
Thanks for the advice on routing bits. I picked up the straight flush cut bit for trimming the sides, and it saved me hours of using a belt sander. The two friends that built them with me and started before me used the belt sander for 2 days straight to get all of their edges flush. The were pissed off when I went out and bought the bit and finished making the edges flush in 5 minutes.
Thanks!
--
Brian
Attachments

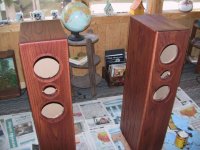
As for the speaker status, my friend Jack, who started first is in the staining stage and it is coming along great. Attached is the picture from his speakers.
I am still in the process of gluing the oak to the mdf, and have one almost done (just need to glue on the top) and the other speaker needs to have the front and top glued on.
In another couple of weeks, I should be done. I will post listening experiences when my friend finishes his. (he is getting ready to apply poly urethane now).
Thanks all for the finishing advice, and tool selection. There are more new pictures of my Thor building on my website:
http://brian.darg.net/thor
--
Brian
Attachments
Brian,
I'm glad I could help. That bit is one of my favourite and I couldn't imagine building boxes without it. 😉
I'm glad I could help. That bit is one of my favourite and I couldn't imagine building boxes without it. 😉
For the best deal on cheap router bits (ie for the odd speaker project, not bullet proof bits for cabinet makers) go here:
http://www.pricecutter.com/
http://www.woodbits.com/
eg, I got a large roundover bit for $30 online that would have cost me more like $130 at a local woodworking place.
http://www.pricecutter.com/
http://www.woodbits.com/
eg, I got a large roundover bit for $30 online that would have cost me more like $130 at a local woodworking place.
Thor Kit with or without cabinet - price difference
Brian,
You have answered my previous question regarding to the cost of the kits and you have said that the total cost to you to get it done is about $1300. I saw an ad in the AudioXpress magazine that says you can get the kits with the cabinet for $1400. You choose to built the cabinet yourself becasue you WANT to?
I'm asking some questions on building speakers because I might want to try that out (not necessary Thor) in the future.
BTW, did you get the Thor done yet? How does it sound - especially the bass response? Please post more pictures.
Fcel,
Brian has a whole bunch of pics at his web site here:
http://brian.darg.net/thor
He also has pics of his amps.
Rodd Yamas***a
Brian has a whole bunch of pics at his web site here:
http://brian.darg.net/thor
He also has pics of his amps.
Rodd Yamas***a
- Status
- Not open for further replies.
- Home
- Loudspeakers
- Multi-Way
- Pictures of my Thor project