Finished PP amplifier 😀
Beautiful work with great attention to detail.
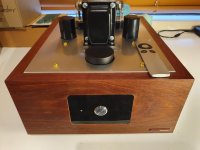
Lots of good ideas I can use in my next build. I like the power transformer mounted underneath the top plate. It significantly reduces the size of the amp.
I also like how you've "potted" the Toroidy transformers. Did you use the covers from GD-Parts? I can't see from the pictures whether there are screw-heads showing on the top for those. I was going to mount the covers on top and paint the corners the same colour as the top plate but mounting them from underneath is much neater.
Is the top a sandwich to hide all the screws?
Finally, what are the covers over the wires where they enter the terminal blocks? They look too perfectly matched to be heat-shrink. Looks very professional. I use PTFE wire but only have red, black and blue because it's so expensive. The different coloured sleeves would help identify matching wire ends.
Attachments

Beautiful work with great attention to detail.
Lots of good ideas I can use in my next build. I like the power transformer mounted underneath the top plate. It significantly reduces the size of the amp.
I also like how you've "potted" the Toroidy transformers. Did you use the covers from GD-Parts? I can't see from the pictures whether there are screw-heads showing on the top for those. I was going to mount the covers on top and paint the corners the same colour as the top plate but mounting them from underneath is much neater.
Is the top a sandwich to hide all the screws?
Finally, what are the covers over the wires where they enter the terminal blocks? They look too perfectly matched to be heat-shrink. Looks very professional. I use PTFE wire but only have red, black and blue because it's so expensive. The different coloured sleeves would help identify matching wire ends.
Hi,
Thanks, for beautiful words addressed. I am not, at the first, amplifier built, and we always, learn something, and adapt, to the imposed, requirements. Yes, the covers, of the output transformers, are from GD parts, and I chose, the sandwich arrangement, for a smaller size of the amplifier. The insulation, is the original PVC of the transformers. The amplifier housing, is made of 1.5 mm iron sheet, laser cut, and painted, in electrostatic field. Lacquered beech, wood sides have been added, to the box for appearance. Quality parts was used for good performance.
The screws are drowned. I'm going to do tests, this week and the necessary adjustments.
BR Alex mm
They look like insulated bootlace ferrules which get crimped on to the ends of the wires. You need a suitable crimping tool to attach them properly. I find them to be perfect on screw down terminals.Finally, what are the covers over the wires where they enter the terminal blocks? They look too perfectly matched to be heat-shrink. Looks very professional. I use PTFE wire but only have red, black and blue because it's so expensive. The different coloured sleeves would help identify matching wire ends.
They look like insulated bootlace ferrules which get crimped on to the ends of the wires. You need a suitable crimping tool to attach them properly. I find them to be perfect on screw down terminals.
Thanks Kei! Searched and found some suppliers.
Then why does it look good to me 😀
Thank you Allan. Much better the right way up.
Here is another photo with the new acrylic inlay. Looking a bit more professional now.
Attachments
Sorry your video cannot play:My diy e810f 300b se.
diy e810f 300b se - YouTube
it says you use some SME code so it is blocked to me here in the USA

The black plate with all the boards is sandwiched to the bottom of the top plate. Everything is fastened with treaded standoffs that are welded into the bottom of the top plate.
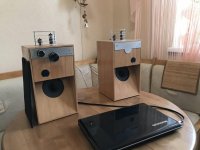
they look really good, and I bet they sound lovely 🙂 my little boy is 5....give it another 5 years and I might have finished something nearly as nice.......for his 10th birthday
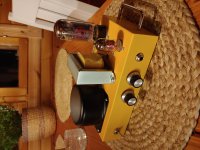
Trying out Tung Sol 7581A's in my 5-20ish UL amplifier. Biases ok, no signs of cooking and they sound great with 428V on the plates and 427V on the screens.


Great photo, the blue glow on the glass is fine. Just electrons escaping the holes in the anode and creating a charge on the glass.
Beautiful work and beautiful photos!These 7581A's appear to produce significantly more blue glow than EL34/KT77/6CA7.
- Home
- Amplifiers
- Tubes / Valves
- Photo Gallery