Looks nice Steve, cant wait to hear it next week.... 41 mtls where i have i heard them? They will make the kt120 sound much better than the have a right to
Thanks guys, 🙂
Steve
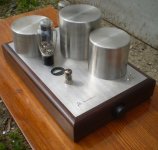
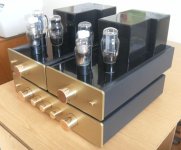
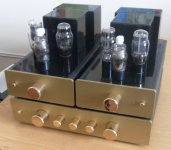
This amp was quite a surprise when I fired it up for the first time, I couldn't believe how good it sounded.
You're right. The 41MTL valves are the special ingredient that makes this thing sound so well. I tried a pair of Osram MH4s and the amp didn't sound as good.
The big task would be to find a modern valve with a gain of around 40 that would equal the 41MTL, but us wartime Brit valve enthusiasts know in our hearts that it's not gonna happen.
Perhaps there is an old American valve of similar type and gain, that would do the business.
Steve
This amp was quite a surprise when I fired it up for the first time, I couldn't believe how good it sounded.
You're right. The 41MTL valves are the special ingredient that makes this thing sound so well. I tried a pair of Osram MH4s and the amp didn't sound as good.
The big task would be to find a modern valve with a gain of around 40 that would equal the 41MTL, but us wartime Brit valve enthusiasts know in our hearts that it's not gonna happen.
Perhaps there is an old American valve of similar type and gain, that would do the business.
Steve i doubt very much there is is any thing modern or american that touches those valves, a UK dealer told me most of his stock has gone to asia, whilst looking for info for the mazda p650 the only site I found with any for sale was in japan, along with early short path ac/ types ... In the UK we didn't know what we had... They are fairly rare now
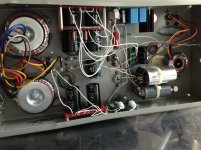
Kevin, those are super-simple! Admire!My current amplifiers have been in continuous use since October of 2011 when I completed them. They average about 30hrs a week of use, and are on their second set of tubes. Simple all transformer coupled stage design using a single GM70 and triode connected D3A per channel. The transformer coupled outputs of my line stage float and are direct coupled to the grid and bias networks for the D3As.. Fixed bias is used throughout. No coupling capacitors except in the input of the 26 dht based line stage.
Output power is a little over 20W per channel, and operate full range. The speakers are 100dB+ efficient..
Because of the high voltages involved I have not shared the design. (and won't)
I've sold all of my other amps.. These will suffice and have proven to be extremely reliable in use.
I find valve amplifiers much easier to listen to.
The detail is much better than SS.
I can listen all night to a valve amplifier but get a headache listening to SS for too long.
The detail is much better than SS.
I can listen all night to a valve amplifier but get a headache listening to SS for too long.
Hi,Here's my everyday amp:
I'm curious, this beautiful green, is RAL 6011, or is a custom blend?
Cheers
J.
Mouser, Allied, Digi-key, and FArrell also have those.Sticky feet..🙂
Amazon.com: Startech HC102 Self Adhesive Cable Tie Mounts (Pack of 100): Electronics
Regards
M. Gregg
Well said!I find valve amplifiers much easier to listen to.
The detail is much better than SS.
I can listen all night to a valve amplifier but get a headache listening to SS for too long.
Sticky feet..🙂
Amazon.com: Startech HC102 Self Adhesive Cable Tie Mounts (Pack of 100): Electronics
Regards
M. Gregg
i cant ever get them to stay longer than a year! even clean the surface, grind off paint clean with solvent etc.... dont last.
i like the duct tape, not that it is the best looking underside... but come on, you cant argue the top side is B-E-A-Utiful!
self-adhesive ty-wrap pads
I'm in the process of repurposing an electrical panel as a control system module for my new DIY wind turbine here at home. There were a bunch of these self adhesive ty-wrap pads which had to go and they were very difficult to remove. Perhaps not all of these are made to the same quality spec. These had a very thin layer of white foam sandwich under them.
i cant ever get them to stay longer than a year! even clean the surface, grind off paint clean with solvent etc.... dont last.
i like the duct tape, not that it is the best looking underside... but come on, you cant argue the top side is B-E-A-Utiful!
It's probably the heat of the amp that degrades the adhesive and/or the temperature cycling of the amp going on and off. Some JB Weld epoxy will keep them from going anywhere. Just be aware that the epoxy will never come off once cured. Never. (picture included)
The last amp I built had a thick enough top plate that I could drill blind holes for mounting. It turned out really nice but that was the most nervous I've been tapping a thread. I think I can live with screw heads sticking out of the top plate on the next project.
Attachments
i cant ever get them to stay longer than a year! even clean the surface, grind off paint clean with solvent etc.... dont last.
i like the duct tape, not that it is the best looking underside... but come on, you cant argue the top side is B-E-A-Utiful!
what i do in my case is i remove the original sticky backing completely, instead i use rubber cement, the type that is used on shoes....
coat both surfaces to be joined lightly and allow a few minutes to dry somewhat, then using a rubber mallet to bond the mounting base to the chassis...
You guys could be right could be quality and I had never thought of epoxy. Would work nice.
I must admit,
I use evostick to glue them..or epoxy..and as said you can't get them off even if you want to..😀
I'm not a fan of epoxy on plastic I prefer rubber type glue.
And there is a quality issue..I have used some in the past and they are still stuck fast after 10years..
Regards
M. Gregg
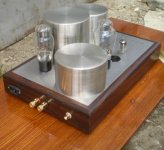
mono 300b lamp SE. the body is made of rosewood
Very nice!
How do you cut the covers for the transformers and fix mountings?
Regards
M. Gregg
Male42: very nice build. Clean and smart looking. What is the driver tube and do you have a schematic?
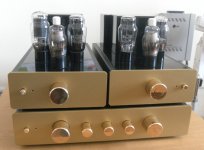
They are pro looking amps. Excellent work.24A-2A3 SE monoblock with a preamplifier.
- Home
- Amplifiers
- Tubes / Valves
- Photo Gallery