Nice! I used Jentzen caps on mine. If I remember, the kit came with some trash electrolytic 22uF caps, which should definitely be replaced. Everything else in the kit looks good.
Feel free to post some updates as you put them together, I can't wait to see how they turn out!
Feel free to post some updates as you put them together, I can't wait to see how they turn out!
Yeah I def wanted to get those lytics out of there. I'm going to try out some GR-Research No-rez in my cabinets instead of the egg-crate foam. I've had a few sheets laying in the closet for years now, waiting for a good application. Ah yes, and some good ol' Propeller Posts.
The hardest thing will be cutting the baffle since I've long ago lost access to a CNC router and have minimal hand tools. Fingers crossed on this one.
The hardest thing will be cutting the baffle since I've long ago lost access to a CNC router and have minimal hand tools. Fingers crossed on this one.
Cutting the baffle was a problem for me too since I don't have a circle router guide. In the end I just surface mounted the drivers, and got the black baffle cut on a laser, which then fit around them to make them flush.
There is some information on using that tweeter as an ow1 replacement here: http://www.diyaudio.com/forums/mult...-scan-d2010-8513-65-alternative-hiquphon.html
It might work, but it's very likely that you would have to make some tweaks to the crossover.
Yes.
Here we can see that Troels has used hiquphon and d2010 with minor modifications.
T14RCY-P
The hardest thing will be cutting the baffle since I've long ago lost access to a CNC router and have minimal hand tools. Fingers crossed on this one.
Man, I was thinking you would be sharing pics of cleanly cut plywood very soon courtesy of the CNC router. 🙂
If you have a tool like the Jasper jig, the baffles should not be too difficult to do by hand router. Keep us posted.
Last edited:
Well, I checked this morning and I just might be able to do some CNC work, but it would be minimal if any. We'll see. The toughest decision I have now is mottled makore or bubinga veneer.
Nice veneer. What kind is it?
Makore is the species. Or is your question towards the OP?
The toughest decision I have now is mottled makore or bubinga veneer.
If well executed, either of the too choices will yield striking results.
I ordered up the makore and am awaiting it from the mill. I estimate it should be shipped by the end of next week. The kit is due in on Monday and I verified that I can use the CNC router for this pair of speakers. I may have a line on some pre-veneered MDF with birds eye maple on the front which I think would be real nice on contrast with the Makore. Will keep you guys posted on how it shapes up. Another option is to just paint the faces black as I will need to build some grills as well.
Steven,
Read that the baffle should be stiffest panel in the cabinet - MDF is not as stiff as plywood (assuming you are building the box with ply?).
Well done black planet looks pro. 😉
Read that the baffle should be stiffest panel in the cabinet - MDF is not as stiff as plywood (assuming you are building the box with ply?).
Well done black planet looks pro. 😉
I plan on using a plywood rib brace between the tweeter and woofer. I don't think the front baffle is big enough to need more than that. The side panels should be fine considering I'm using the GR Reasearch No-Rez, otherwise I would need at minimum a window brace.
And the black paint would only be used on the face since it would be covered by a grill. Thhe jury is still out though.
Alright. I got them finished finally. At this moment I've only had about 20 minutes of very low level listening (finished them at the office / don't tell the boss). So far it's a bit too early to give any real listening impressions due to their freshness and low level volume. What I hear I do like. I can definitely tell that after these crossovers and drivers settle in they will no doubt be my new reference speaker.
I will note that on this build I had difficulty with the tweeters. The "solder cup" is a terrible design. Why the designer ever thought this would be a good idea to use is just beyond me. As of now, I'm still quite unsure of the actual holding power of the solder job I did on them. It was incredibly difficult to not only flow solder into these cups but to even get the solder to stick! I used Cardas Quad Eutectic solder which on everything I've used it on, was perfect. Except for these solder cups.... it would either fall right out or just stick to my iron. I even went as far as cleaning the contacts with alcohol to try and possibly clean off any residue... of which there seemed to be some kind of black film that came off. Even after cleaning them it was still difficult but I managed to slow some in there and dip the wires in just enough for them to hold. A few yanks to make sure it was "solid" and I was done messing with it. Still as mentioned I'm quite unsure of the actual job done, but it is what it is.
Anywho, aside from that the build went as planned. I used the block mottled makore as mentioned earlier and unfortunately it seems the figuring doesn't pop like I had hoped. It looks like standard mahogany until you take them into the sunlight which is when the figuring comes out to play, flashing blocks of irridescent flakes of gold. It's very pretty and nearly impossible to photograph unless you have a good cam (I don't).
Another odd thing I found is that these speakers call for zero bracing. I was a bit worried about this but threw caution to the wind and built them as designed. I do notice a slight bit of panel flex/resonance even at low volumes but it doesn't seem to smear the midrange. I should also note that I installed a layer of adhesive backed rubber before I installed the foam.
I can't wait to get these speakers home and hook them up to my main rig. That'll be the real acid test. Will update at a later date when I've had a good 50/100 hours on them or so.
Well it seems I can't upload photos at the moment, something about missing security token. I'll try a bit later.
Wow! You finished them in no time!
On the subject of the solder cups, how powerful is the soldering iron you used? I do remember they definitely suck the heat away from the iron, but after cranking up the power I was able to make a very nice connection with them. I think I remember filling the cups with solder first, and then placed the wire in while keeping the solder molten.
Interesting that you didn't need bracing, I didn't personally either, but the walls of the cabinet were about 30mm thick. Even still, the walls still definitely flex at high volumes. I can only assume you used plywood, which is stiffer than MDF?
And as for uploading pictures, I think I remember having the same problem. In the end, I had to just upload a few photos at a time, which solved it.
In the meantime I eagerly await your first impressions when you get then home!
Well, I figured Paul would know best so I only used 3/4" MDF all the way around and no bracing as he specifies. Guess I should have gone with my gut and reinforced them at least a little. Oh well, no biggie still sounds great to me and I'm glad there's no smearing of the very important midrange. I finally managed to attach a couple pics. Enjoy!
Attachments
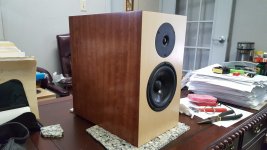

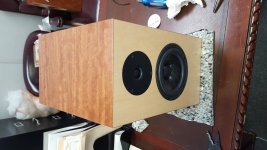
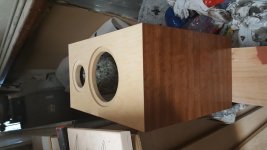
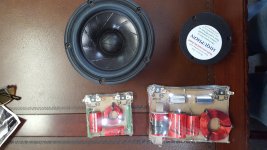
And just a couple without the drivers. Adding pic of crossovers. Meniscus did a beautiful job building these crossovers. Kudos to them.
Attachments

Last edited:
Great job, they look awesome!
Glad to see you got your hands on that CNC in the end.
Also, great work on the veneering, it's way better than I could ever do!
Glad to see you got your hands on that CNC in the end.
Also, great work on the veneering, it's way better than I could ever do!
Thanks! Yeah the CNC access definitely helped. Going to let them run in over the weekend and we'll go from there. Glad to be apart of the Carrera family, these things do vocals like crazy.
Hi Steven,
Good to see the build finished. And in good time too. 🙂
Fit and finish looks top notch.
Thanks for sharing the experience regarding the "solder cup" - will be careful. And also on bracing - I was mulling over a horizontal brace for my plywood cabs, will include in my build.
You enjoy the music and get back to us with some more impressions after you get some decent hours on the drivers.
- Home
- Loudspeakers
- Multi-Way
- Paul Carmody Carrera Build