Guys,
Don't run too fast. What you need are two parts, 1) a sinewave generator and 2) a phase splitter .
The phase splitter part is quite simple, and I will come back to you with more details.
But for the sinewave generator there are many more options.
Googling around I found this kit, digitally synthesized, adjustable in steps of 0.01Hz, with a display showing the real frequency and with power supply. And that all for just under $40,- dollars.
I am astonished that you can get so much for so little money.
0 01 5MHz DDS Function Signal Generator Module Wave New | eBay?
The XR2206 Kit, which can also be used, needs an additional supply and has no display and I suspect the output voltage to have a DC offset voltage of 1/2 supply voltage.
When switching from 33 1/3 to 45 RPM, the XR2206 kit has to be adjusted and fine tune every time you switch, but the other kit can be dialled in between two known frequencies without any further adjustment.
So my advise would be, buy some affordable digital sinewave generator with a display, with at least 0.1 Hz adjustment steps or even better.
Hans
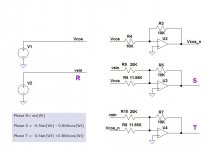
Many thanks Hans for moving this project on, I do have a question regarding the 3 phase splitter; is it necessary to have 3 time constants?, mathematically you only need a sine and cosine signal, from these the 3 phases can be accurately generated with only addition and inversion:-
If you want to use the divider at two frequencies then you need only change the capacitor C1 from 1.0uF for 60Hz, to 0.74uF (0.47 || 0.27) for 81Hz.
If you want to use the divider at two frequencies then you need only change the capacitor C1 from 1.0uF for 60Hz, to 0.74uF (0.47 || 0.27) for 81Hz.
Attachments
With DDS you can set phase offset to an arbitrary value. Some synchronous motors perform better if offset is slightly more or less than 90°.
This is the way I'm going, a 3 phase board that takes ebay DDS modules and Arduino zero boards that plug onto headers and running off the same external clock on the main board.
So I can choose 1 to 3 phases. Amps and transformers off board. Makes it very cheap and modular.
This is the way I'm going, a 3 phase board that takes ebay DDS modules and Arduino zero boards that plug onto headers and running off the same external clock on the main board.
So I can choose 1 to 3 phases. Amps and transformers off board. Makes it very cheap and modular.
Many thanks Hans for moving this project on, I do have a question regarding the 3 phase splitter; is it necessary to have 3 time constants?, mathematically you only need a sine and cosine signal, from these the 3 phases can be accurately generated with only addition and inversion:-
If you want to use the divider at two frequencies then you need only change the capacitor C1 from 1.0uF for 60Hz, to 0.74uF (0.47 || 0.27) for 81Hz.
Hi Ralph,
The 3 time constants were for 2 different situations, for a 2 phase motor 90 degrees and for a 3 phase motor 0, 120 and 240 degrees.
So you will only need one of them depending on your motor.
And yes, your design is even nicer with just one precision cap/ resistor, although I have to take a closer look, because I do not understand the adder in your diagram.
The idea is to construct -120, 0 and +120 degrees by inverting the 120 degrees.
Since you need a 1% cap, it is easier to find a 330nF 1% and use a 13K9 resistor.
Switching from 33 1/3 to 45 RPM can be accomplished by switching the capacitor, but easier is to switch the resistor because a 1% 244nF will be more difficult to construct.
Hans
Last edited:
This is a very nice solution, but far out of reach for most DIY's.With DDS you can set phase offset to an arbitrary value. Some synchronous motors perform better if offset is slightly more or less than 90°.
This is the way I'm going, a 3 phase board that takes ebay DDS modules and Arduino zero boards that plug onto headers and running off the same external clock on the main board.
So I can choose 1 to 3 phases. Amps and transformers off board. Makes it very cheap and modular.
Hans
With DDS you can set phase offset to an arbitrary value. Some synchronous motors perform better if offset is slightly more or less than 90°.
This is the way I'm going, a 3 phase board that takes ebay DDS modules and Arduino zero boards that plug onto headers and running off the same external clock on the main board.
So I can choose 1 to 3 phases. Amps and transformers off board. Makes it very cheap and modular.
Please keep us up to date on your progress; I'm thinking along the same lines, but my skills (such as they are) are more in the analog field.
As a lite aside; if you only need 2 phases why not get a cheap mp3 player, and load a stereo file of the relevant frequency with a 90* phase shift between the channels. I've tried it, and a 11025 kHz bitrate file gives me 16Hrs in around 400Mb. If anyone's interested let me know and I'll send them a sample for investigation.
This would also easily allow a selection of different frequency files to be stored on the mp3 player and selected to choose different speeds.
This method could also be used in conjunction with a modified 3 phase splitter, eliminating the need for any time constants. All resistors are 10k

Last edited:
I was wrong by thinking that the inverse of 120 degrees is -120 degrees, this is of course -60 degrees. So the trick with inversion does not work.Hi Ralph,
And yes, your design is even nicer with just one precision cap/ resistor, although I have to take a closer look, because I do not understand the adder in your diagram.
The idea is to construct -120, 0 and +120 degrees by inverting the 120 degrees.
Since you need a 1% cap, it is easier to find a 330nF 1% and use a 13K9 resistor.
Switching from 33 1/3 to 45 RPM can be accomplished by switching the capacitor, but easier is to switch the resistor because a 1% 244nF will be more difficult to construct.
Hans
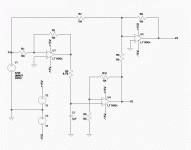
So If you have one Sinewave generator, I stick to my earlier circuit diagram in posting #151. So for a 3 phase motor you will need a dual opamp. For a two phase motor just one opamp will do.
Here is the simulation for a 3 phase version, including the addition of the three signals showing that their phase is correct.

Hans
You are right about the opamp supply. What you need is a +/-15 Volt supply to cope with the output of the generator.. If you look at the third page of the spec sheet you will see pin 4 is marked Vcc- and pin 8 is marked Vcc+ in the table right below the pinout on the same page it says pin 8 positive supply, and pin 4 negative supply. On the 4th page of the spec sheet table 7.3 gives the recommended voltage at 5-15 volts positive and negative. I just figured that it would be appropriate to use a 12V supply because I thought they'd be readily available, could be wrong about that though, as I haven't found a suitable supply yet. I learned a painful lesson by buying a single rail positive supply for my amps that I used in the first iteration of this project, they required a 50V dual rail supply, 50V+ and 50V-.
I'm thinking that Hans probably assumed we knew we would need a supply, so didn't include it in the schematic, but I could be wrong about that too. Kind of painful for a couple tube guys trying to deal with solid state. maybe one of the solid state guys will take pity on us, and straighten us out. 🙂 Onward through the fog!
twystd
This can be best solved by using a wall mount supply giving you +/- 15 Volt without any extra components to worry about.
There are many different makes on the market, and what you will need for feeding the dual opamp is less than 1 Watt, so look for a low cost 3 Watt version.
Hans
And yes, all resistors are 1/4 watt.
You are right about the opamp supply. What you need is a +/-15 Volt supply to cope with the output of the generator.
This can be best solved by using a wall mount supply giving you +/- 15 Volt without any extra components to worry about.
There are many different makes on the market, and what you will need for feeding the dual opamp is less than 1 Watt, so look for a low cost 3 Watt version.
Hans
And yes, all resistors are 1/4 watt.
Don't know if this fits, but th tle2426 can be used to split a single supply into a +/- supply. It may not have the current requirements, but my phono stage uses it to supply some lm4562's opamps.
There's no reason why this can't be done with a single ended supply. Use one of the spare opamps to create a virtual ground (VCC/2) and capacitively couple the signal in and out of the circuit if DC offset is a problem.

Ralph-
You can do quadrature to 3 phase with 2 opamps (plus one for a virtual ground):
Hi Ralph,
I like your design with a sine and a cosine as the input signals, but you will need an extra opamp for the 90 degree phase shift, just to make the 33 1/3 to 45 RPM adjustment with one resistor instead of with two resistors, but it will work fine.
What I like less is to drive the 2 opamps generating 120 and 240 degrees with a capacitor. This will ruin the phases.
Just to illustrate, see the simulation below, with and without caps.
Look at the red line where the 3 phases are added. This should be a flat line.

Playing with different values does not make it any better.
So to my opinion, there should be no caps in the signal line.
But I followed your idea to using a single supply, in this case the same 24 Volt as used for the main amps steering the trafo's.
This will result in having to use an extra opamp, but also in 3 caps to drive the 3 amplifiers (not shown here), but these caps are highly uncritical in value and accuracy as long as they can pass the 60Hz without attenuation.
Because I do not know the input impedance of the main amps, I cannot give a value.

Hans
Last edited:
The input caps just need to be larger. You can see the amplitude of V120 and V240 are lower than V0, so the caps are attenuating the signal as well as shifting its phase.
The input caps are necessary unless the DC offset of the signal generator is also VCC/2.
The input caps are necessary unless the DC offset of the signal generator is also VCC/2.
The input caps just need to be larger. You can see the amplitude of V120 and V240 are lower than V0, so the caps are attenuating the signal as well as shifting its phase.
Unfortunately it is not that simple, as I said I played around quite a bit but could not get it right.
That is what I did with the single phase input, but with a sine and a cosine to start with, you will need yet another opamp giving a total of 5 opamps, where I only needed 3.The caps are necessary unless the DC offset of the signal generator is also VCC/2.
Hans
Last edited:
To keep it simple why not use the existing +24V supply, pass it through a 15V reg, eg LM317, and use a separate wallwart or similar 15V reg supply to provide the -15V.
I suggest the LM317 rather than the 7815 as it's easier to exactly match the -ve supply to reduce any offset to a minimum.

I suggest the LM317 rather than the 7815 as it's easier to exactly match the -ve supply to reduce any offset to a minimum.
Ralph,
We are stimulating each other with useful ideas, that's good.
And now I have another question for you.
Since we are focussing on the Amps that you are using, how must they be driven.
Only having a single power supply, you would expect to steer them with a signal that has an offset of supply/2, or do they have a cap inside to block dc.
In the specs I can read that they can be driven SE or balanced, but without any further info whether these inputs are DC or AC coupled.
What option did you use and how?
When having this information, I will complete both versions of generating 3 phases and put them in LTSpice to get the confirmation that everything is working O.K.
With 24 Volt supply, the output per Amp can go up to 15 Veff which is probably something like 1Veff at the input.
As for the Sinewave generator, there are still various options, I believe the XR2206 kit has a DC offset and the DDS not.
So to keep things universal, I better place an input cap to block any DC.
About the Power supply, this can be decided upon when everything else is ready, but with the 1Veff out max for the phase splitter, supply can be as low as +/- 5 volt.
Hans
Hi Hans, the little 100W class D amps I have are AC coupled, they have a balanced input, and each side has a 1uF 63V cap. If you're using them single ended (as I am) then the -ve input is shorted to gnd. You can see the input caps at the bottom of the picture
Attachments
Last edited:
Ralph kindly made the important info available regarding the input circuit of the Main Amps that he is using.
They are perfectly suited to steering the trafo's.
Since these amps have ac coupled inputs, the phase signals offered at their inputs can have a DC component without any consequence.
For that reason, the opamps in the phase splitter can be fed with a single supply, in this case I have used the same 24 Volt that is used for feeding the Main Amps.
In this way no extra hardware is needed for supplying the phase splitter.
The Main Amp has a gain of ca. 30 dB. Maximum output with 24 Volt supply will be 15 Veff because the Amp has in fact two active outputs working an antiphase.
This corresponds with 30dB gain to an input voltage of 0.5 Veff.
0.5 Volt is on the low side as an input for the Phase Splitter. Therefore I have given the Splitter a Gain of 1/5, resulting in a maximum input of 2.5Veff.
The opamp at the Splitters input doing this attenuation, has a cap on its feedback resistor, effectively serving as a low pass filter, thereby eliminating the need to place filters before every Main Amp.
Because it is not known whether the used Sinewave generator has a DC component, I have inserted a 1uF cap at the input of the phase splitter to block DC from the generator.
I will present two possible circuit diagrams, one with a minimal amount of components, but with 2 RC combinations to set 33 1/3 or 45 RPM.
The other circuit diagram proposed by Ralph has just one RC combination to be changed when switching RPM. Everybody can choose what fits best to his taste.
Below you will find the first variation, the other circuit diagram will follow shortly.

The four blocks you see are resp. for 1) the Sinewave Generator, 2) the Phase Splitter, 3) the simulation of one main amp with its balanced inputs and balanced outputs and 4) the 24 Volt power supply for supplying both Main Amps and the Phase Splitter.
The only voltage for the Phase Splitter that should be stable is Vbias with C9 to filter the supply voltage.
Opamps have a high voltage supply rejection ratio and are O.K. without filtering.
What still should be added is a 100nF ceramic cap directly at the supply pins of the opamps, not shown in this circuit diagram.
The upper figure shows the three phases, DC shifted by 12 Volt to put them in the middle of the voltage supply. I have magnified these waveforms in the figure by a factor 10, to make them easier to see.
At the same time I have added 3 resistors, R19-R21 that serves as an adder of the 3 phases.
This "Check" signal can be measured with a simple multimeter and should give a reading that is at the most 10 mVeff with 2.5 Veff input signal.
If not, the RC combinations R3/C1 and R6/C2 are not accurate enough and will need further adjustment.
In the figure I have magnified this signal a factor 100 to prove the correctness of the 3 phases in amplitude and in phase.
You also see the signal between the output pins Out1 and Out2 of the main amp being neatly symmetrical around zero Volt, showing that all DC has been removed.
Hans
They are perfectly suited to steering the trafo's.
Since these amps have ac coupled inputs, the phase signals offered at their inputs can have a DC component without any consequence.
For that reason, the opamps in the phase splitter can be fed with a single supply, in this case I have used the same 24 Volt that is used for feeding the Main Amps.
In this way no extra hardware is needed for supplying the phase splitter.
The Main Amp has a gain of ca. 30 dB. Maximum output with 24 Volt supply will be 15 Veff because the Amp has in fact two active outputs working an antiphase.
This corresponds with 30dB gain to an input voltage of 0.5 Veff.
0.5 Volt is on the low side as an input for the Phase Splitter. Therefore I have given the Splitter a Gain of 1/5, resulting in a maximum input of 2.5Veff.
The opamp at the Splitters input doing this attenuation, has a cap on its feedback resistor, effectively serving as a low pass filter, thereby eliminating the need to place filters before every Main Amp.
Because it is not known whether the used Sinewave generator has a DC component, I have inserted a 1uF cap at the input of the phase splitter to block DC from the generator.
I will present two possible circuit diagrams, one with a minimal amount of components, but with 2 RC combinations to set 33 1/3 or 45 RPM.
The other circuit diagram proposed by Ralph has just one RC combination to be changed when switching RPM. Everybody can choose what fits best to his taste.
Below you will find the first variation, the other circuit diagram will follow shortly.
The four blocks you see are resp. for 1) the Sinewave Generator, 2) the Phase Splitter, 3) the simulation of one main amp with its balanced inputs and balanced outputs and 4) the 24 Volt power supply for supplying both Main Amps and the Phase Splitter.
The only voltage for the Phase Splitter that should be stable is Vbias with C9 to filter the supply voltage.
Opamps have a high voltage supply rejection ratio and are O.K. without filtering.
What still should be added is a 100nF ceramic cap directly at the supply pins of the opamps, not shown in this circuit diagram.
The upper figure shows the three phases, DC shifted by 12 Volt to put them in the middle of the voltage supply. I have magnified these waveforms in the figure by a factor 10, to make them easier to see.
At the same time I have added 3 resistors, R19-R21 that serves as an adder of the 3 phases.
This "Check" signal can be measured with a simple multimeter and should give a reading that is at the most 10 mVeff with 2.5 Veff input signal.
If not, the RC combinations R3/C1 and R6/C2 are not accurate enough and will need further adjustment.
In the figure I have magnified this signal a factor 100 to prove the correctness of the 3 phases in amplitude and in phase.
You also see the signal between the output pins Out1 and Out2 of the main amp being neatly symmetrical around zero Volt, showing that all DC has been removed.
Hans
And here is the circuit diagram for the second version with only one RC combination to be switched when going from 33 1/3 to 45 RPM.
There is one thing very strange about this diagram.
The moment I apply a bias to opamp U3 and U4, phase2 and phase 3 are no longer correct in amplitude and in phase, and I found it almost impossible to get it right.
However when all signals are centred around zero volt, everything is O.K.
That is why for this circuit I used +/- 12 Volt.
The +12 Volt can be taken from the 24 Volt, but the -12 Volt has to come from an external source.

I havent attached a Main Amp, because that brings nothing news,
The rest should speak for itself.
Hans
There is one thing very strange about this diagram.
The moment I apply a bias to opamp U3 and U4, phase2 and phase 3 are no longer correct in amplitude and in phase, and I found it almost impossible to get it right.
However when all signals are centred around zero volt, everything is O.K.
That is why for this circuit I used +/- 12 Volt.
The +12 Volt can be taken from the 24 Volt, but the -12 Volt has to come from an external source.
I havent attached a Main Amp, because that brings nothing news,
The rest should speak for itself.
Hans
- Home
- Source & Line
- Analogue Source
- Optimally driving a (VPI) synchronous turntable motor