Thanks. That's good advice. Wondered if your approach to mid hole alignment was way to go. Also wondered about dealing with foam if back not removable. Just that creating removable back is a very precise effort. By the way, your cabinets look great--truly. The cabinets part of this is harder than I expected. Still need to figure out veneer. (I wonder, in hindsight, if getting this all CNC'd was the way to go.)

Making a removable back is a lot easier than mounting the mid and everything else with a fixed back.
The mounting holes of the mid are on a square. Just measure and mark the positions on the baffle. Whatever you do, don't remove the mid dome assembly from the magnet or you'll have to go to great lengths to re-center the coil in the magnet...
The mounting holes of the mid are on a square. Just measure and mark the positions on the baffle. Whatever you do, don't remove the mid dome assembly from the magnet or you'll have to go to great lengths to re-center the coil in the magnet...
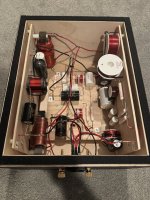
I also glued all the panels and will install the volt via the woofer hole. However my bracing is different from the official plan and I used my 3d cad model in fusion to ensure that I had enough clearance to get the volt in place.
I installed the foam during the assembly although you can install the foam in the bottom half through the woofer hole.
I installed the foam during the assembly although you can install the foam in the bottom half through the woofer hole.
Matthias, can you tell me more about 're-centering' the voice coil? Asking for a freind.. 😳Making a removable back is a lot easier than mounting the mid and everything else with a fixed back.
The mounting holes of the mid are on a square. Just measure and mark the positions on the baffle. Whatever you do, don't remove the mid dome assembly from the magnet or you'll have to go to great lengths to re-center the coil in the magnet...
I am not 100% sure with the Volt, but here's how it's done with the ATC dome driver. You'll need to have a measurement microphone in front of the dome, running a clean sine wave signal into the driver (1 kHz or so), and analyze the harmonics. Carefully adjust the dome position for minimal distortion, then carefully lock it in this position. Make sure the dome assembly does not move while tightening the screws (verify with the distortion analyser).
You can also measure multiple impedance sweeps. When you get the highest peak, that's centered coil.
Other way would be to use your amp. Set the amp volume to minimum. Attach the midrange without crossover to the amp speaker terminals. Play a song with deep male voice (Alan Taylor or similar). Turn the volume slightly untill you hear the sound, move the dome assembly and listen. You are hunting for cleanest sound (no crackling). When you get it, turn it up a bit and listen some more. If it still plays clean, tighten the screws but slowly. If not, keep on searching for the cleanest sound. The screws should be screwed but not tight so you can move the dome a bit.
Other way would be to use your amp. Set the amp volume to minimum. Attach the midrange without crossover to the amp speaker terminals. Play a song with deep male voice (Alan Taylor or similar). Turn the volume slightly untill you hear the sound, move the dome assembly and listen. You are hunting for cleanest sound (no crackling). When you get it, turn it up a bit and listen some more. If it still plays clean, tighten the screws but slowly. If not, keep on searching for the cleanest sound. The screws should be screwed but not tight so you can move the dome a bit.
If the midrange has to be fixed from the outside of the baffle, a simple ring of wood or any other convenient material can be made, increaseing the flange.
That way front mount in a matching rebate is no problem any more. No rocket science.
No need to ruin the expensive driver.
That way front mount in a matching rebate is no problem any more. No rocket science.
No need to ruin the expensive driver.
Afternoon all..
My Monkey Coffins are progressing.. Both plinth/crossover boxes are finished.. Waiting on a few more coats of poly to dry, and then It will be assembly time! Very excited to hear them!
I have two questions today..
A. when measuring port length.. Do you measure from inside back panel to end of port, or just simply the length of the port to include the outer portion?
B. Gasket material for mounting drivers.. I have two options. I purchased some speaker gasket material from Parts Express that I intended to use to seal the back panels.. However, I have enough for speaker gaskets as well. Alternatively, I cut gaskets from 1mm cork material. Any distinct advantage to using one vs the other? Making holes for the bolts to pass through may be easier with cork, but the foam shouldn't be that difficult either.. TIA!
Attachments
SkyPirate,
Please refer to the illustration below - the arrow indicates how you should you be considering the port length.

Please refer to the illustration below - the arrow indicates how you should you be considering the port length.
Making progress, but way behind you. Need to veneer cabinet (except front) and do baffle (gluing on front). Crossover, including box, after that. Need a few clear weekends.
When you say finishing veneer, do you mean coating it with something (e.g., varnish)? I've not even considered that yet, and interested in what you decided on.
When you say finishing veneer, do you mean coating it with something (e.g., varnish)? I've not even considered that yet, and interested in what you decided on.
Anyone considered melamine foam sponges as cheap substitute for recommended pyramid sheets inside cabinet?
I have not tried this myself, but it should work just fine.melamine foam sponges as cheap substitute
I am currently veneering. First tried evo tx528 contact cement. Didn’t like it, but that may be my inexperience. It has soft wax like consistency so needs spreading with a serrated edge. The smell is the worst I ever had, unbearable without a proper vapour filter mask. The instructions said clamping not required, ended up with lots of loose edges. Fixed that with gorilla glue. Now using gorilla glue and lots of clamping for the veneers, much better in every aspect. No smell, low cost, perfect glue line and only a few hours of clamping required. See here for instructions, register for free and download the pdf.
Regarding finish, since I am using walnut veneer, I read somewhere that 1:1:1 poly, boiled linseed oil and pure tung oil make a good finish for walnut. So that is what I am going for. No idea whether I will recommend it after the fact.
Regarding finish, since I am using walnut veneer, I read somewhere that 1:1:1 poly, boiled linseed oil and pure tung oil make a good finish for walnut. So that is what I am going for. No idea whether I will recommend it after the fact.
Looking forward to seeing how it turns out!
I did a lot of finish testing on veneer scraps to test the look/feel in the light and setting where the speakers live. With all the effort going into the building the cabinets, it would be a shame to cap the project with a finish that is not what you had in mind.
I did a lot of finish testing on veneer scraps to test the look/feel in the light and setting where the speakers live. With all the effort going into the building the cabinets, it would be a shame to cap the project with a finish that is not what you had in mind.
Regarding finish, since I am using walnut veneer, I read somewhere that 1:1:1 poly, boiled linseed oil and pure tung oil make a good finish for walnut. So that is what I am going for. No idea whether I will recommend it after the fact.
maxima77,
You can try out Liberon Danish oil. Better to first try on a scrap piece and then see if you like the results.
Anyone considered melamine foam sponges as cheap substitute for recommended pyramid sheets inside cabinet?
Yes. That's what's marketed as Basotect by BASF
@CALboy, I opted to use General Finishes Arm-R-Seal. It's a wipe on satin finish polyurethane. I had planned on using dye to make the cabinets much darker, but after seeing the chatoyance with just poly, I was sold. It's been a learning curve for sure (Well, this entire project has been learning). I've put down 3 coats of poly now on all surfaces. My big error that I made on the bottom (First surface to poly) was not sanding the midfield of the panel. I had sanded around the edges to smooth out the veneer but didn't think I needed to sand the inner portion. What I didn't realize was I had removed a bit of the oxidized layer around the edges and it left a really nice "light colored frame" around the bottom of the panel.Making progress, but way behind you. Need to veneer cabinet (except front) and do baffle (gluing on front). Crossover, including box, after that. Need a few clear weekends.
When you say finishing veneer, do you mean coating it with something (e.g., varnish)? I've not even considered that yet, and interested in what you decided on.
I took a few days to think it through, and asked a lot of questions of my friends with more experience. I was hesitant to sand much as the veneers were VERY thin and I was paranoid about sanding through them. My suggestion: Raise the grain on each side with a damp cloth. After it dries, lightly sand the whole panel right before you put the finish on. I did 1 coat, 320 grit sanding (lightly), then second coat.. 0000 steel wool, then last coat.
I"m fairly happy with most of the finish. The tops of both boxes have a some minor deviations in sheen if you look at a very low angle, and with the right light. So, I'm going to take a few days to consider if I want to continue to work those panels to get them to be more even. Everything else I think looks ok.
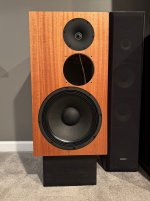
In the photo below, you can see my poor sanding technique.. Second pic is where I left off today.. Seeing how the finish looks in the lighting in the room they will live in.
Attachments

- Home
- Loudspeakers
- Multi-Way
- Open Source Monkey Box