Thanks a lot @poseidonsvoice. I have quadrupled the woofer wiring and doubled it for the mid. Will have to order more wiring though. The box is necessary I’m afraid, and it already pretty much is the maximum size of what will fit inside the stands.
PS: the mid xover board above has an error, hope nobody copies it.
PS: the mid xover board above has an error, hope nobody copies it.
I'd try to further rotate the big coils on the left. They are currently at a 45° angle. 90° would be better. Looks nice otherwise.How do the coil distances and directions look to you?

This should help…

Distance is your friend as is orientation. If you were running a line through the core centers of two inductors, they should never cross in any axis. I particularly like this diagram because it includes the ferrite/iron core inductors that are more common when inductance values become large such as woofer circuits (and where you are trying to keep DCR low). Air core at values like 6.8mH depending on AWG become very, very big!
Best,
Anand.
Last edited:
Monkey Coffin update..
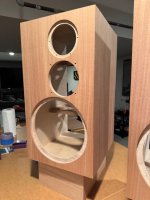
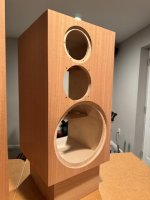
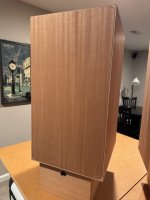
Spent the last week working/learning about the veneer process. First time ever veneering anything. Lots of reading, lots of youtube videos, and lots of questions to friends who have gone through it! I bought all of the supplies and the veneers from Veneersupplies.com. The veneer is quartersawn mahogany. I ordered a single sheet at first thinking it was enough, but quickly realized I needed a another sheet. What I didn't realize, was that the first sheet I had was flat cut.. Sooo.. Second sheet showed up and when I opened it (Quartersawn) I thought "WOW! This looks soo much better!".. Off the the interwebs to order a third sheet. For adhesive I used Joe's Titan DX. Worked like a treat on the paper backed veneer. His glue roller was excellent and rolls just the right amount of adhesive. I ordered his 'veneer saw' but found it to be clunky (I'm left handed) and a razor knife was much faster and cleaner for me. If anyone needs a veneer saw, let me know. Happy to donate for shipping cost.
Next up will be to take the cabs back to my friend Marks shop to prep them for finish. I had planned to use General Finishes dye to have a darker look. @pfarrell informed me this evening that I've been forbidden from finishing them any other way except clear poly.. Will have to get spousal approval for a big shift in finish. Planning to stain/dye the plinths black and let the speakers be the star of the show. Also, still have some woodworking to do, the bass tube holes need to be cut along with speakon holes in the back panels. Also, I miscalculated the depth of the rabbet in the rear of the cab and with insulating foam, it will sit proud. So we need to address that and increase that depth by a little bit. Otherwise remaining parts are in hand and should go together pretty quickly after the finish is complete.
Cant thank everyone enough for the inspiration and help so far.. @mbrennwa, @pfarrell @6L6 and @Sorenm.. Thanks so much for answering questions!
Attachments
Last edited:
Looks good. I am also about to veneer the speakers.razor knife was much faster and cleaner for me.
How did you cut off the veneer at the edges when the adjacent side was already veneered? Did you protect the veneer with eg low tack masking tape?
Of course, you would not want any of the adhesive to soak in, in the raw veneer.
At first I used to cut off the excess veneer using a smaller/thinner blade snap off razor knife, under
a certain angle and the rest sanded off. Later I got used to routing with a flush cut bit.
At first I used to cut off the excess veneer using a smaller/thinner blade snap off razor knife, under
a certain angle and the rest sanded off. Later I got used to routing with a flush cut bit.
I tried several different methods with this.Looks good. I am also about to veneer the speakers.
How did you cut off the veneer at the edges when the adjacent side was already veneered? Did you protect the veneer with eg low tack masking tape?
First go around was to use blue painters tape when rolling the contact cement, and I left it there until the next day and then used trim router with flush cut (Downcut) bit. It worked well, but blue painters tape was def not the right choice because it pulled the grain up in multiple spots. Thankfully it was on the bottom.
Next method was scotch "delicate" tape. It's purple and has a lower tack. I masked the edges, rolled the cement then removed the tape. The next day, I re-taped and then used trim router. This worked OK, but again, in several spots it lifted the grain. I think a little heat from the spinning bearing on the bit is enough to create more tack than I wanted.
V3.0 was to use delicate tape to roll contact cement, removed it before joining panels, and then went straight to the trim router without any tape. For me, this worked very well. Two passes with the router and it removed all of the 'cement boogers'. You'll need to sand each of the corners though because the trim bit will leave a VERY small lip. Your experience with grain pulling may be different depending on what veneer you're using. Evidently the quartersawn material I used is more susceptible to having that happen.
I was pretty nervous about the veneer process but once I got it going, I really found it to be fairly simple and enjoyable! Good luck and happy to answer any more questions.
John
Hi John, this is very useful as would otherwise have gone through the same learning process. More questions:
- Why a down cut flush trim router bit? My flush cut bit has straight shanks, do you expect that to cause tear out?
- When sanding after routing, did you use masking tape to protect existing veneer?
Maximax77,
I used the downcut bit as it was recommended by the folks at VeneerSupplies. It's avail on amazon as well: Yonico Downcut. I suppose the thought is that it will exert some downforce on the panel you're trimming so that it doesn't tear out, or lift the panel at all. I had great luck with that bit and would recommend it. Speaking of bits, for the recesses on the tweeter and woofer, you'll need a different bit. I used this one, from Amazon with good results: Whiteside Flush Trim Bit
As far as the sanding, I didn't tape the finished side before taking down the edge. Perhaps I should have? I'm not finished with that process yet and was using a rubber sanding block. @pfarrell recommended using a block of wood with 220 grit paper glued down to it. I'll go that route to do the finish up before we finish them. There are certainly imperfections but I was really happy with how well the paperback veneer and Titan DX glue work together.
-John
Thanks John. I was planning to use a sharp scalpel knife on the driver recesses as scraping the insides doesn’t really matter. Let’s see how that goes.
Phew, this is beautiful work here! Certainly not what I had in mind when I wrote The box shoud be easy enough to make on a kitchen table in the first post of this thread 🙂
Thank you for the kind words, Matthias. Very appreciative of all of your efforts on this project! After having almost completed a set, I have such more appreciation for the work that went into the design. As far as the kitchen table goes.. I did work on some of this on my boys air hockey table.. I think that counts!
Do you think think this Parts Express port would work if cut to length? Dimensions given on website are 3 3/4 x 7 5/8 inches.

https://www.parts-express.com/Port-Tube-3-3-4-ID-x-7-5-8-L-Flared-260-480?quantity=1
Thanks
https://www.parts-express.com/Port-Tube-3-3-4-ID-x-7-5-8-L-Flared-260-480?quantity=1
Thanks
With respect to above, smallest internal diameter (inside of internal end) of Parts Express port = 95.25 mm (Monacor = 93 mm; Jantzen = 93.55 mm) If narrows, diameter at internal end will, I assume, be even wider (not sure how much) if cut down in length.
"Outside diameter" (measured at edge of flare lip?) = 141.29 mm (Monacor = 143 mm; Jantzen = 139.1 mm (insert diameter, not flare lip)
"Outside diameter" (measured at edge of flare lip?) = 141.29 mm (Monacor = 143 mm; Jantzen = 139.1 mm (insert diameter, not flare lip)
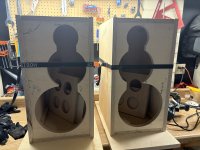
Here is where I am. Embarrassed to admit how long (and number of tool purchases) it took me to get everything cut right. Never heard of a track saw before this. Once glued, will use flush trim router bit to remove slight extra on boards.
Planning on foregoing removable rear access panel at this point. To-be-made front baffle will be glued on and midrange can be installed through woofer hole. Am I missing something with this strategy?
Thanks
Planning on foregoing removable rear access panel at this point. To-be-made front baffle will be glued on and midrange can be installed through woofer hole. Am I missing something with this strategy?
Thanks
Attachments
Also, how do you align midrange bolt holes in baffle? Do you remove waveguide and use something to mark drill spots through bolt holes in wave guide?
Thanks,
Thanks,
CALboy,
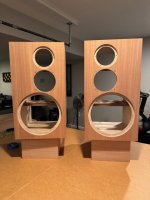
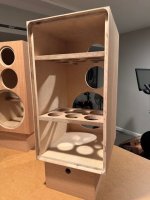
Looking good! I know how you feel, there are so many details in this project that have to be sorted along the way. I'm not much further ahead of you in the process but did do a test fit of the mid last week.. That thing is not easy to maneuver into place. My suggestion prior to making the back panel permanent would be to try to fit the volt into the woofer hole, and see how manageable it is. My backs are open, and it wasn't fun! Also, if you seal the back panel, the acoustic foam will be a bit trickier to get into place, wiring, etc.. Def doable however..
As far as the bolt hole locations for the mid.. I removed the outer ring/waveguide.. Flipped it upside down into the hole cut into the baffle, and then marked the holes directly with the actual ring.. Very simple and the holes lined up perfeclty.
-John
- Home
- Loudspeakers
- Multi-Way
- Open Source Monkey Box