MJL21193 said:Thanks Dave.
Playing with the spreadsheet tells me My original was crossed at 2500Hz with a zeta of .8. This is probably too low. I think the tweeter will be more comfortable at around 3500Hz.
The woofer has good responce all the way up to 5000 Hz, the tweeter looks best in the 3000 to 4000 range.
Given the woofer is a poly cone, will I hit break-up if I crosss higher? Say as high as 4000?
Any help in this would be appreciated.
Check out the Wiki (no time for me to dig out the URL). Somewhere in there is the main bumf on the diyAudio Reference project which uses the same midbass & a slightly large tweeter. There is a series of XO options... myself i'd just start with a cap on the T that rolls it in where rhe P13 naturally rolls off (~5k = 4 uF with an "8 ohm" T)
dave
Thanks again Dave.
I think in the beginning I tried the single cap solution and I didn't like it. I think there was some harshness from the woofer, therefore I tried a few combinations, ending up with the series cross at 2500. Could be the box had something to do with it, so I'll try the single cap again.
I want as simple a crossover as possible, but this is the part that can make them sound like sh@t or sugar. It's also the area of speaker building I have the least luck with. I went through at least 10 different versions for my mains, and I'm still not satisfied.
It's all fun though.😉
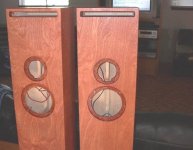
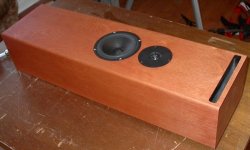
I'm back. Before leaving last week I applied the first coat of stain( my own recipe). Yesterday I gave it a 2nd coat and today the third and final coat. Colour is uniform and the plywood finished nicely, although in some areas there are fine cracks in the veneer. You have to be looking very closely to see these though.
For final finish I'll use satin Varathane Diamond polyurethane - water based.
Working on the crossover tonight. I've decided to go the series route again, crossing at ~4000Hz. Given the range of these drivers, that should be ok.
Anyhow, here's how they look stained. Image quality is not great(my camera is a POS):
Attachments
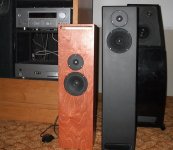
After 2 coats of finish today I could wait no longer, I had to hear it. Some stuffing( mostly at the start), the drivers with just a 2.4uF cap on the tweeter. I am listening to it now with one of my main speakers, as I only have one ready. I can say it's a success beyond my expectations. There is smooth bass with authority, not forced. The midrange is crystall clear and the highs are sweet. Good imaging, even with it stuck out in the middle of the room, and paired with an unlike speaker.
I hooked up the old one and can say there is a hugh improvement in both bass response and dynamics.
A few more days listening and I'll have a better idea if I need to do anything different, as in more or less stuffing, crossover work.
I hooked up the old one and can say there is a hugh improvement in both bass response and dynamics.
A few more days listening and I'll have a better idea if I need to do anything different, as in more or less stuffing, crossover work.
Attachments
Ok. After not much listening I decided that the midrange was a little to over-powering, and the tweeter is not playing enough of a part. I added commercial rubber back carpet directly behind the woofer, as I think this will stop the backwaves from boucing off the plywood and straight out through the cone. I also put in some more stuffing.
I then changed the cap for a higher value(6.2uF), which put the cutoff below 4K, in stead of the 10K of the 2.4uF.
Both of these proved to be very good improvements. The midrange is toned down enough to better match the bass, and the tweeters output doesn't sound isolated anymore. I was tempted to put a choke on the woofer, for a proper 1st order rolloff a 4K, but I really don't think it's needed. The sound is very clean and natural.
When I put the drivers in the other box, I'll get a better idea of how they sound.
This process is making me want to go back and re-do my mains, especially the crossover - these new ones sound so clear and open. The tinkering never ends.🙂
Attachments
MJL21193 said:
When I put the drivers in the other box, I'll get a better idea of how they sound.
This process is making me want to go back and re-do my mains, especially the crossover - these new ones sound so clear and open. The tinkering never ends.🙂
The tedious part... remove the drivers, change things, reinstall the drivers, listen. Repeat, repeat, repeat.
Well. With both speakers put together and connected I can hear something is still not right. The midrange is still too dominent. Too in-your-face, vocals trough a megaphone type of sound.
Try a single .25mH coil on the woofer. Better, but still not there.
More stuffing in the mid-line: worse - bass has vanished. Remove this stuffing.
Try padding the tweeter down 2 dB - no improvement. Remove the l-pad( tweet and woof same spl anyway).
Try a 2nd order Linkwitz-Riley on the woofer. MAGIC!
Apparently the woofer was going too high. I'm happy now, just need to get the port holes painted black and get them mounted up where the others were. I need to figure a different way to mount , rather then from the ends like the old ones. Some way to mount from the back, a hook type arrangement.
Will make measurements soon (for what they are worth). Did a sweep with my PC tone generator and am getting descent response down to about 65Hz before it starts to drop off. I can definitly live with that.
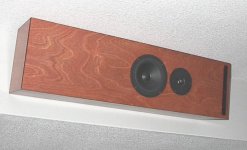
Pleased to say that this project is finished. Just finished mounting them back up where the old ones were.
After extensive listening last night and today, I can say the results are well worth the effort. When I turned on my subwoofer to fill in the bottom end, they really sounded good.
Came up with a new mount for them that's in two pieces - one part screwed to the back of the speaker, the other part on the wall. With two per speaker, it works well. Anyone interested in this mounting system, I'd be glad to share the details, as it is very simple.
When the weather warms up enough, I'll take one down a test it outdoors. It's been fun.
Attachments
Time for a change...
These speakers have been in service for about 10 months as the rear surrounds in my "home theater". They sound very good, and I'm (almost) satisfied on that front, but I've never been thrilled about the way the Baltic Birch plywood turned out finished.
I found there were tiny cracks in the face veneer that were magnified when I applied the stain. The grain pattern was not the best either and certainly not a match for the maple of the main speakers.
I decided a while back (about 3 days after I finished them 🙂 ) that I would take the time to veneer these. This would fix the mediocre appearance and allow me to make another improvement: round the edges, at least along the sides.
When I do a veneered project (not often anymore), I use paper backed veneer from Cedan. This veneer is fairly thick (almost as thick as raw veneer) and has consistent grain and few, if any, defects.
I start by taking out the drivers, stuffing and crossover.
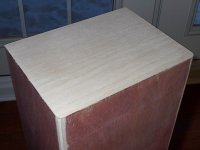
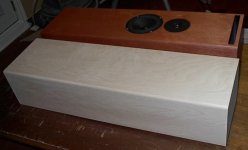
I want to round the edges, but there isn't enough "meat" in the corners for a big one, so I settle on a 1/4" radius. This will improve the "boxy" appearance and make it possible to wrap the enclosure on three sides with one continuous piece of veneer, with only the ends applied separately. I will leave the back as is.
Here's a shot of the veneer sitting on top of the box, These have been cut for the ends and will be glued on first. Notice the box has the raw edge where I cut the 1/4" radius.
These speakers have been in service for about 10 months as the rear surrounds in my "home theater". They sound very good, and I'm (almost) satisfied on that front, but I've never been thrilled about the way the Baltic Birch plywood turned out finished.
I found there were tiny cracks in the face veneer that were magnified when I applied the stain. The grain pattern was not the best either and certainly not a match for the maple of the main speakers.
I decided a while back (about 3 days after I finished them 🙂 ) that I would take the time to veneer these. This would fix the mediocre appearance and allow me to make another improvement: round the edges, at least along the sides.
When I do a veneered project (not often anymore), I use paper backed veneer from Cedan. This veneer is fairly thick (almost as thick as raw veneer) and has consistent grain and few, if any, defects.
I start by taking out the drivers, stuffing and crossover.
I want to round the edges, but there isn't enough "meat" in the corners for a big one, so I settle on a 1/4" radius. This will improve the "boxy" appearance and make it possible to wrap the enclosure on three sides with one continuous piece of veneer, with only the ends applied separately. I will leave the back as is.
Here's a shot of the veneer sitting on top of the box, These have been cut for the ends and will be glued on first. Notice the box has the raw edge where I cut the 1/4" radius.
Attachments

I got tangled up in a "discussion" about veneer and, more to the point, what to glue veneer on with in this thread.
My experience with contact cement for veneer has always been positive. I have never had a problem with bubbling, or delaminating. The veneer has never moved or shown any signs of the glue loosing adhesion. Generally speaking, if something works for me, I continue to use it. So it goes without saying that I used contact cement here.
I use the glue straight from the can, without thinning it and use a small foam roller to spread it. Keeping the roller wet and not rolling excessively will prevent the glue from clumping up as you spread it. I do one quick coat on the veneer and one on the first end of the box, wait 10 minutes, then stick it on.
I have a hard rubber J-roller for putting pressure on the piece to ensure complete adhesion. After the piece is attached, I trim the excess off with a laminate trimmer bit in my trim router.
Here's how it looks with one end done. At this point, the entire box has been sanded with 320 grit disk in the random orbit sander. This isn't necessary for adhesion, but will provide a smoother base for the veneer.
Attachments
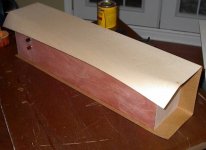
With both ends capped, it's time for the tricky part: wrapping the veneer around three sides.
I cut the veneer big enough to cover the sides and front with some extra to spare. Spread the glue on the veneer and the box and let it dry for 15 minutes.
I figured the best way was to adhere the front first, then ease the veneer around the radius and cover the sides. Laying the sheet of veneer on the table with it's back up, I position the box above it and set it down on the veneer in the right place. Turn it over and use the J-roller to smooth it on. Rolling out to and on the rounded corners starts the veneer around the sides.
I find patience and a heat gun are effective tools here. Once the veneer is attached, I use the heat gun to warm it up and the roll it out again.
Here it is before I trimmed the excess off.
Attachments
lookin' good... you inspire to me to try veneering some mdf cabs I'm working on at present (if I've got any dosh left after my kitchen reno...)
Hi Pete,
Thanks.
Renovation - I know what you mean. I've been hard at it here for the last 3 years. It has a way of burning up the cash.
I have sanded the first box and put the first coat of stain on. It took the stain very evenly and the colour is very consistent throughout. I will let this dry overnight and apply a second coat tomorrow. Two coats should be sufficient for good colour.
I have prepared the other speaker for veneer - removed the drivers etc. Hopefully, it goes as well as the first.
I want to take this opportunity to redesign the crossover, maybe incorporating baffle step correction. I was looking at Jay_WJ's way of modeling crossovers and I think I'll give it a try here. I have the equipment for the measurements, but I'm just too lazy to set everything up. 😱
I did initially measure the T/S specs of both midwoofers, and I have that written down somewhere.
We will see.
Here's the first speaker, stained with the driver put in place (though not hooked up). Camera is not showing it, but there is a HUGE improvement in colour and grain consistency.
Also, no cracks. 🙂
Attachments
Number 2 is done. It feels good in it's new skin. 🙂
All went smoothly, though I tried to use the same roller from last night (I wrapped it in a plastic bag to try to stop it from drying out). This didn't work, as the old glue from last night was too thick on the foam - it was clumping.
No big deal, use a fresh roller and all went well.
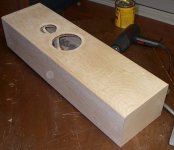
All that's left is to cut out for the drivers and the vent. I'll probably do that tomorrow.
All went smoothly, though I tried to use the same roller from last night (I wrapped it in a plastic bag to try to stop it from drying out). This didn't work, as the old glue from last night was too thick on the foam - it was clumping.
No big deal, use a fresh roller and all went well.
All that's left is to cut out for the drivers and the vent. I'll probably do that tomorrow.
Attachments
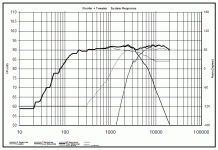
Working with the Pasive Crossover Designer, I've come up with what I hope will be a good design.
In order to us this utility, I need to have the frequency response plots in the .frd format and the impedance response in the .zma format. I downloaded the SPL tracer that allows me to convert the graphic image of these plots (from the spec sheet) and convert it to usable plots.
This is a little tedious, but it does the job fine.
With this data in the designer spreadsheet, I played around until I had what looks like a good alignment.
Earlier today, I calculated the baffle step for these with The Edge, but I will leave this out of the final crossover, as I don't know where these speakers will finally end up.
The crossover is a series type with a Zobel on the woofer. It uses a 2nd order slope on the woofer and a 3rd order on the tweeter, crossed at 4500Hz.
Here is the projected overall response:
Attachments
For baffle step, Rod Elliot has a line level passive design on his site that I may use, depending on the amp arrangement. Currently, I use a Yamaha HTR, with the audio over SPDIF from the computer (where I play movies from, either on DVD or stored on the hard drive). This limits options as far as putting the BSC in the line though, so I may change this setup to direct out from the soundcard to the HTR.
I have the same problem with the HD cable box - this is connected to the HTR with an optical link, with no options on the cable box for individual 5.1 or 7.1 output. Not much of an issue, as I don't watch much TV.
I have the second coat of stain on both boxes now. I'll need to let the stain dry completely before proceeding with the finish. First coat will be solvent based urethane. I have found that this highlights the grain and deepens the colour better than the water based urethane. I will then do the rest of the finish coats with waterbased urethane.
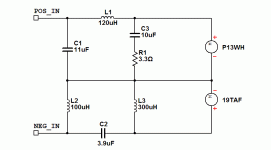
Getting back to the crossover: Circuit has been designed and simulated electrically with SPICE. It works as designed, with the xover at the 4.5K point. Time will tell if it sounds as good as it looks.
I will start to construct these crossovers today. The components are already in my stock, just need to unwind a few inductors from larger ones.
Here is the circuit:
I have the same problem with the HD cable box - this is connected to the HTR with an optical link, with no options on the cable box for individual 5.1 or 7.1 output. Not much of an issue, as I don't watch much TV.
I have the second coat of stain on both boxes now. I'll need to let the stain dry completely before proceeding with the finish. First coat will be solvent based urethane. I have found that this highlights the grain and deepens the colour better than the water based urethane. I will then do the rest of the finish coats with waterbased urethane.
Getting back to the crossover: Circuit has been designed and simulated electrically with SPICE. It works as designed, with the xover at the 4.5K point. Time will tell if it sounds as good as it looks.
I will start to construct these crossovers today. The components are already in my stock, just need to unwind a few inductors from larger ones.
Here is the circuit:
Attachments
I didn't get much of the crossovers done today - I didn't have as many inductors as I originally thought. I did have a few 2.2mH coils that I bought from a surplus store. These are 18 gauge wire, so I thought I'd go DIY all the way and wind my own. 🙂
I came across a good site with an inductor calculator a couple of years ago. Luckily the link was still active. The site is Shavano Music Online, and the calculator couldn't be simpler.
I used this to give me the length of wire and centre hole size. I used Speaker Workshop to measure these, and they are all within a few uH of the required values. The length of wire and the hole size suggested by the calculator are bang on accurate. I highly recommend this site for anyone interested in wind your own coils.
Today, my biggest problem was getting Speaker Workshop running correctly again as I needed this to measure the inductors (I don't have an inductance meter). It is a truly amazing program but it has a very steep learning curve. I've been using it for 3 years, but every time I want to do something, I have to re-learn a lot of it. Especially troublesome if there is another program on the computer that uses the sound card for measurement. A recent amp project had me using Right Mark Audio Analyzer, and I reset all of the levels for that AND changed the in/out cables from the card.
There are solutions for all this, programs that will save the record and playback levels and pencil and paper for me to draw a diagram of the cable routing, but I'm too lazy to do these things. I'd rather take extra time messing around and getting frustrated.
Do you still have the .frd and .zma files for the P13WH-00-08? I'm interested in obtaining them.
TIA
TIA
- Status
- Not open for further replies.
- Home
- Loudspeakers
- Multi-Way
- New Compact TL Project