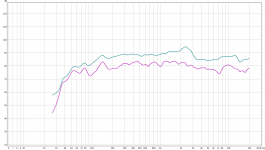
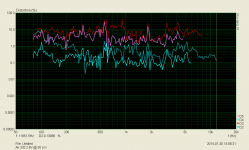
That's better, now we're seeing more of the driver and less of the other bits. I think we can perhaps say that at 15cm it's a bit close and some issues show up because of that. But the 30cm trace is quite respectable and aside from that dip at 7k is essentially very flat.
If you want to experiment with the settings gating the measurement would be a good idea too as that will help remove the rest of the room, but it will limit the low end accuracy. A 3-5ms gate will probably help a lot and let us see what the top octaves really look like. If you manage to get the gating working you should see the accuracy in the top octaves increase as the gate length is reduced, but the low end will get worse and worse. This is only up to a point because once you've gated out all of the room reflections you wont see any improvement for shorter and shorter gates.
You could also download the ARTA measurement package (it's free) and run a distortion sweep in STEPS, so we can see how the motor performs. Again doing this at 30cm, with around 1 watt input would be a good place to start.
Does anyone know of a good walk through on how to use STEPS? I'll be happy to do the distortion measurement using STEPS, I just haven't been able to figure out how to do it. I found a really good walk though for using ARTA but nothing for STEPS.
STEPS is fairly easy to get to grips with. The first thing you need to do is make sure that you've got your sound cards inputs and outputs selected correctly in the setup under audio devices.
After having done this, on the main window, you've got three main options, the start frequency, the stop frequency and the step size.
In the case of this little driver a good start frequency would probably be 80Hz as there's no point in trying to get it to reproduce stuff that it cannot cope with and a good stop frequency would obviously be 20kHz.
The higher the number of STEPS (ie 1/48 oct vs 1/6 oct) the better the end results will be as you have more points of measurement per octave, but the trade off is that it takes more time.
At the top you will see a red arrow. This starts the measurement process, the square to the right of it stops the measurement process.
If you've selected your sound card correctly, set the start/stop/step parameters, you can basically click start and it should work just with that.
After it has gone through the measurement process click on the D% button at the top and it will load up a distortion window.
Make sure to have D2, D3, D4 and D5 selected. THD and D6 you can ignore if it looks too messy.
Make sure to have the thick pen option selected too.
That should be enough to get decent results providing your sound card is decent.
Most of the additional settings will fine tune the measurement process for slightly better results or for optimising how long the measurement process will take for each STEP and isn't generally required to get acceptable results.
What you do need to do though is make sure that you are measuring with the driver working hard enough. 1 watt of input power is generally enough to make sure that this happens, but lots of people measure at greater input voltages too, just to see how the driver handles greater SPLs.
Quite frankly, 1 watt is loud with most drivers anyway and no one is going to try and blow the rafters away with this driver, but you could measure the voltage across the drivers terminals, with a sine wave playing, and set it to 2.83V RMS. With this driver that will equal around 2 watts as it's 4 ohm, but it should give a good idea of what it is capable of. Zaph, if I remember correctly, measures all his drivers with 96dB nominal output at 1 meter.
After having set the volume correctly all you need to do now is make sure that nothing is clipping. This means the sound card input, the mic preamp levels and the microphone. If the first two are clipping, turn the gain down on the mic pre. If the mic is clipping you'll need to move it further away from the loudspeaker. 30cm should be good with 2.83V being fed to the driver.
Last edited:
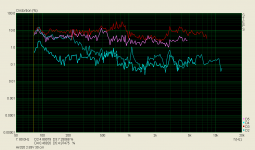
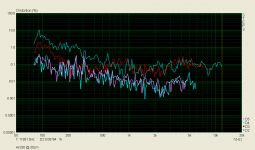
Okay, something isn't right there, it looks as if something is clipping somewhere. The distortion % should be far lower.
Depending on the quality of the driver you should be generally looking at 0.1-1% for the 2nd harmonic. 0.01-1% for the third and 0.001-0.01% for the 4th and 5th.
Of course these can be quite different depending on the specific driver, but should be ball park figures.
I've attached an example of how things should be closer to looking.
What amplifier are you using?
Attachments
Its a Lepai LP-2020A+.
I measured one of my EL70's using the same method and result was a graph with mostly the same magnitude of measurements.
Could background noise in my room be tainting the results?
I measured one of my EL70's using the same method and result was a graph with mostly the same magnitude of measurements.
Could background noise in my room be tainting the results?
Last edited:
So we're basically looking at high 3rd, high 5th and lowish 2nd and lowish 4th order harmonics.
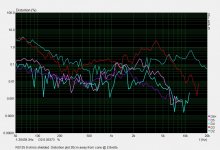
This could be entirely amplifier related. Some class D chip amps are known for having high distortion and are almost always bridged. In such a configuration the dominant harmonics are the odd order as the even order products cancel out somewhat due to the balanced/bridged nature of the amplifier.
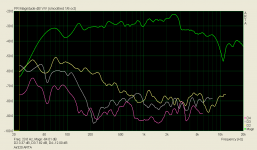
I've attached an image of a distortion sweep I've run of a TAS5706B build that I've done and this highlights what I am talking about. As you can see the 3rd and 5th are an order of magnitude higher than the 2nd and 4th.
If the amplifier distortion is really swamping the results to this bad a degree throw it in the bin as by any standards it would be considered faulty. 10% distortion of any kind only appears when you are hard into clipping or there is something else not right. If it was just the 2nd order products that were high, I could dismiss it as a design 'flavour' such as a single ended valve design. Or if you had high 2nd, lower 3rd followed by lower still 4th and 5th then it could again be a design feature, like the SE designs, but this is not what's going on.
Noise generally doesn't show up like this. If the noise floor is high then the noise swamps out all of the harmonics and you simply end up with a flat line of all the harmonics. That is 2nd, 3rd, 4th and 5th all have the same magnitude, this is not what we're seeing here.
To rule out the clipping scenario try doing this at lowish signal levels. Keep the mic gain low and place it around 30cm from the cone. Nothing should clip with a situation like this. You may get noise like this, as reducing the signal level reduces the signal to noise ratio, but if clipping is the problem it should become obvious as the distortion will drop like a stone once you've turned things down enough.
There is also the possibility that turning it down will significantly lower the amplifier distortion too. So turning it down may well solve the issue, not because anything is truly clipping, but because the amplifier isn't of good design.
Do you have a standard class A/AB amplifier you could switch to? It doesn't have to be very powerful.
This could be entirely amplifier related. Some class D chip amps are known for having high distortion and are almost always bridged. In such a configuration the dominant harmonics are the odd order as the even order products cancel out somewhat due to the balanced/bridged nature of the amplifier.
I've attached an image of a distortion sweep I've run of a TAS5706B build that I've done and this highlights what I am talking about. As you can see the 3rd and 5th are an order of magnitude higher than the 2nd and 4th.
If the amplifier distortion is really swamping the results to this bad a degree throw it in the bin as by any standards it would be considered faulty. 10% distortion of any kind only appears when you are hard into clipping or there is something else not right. If it was just the 2nd order products that were high, I could dismiss it as a design 'flavour' such as a single ended valve design. Or if you had high 2nd, lower 3rd followed by lower still 4th and 5th then it could again be a design feature, like the SE designs, but this is not what's going on.
Noise generally doesn't show up like this. If the noise floor is high then the noise swamps out all of the harmonics and you simply end up with a flat line of all the harmonics. That is 2nd, 3rd, 4th and 5th all have the same magnitude, this is not what we're seeing here.
To rule out the clipping scenario try doing this at lowish signal levels. Keep the mic gain low and place it around 30cm from the cone. Nothing should clip with a situation like this. You may get noise like this, as reducing the signal level reduces the signal to noise ratio, but if clipping is the problem it should become obvious as the distortion will drop like a stone once you've turned things down enough.
There is also the possibility that turning it down will significantly lower the amplifier distortion too. So turning it down may well solve the issue, not because anything is truly clipping, but because the amplifier isn't of good design.
Do you have a standard class A/AB amplifier you could switch to? It doesn't have to be very powerful.
Attachments
I tried testing again with an old 70's Sony amp I've got laying around. I assume it is not Class D. Unfortunatley it requires an 8 ohm load so I had to wire both drives in series to get the impedance up, I don't know if that would effect the results or not.
The results look different, but the magnitudes seem about the same. Maybe the audio hardware in the laptop I'm using aren't up to the task. I'll try a different sound card and see what that does.
The results look different, but the magnitudes seem about the same. Maybe the audio hardware in the laptop I'm using aren't up to the task. I'll try a different sound card and see what that does.
Attachments
Thanks for trying that out, the results are indeed quite odd.
The old Sony should be absolutely fine with a 4 ohm load providing you keep the volume low. Meaning here that it should easily be able to drive a couple of watts into 4 ohms unless its hideously designed.
If you wanted to keep the load 8 ohms, you'd be better off using a resistor in series with the driver, rather than using two different drivers.
I take it you tried the test using low signal levels? As you're using a laptop, you're probably using the line out into the amplifier? If so make sure you alter the signal level output by STEPS down by say 10dB and turn the volume up on the amplifier as some sound cards exhibit higher distortion when operated at full volume. I mean I'm surprised that any modern chipset inside a laptop would sit around 10% THD. Do make sure you've got any noise cancellation or effects processing turned off as this could possibly be the problem.
I have to say, I am quite surprised that the input to the laptop is as bad as it is. What mic and preamp are you using?
It's also nice to see that the TA2020 amplifier isn't as bad as I thought it was.
That's good to know that the Sony should be able to handle 4 ohms, at least at reasonable volumes. It says 8-16 ohms on the back so I wanted to error on the side of caution.
I have been using the line out on my laptop for testing. I had the volume set pretty low coming out of it (< 20% of max) so I wouldn't think that would be the problem. Though I don't have a lot of faith in that laptop. I've got a Behringer USB DAC that I'll try using to see if that makes a difference.
The mic I'm using is a Dayton UMM-6, its a USB mic so no preamp is needed.
I'm glad my TA2020 amp doesn't appear to the problem. I've got a couple of those things and I've been really happy with them thus far.
Tomorrow when I get a chance I'll do some more experimenting to see if I can figure out what's going on here. Now that I know what it should be looking like I can at least tell if I'm making any progress or not. Thanks again for all your help.
If the Sony also has two pairs of outputs, ie speakers A and speakers B, that are switchable, it would help to explain why it says only 8-16 ohms. The designers would assume that people might connect up two pairs of 8 ohm loudspeakers and run them together. At least this is the usual reason for amps only listing out to 16 ohms.
If you've got a UMM-6 then it's not going to be the mic, unless it's faulty, which it probably isn't.
I am surprised that the output of the laptop is that poor.
Now I am assuming that the basic settings in STEPS are going to be adequate to run with your hardware. I have never had any trouble with them and I've used a variety of sound cards and a laptop or two with it, but there's always the chance that something isn't quite right.
One thing you could try is using ARTA as it too has a distortion measurement. If you make a measurement using ARTA, but select swept sine as the stimulus, then set the legnth to 64k or greater and click the 'centre around peak to peak value' or something like that. Then once the sweep has taken place you can click analyse 'frequency response and distotions'.
This tends not to be as good as STEPS and it also helps to perform 3-5 measurements in the averages box.
If doing this gives you exactly the same results then we know its hardware related. If ARTA works then you'll need to have a play with STEPS' settings.
Speakers finally arrived. Everything is intact, first optical and physical impression is a solid build, has a good weight to it, cant wait to try it out!
I ran the test again using my Behringer USB-DAC and it looks like it improved things significantly.
I did three tests. One at 2.83V, one at significantly lower volume, and one more using ARTA at 2.83V.
I think they look a lot better. Hopefully now I'm actually producing some data that other folks will find useful.
I did three tests. One at 2.83V, one at significantly lower volume, and one more using ARTA at 2.83V.
I think they look a lot better. Hopefully now I'm actually producing some data that other folks will find useful.
Attachments

Now that is a big difference...
Good work to continue till you found the cause of the previous strange results.
Good work to continue till you found the cause of the previous strange results.
Those results are much, much better. It's great to see that you've found out where the problem was.
Is this with the Sony amp or the Tripath?
One thing that I notice is that in ARTA the SPL level drops off at around 3kHz and this, you could say, corresponds to the increase in distortion around the same point in STEPS. The two might not be linked at all, but as this driver is supposed to be pretty flat out to 20kHz, I am tempted to say that the drop off could be related to the mic position.
Does this drop off also happen in STEPS on the main screen? If it does you might want to try playing around with different mic distances or take the measurement slightly off axis and the cliff that occurs at 3kHz might go away.
I have noticed a similar thing happening myself and sometimes a cliff like that does directly correspond to an increase in distortion where the level drops off as the signal to noise ratio decreases.
Peaks in the harmonic distortion like this are often caused by driver resonances, or by things like the cabinet, or anything close to the cabinet vibrating.
I'd be interested in seeing where this resonance comes from because it's the only fly in the ointment. I would like to see lower levels of the higher order harmonics however, but for low listening levels the distortion is decently low.
One thing we're not told on the drivers spec sheet is whether or not the 84.5dB SPL is with respect to 1 watt, or 2.83VRMS.
Those results were using the Sony amp. After what you said earlier I didn't worry about giving it a 4 ohm load and wired a single driver up to it. I'll probably repeat the test using the Tripath amp just to see if there are any noticeable differences.
That's interesting that mic position may be having such a noticeable effect on the results. I'll have to play around with it a bit and see what it does. Is there any generally accepted best practices when it comes to measuring like this? Its seems these kind of issues would make getting repeatable results extremely difficult.
That's interesting that mic position may be having such a noticeable effect on the results. I'll have to play around with it a bit and see what it does. Is there any generally accepted best practices when it comes to measuring like this? Its seems these kind of issues would make getting repeatable results extremely difficult.
The really important factors are basically the drive level and to ensure that nothing else in the chain is displaying significantly higher distortion than it should, because the levels its working at are slightly too high, or, too low.
In other words if you're using the mic close to clipping, or if the preamp is also working close to its limits, this can cause an increase in distortion that will swamp out something that is driver related. The same can be said if the signal to noise ratio is too low because the noise will then start to dominate. This may sound like a lot to get right, but usually it isn't that hard, all you do is alter the gain somewhere, or alter the mic distance and you're sorted.
Providing that nothing is clipping you can place the mic just about as far away or as close to the driver as you like. Moving it close will reduce the effects of room reflections, but will reduce the high frequency accuracy. It is ideally suited to getting good data for the lower range of the driver. Moving it further away will allow the high frequencies to sum correctly, but you stand the risk of introducing more of the room into the equation. The trick is simply making sure that the way you're measuring the driver is suitable for it. If you're measuring at 2.83 volts then its distortion isn't going to change if you're 10cm or 100cm from it, what does change is the way it radiates sound vs frequency vs mic distance/position. So if you're taking a measurement close up and you see that the SPL recorded deviates significantly from how it should be - in this case pretty much a flat line from 10-20kHz, then you know the mic distance isn't allowing the higher frequencies, producued by the driver, to sum correctly and a different mic position is probably going to be required to capture the high frequencies accurately.
WIth a driver so small I would expect 30cm to give good results, but there's no absolute guarantee that it will. Sometimes cabinet diffraction, a phase plug, a horn loading effect or similar will affect the radiation pattern in a way you didn't expect, that requires you to use the mic further away, or simply move it off axis a little to get things to sum correctly.
The repeatability for something like this comes from making sure that the drive levels/SPL that the drivers are producing is kept consistant. As well as making sure that it's the distortion that the driver is producing is what you are really measuring, rather than some other piece of equipment getting in the way. The mic position after this is not tremendously important providing that it is accurately measuring what it is that needs to be measured.
Sure it'd be nice if you could always use the same measurement setup and most of the time you can, but if the driver under test needs a small modification to the setup in order to get accurate results then there is no harm in experimenting. Usually I will perform a 1/12th octave sweep and see what happens. Then if something crops up that doesn't look right I will reduce the range the measurement is being taken under, ie limit it to say 2-5kHz in this case (because it speeds things up in the trouble area) and play with the mic position to see if I can get the cliff beyond 3kHz to go away. If I can, I will then go back to 100-20kHz. If that looks good, sometimes I'll swap to a 1/48 sweep.
- Status
- Not open for further replies.
- Home
- Vendor's Bazaar
- new 3" fullrage to provide test