Dear diyAudio members,
By way of introduction I come from Germany and just joined your exciting forum that I've been ploughing for about a year since I started restoring old record players (a Dual 1229 and a Micro Seiki BL91) that I run over a Fidelity Research SUT and a Unison Research Performance amp that leads into a pair of Martin Logan Spire speakers.
This is also a nice segway into my issue that I'm seeking your help with: One of the speakers started a year ago to develop a light crackling sound (a bit like white noise) at power-up from standby mode (i.e. when you start the music). This crackling persist for about 10 seconds after the music starts and then gradually disappears... it sounds like electrostatic discharge.
Upon contacting the ML support team, I was advised to replace the ESL panels, so in went a pair of brand new panels, tearing a big hole in my purse, but...alas..no remedy. Worse even, stupid me forgot to connect one of the panels in my impatience to hear music again and so I blew the ICEpower 200ASC module in that speaker. So, these two were replaced with new brand new ones in both speakers (I had to do both as I could not obtain the previously mounted version G, only the newer L version).
So here I am, both speakers work again, but the crackling noise is still there. I replaced the electrolytic caps on the cross-over and the small power supply board for the ESL panel with new ELNA Silmic II caps of same rates in the assumption one might have gone, but this is not the problem either. I've not touched the large foil caps on the big pcb with the large resistors, although I was tempted to swap these against some audiophile caps, but have not been able to find any caps that will fit in the cramped space of this board and are "swingable" price-wise (all highly coveted caps build exceptionally large in the higher values needed, i.e. 15uF, 33uF and 47uF)... however some gut feel tells me these are not the issue and I'm beginning to suspect a transistor or coil on the small power supply board for the ESL.
Do you have any idea or know what part could have aged and gone causing this noise at start up that then disappears after a short time?
Thanks in advance for every helpful hint!
Kind rgards,
Andre
P.S.: I am equiped to do some soldering (have a decent powerful soldering station, all necessary equipment and some experience) and am fully aware of the dangers working in high voltage power supplies like in the ML... I always let the speakers discharge a week disconnected before opening them and even then I test/short the main caps carefully to avoid electrical shock. So repair recommendations are welcome.
Do you have any pic of the bias an crossover...?
I have worket on logans time to time...a pic can tell a lot..i would think it not the crossover caps an res....
I have worket on logans time to time...a pic can tell a lot..i would think it not the crossover caps an res....
Is the crackling only audible in the ESL panel? Or do you hear it coming from the woofer too.…One of the speakers started a year ago to develop a light crackling sound (a bit like white noise) at power-up from standby mode (i.e. when you start the music). This crackling persist for about 10 seconds after the music starts and then gradually disappears... it sounds like electrostatic discharge….So here I am, both speakers work again, but the crackling noise is still there. …Do you have any idea or know what part could have aged and gone causing this noise at start up that then disappears after a short time?
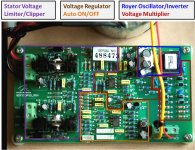
If crackling is only in one speaker and is just coming from the ESL, then I would recommend swapping the HV supply/Limiter board between the two speakers…pic of board attached. There are quite a few wires to connect, so recommend taking a few pics before performing the swap for a visual record of what goes where. If the crackling stays in the same speaker, the issue is with the panel or the HV wiring between board and panel. If the crackling follows the board to the other speaker, then the problem has been isolated to the board.
Attachments
Dear All,
Thanks for all your fast replies!
@alexberg and bolserst: The crackling only seems to come from the ESL panel, not the woofer, but I'll check it again to be sure and try it in the dark. The picture depicts what my HV power supply board looks like and I'll test what you recommend and will report. Thanks for the good hint!
Out of curiosity, the sections you've outlined on the cob in the picture, what do they do? Just want to learn the function of the electronics in these speakers better ;-)
Thanks and kind regards,
André
Back again and sorry for both the stupid question in my previous post (it helps to read the picture properly) and also for keeping you waiting, butI wanted to give the speakers some time to discharge fully before conducting the transplant of the high voltage power supply board. And... bingo... the crackling moved with it to the other speaker. There is no static discharge visible in the dark on the ESL panel.
What component on the board could it now be? I already replaced the electrolytic Jamicon caps on the board prior to my inquiry sme time ago in an attempt to solve the issue, but they made no difference, so I would exclude them as culprits.
Thanks in advance for your advice!
Best regards,
André
What component on the board could it now be? I already replaced the electrolytic Jamicon caps on the board prior to my inquiry sme time ago in an attempt to solve the issue, but they made no difference, so I would exclude them as culprits.
Thanks in advance for your advice!
Best regards,
André
One more question before I forget: what is the little switch marked SW301 on this board used for or rather what does it do?
As Wrinex guessed, the switch is part of the auto-ON/OFF circuit. Specifically, when you push it, it discharges capacitor C304 so the HV oscillator turns off, rather than having to wait 10 or 15 minutes without audio signal for it to discharge thru it’s timer resistor.…what is the little switch marked SW301 on this board used for or rather what does it do?
From the symptoms you describe in post#1, the most likely culprit on the board is a poor solder joint in the Voltage multiplier section, or one of the 6 HV bias resistors nearest the HV connection block(R216, R218, R219, R221, R222, R223) is starting to fail open.... the crackling moved with it to the other speaker. There is no static discharge visible in the dark on the ESL panel. What component on the board could it now be?
1) First take a close visual inspection of the voltage multiplier and oscillator section to see if you notice any obvious poor solder joint.
2) If not, you can try powering the unit on in a dark room. While the panel is making the static discharge noises, look for small bluish sparks anywhere on the top or bottom of the board in the voltage multiplier area.
3) If 1) &2) does not uncover anything, next test the 6 HV bias resistors. If you have a DVM that can measure high resistances, you can test them. They should each measure about 10Meg. If one measures open or is significantly higher, that is the faulty part.
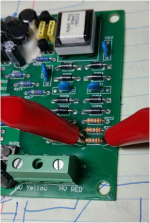
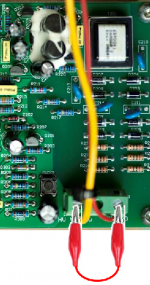
4) Another method to test the resistors for internal failures, is to bypass them one by one with a small jumper clips as shown in the pic. Then, power up the supply to see if the crackling is still present. If bypassing a particular resistor makes the crackling go away, that is the faulty part.
Attachments
Dear Wrinex and especially dear bolserst, thanks ever so much for your very helpful replies!
I did check all soldering points at the time of replacing the electrolytics, but will revisit the sections you mentioned and try first of all resoldering all points.
What is funny is that the crackling noise only appears within the first 15-20 seconds after the music starts and then gradually decays with a last crackle or two and then disappears completely for the entire listening session. You only hear a short crackle again when you disconnect the speakers from power (which I do regularly after every listening period to avoid the speakers remaining statically charged for too long a time... they are hooked up to a good power rail, where I just flip the switch). Wouldn't a defective HV bias resistor cause crackling all the time or are these only active at power-up?
I'll definitely try the dark room test with the back panel of the speaker off to see if I can spot any sparks tonight and will report back again.
Finally, a last maybe stupid question, do you know the make and type of these HV bias resistors? If they are the issue I'll probably go ahead and place an order for these now. Would you recommend replacing them on both boards prophylactically?
Cheers,
André
Dear Wrinex and especially dear bolserst, thanks ever so much for your very helpful replies!
I did check all soldering points at the time of replacing the electrolytics, but will revisit the sections you mentioned and try first of all resoldering all points.
What is funny is that the crackling noise only appears within the first 15-20 seconds after the music starts and then gradually decays with a last crackle or two and then disappears completely for the entire listening session. You only hear a short crackle again when you disconnect the speakers from power (which I do regularly after every listening period to avoid the speakers remaining statically charged for too long a time... they are hooked up to a good power rail, where I just flip the switch). Wouldn't a defective HV bias resistor cause crackling all the time or are these only active at power-up?
I'll definitely try the dark room test with the back panel of the speaker off to see if I can spot any sparks tonight and will report back again.
Finally, a last maybe stupid question, do you know the make and type of these HV bias resistors? If they are the issue I'll probably go ahead and place an order for these now. Would you recommend replacing them on both boards prophylactically?
Cheers,
André
The crackling indeed should be bad or faulty connection or component, the crackling start first several second sinds it is charging the panel, the voltage difference before and after the crappy solder joint or broken component is in the begin stage BIG, so the HV will chargeup and when the voltage is high enough it breeches the gap or broken component give a charge to the panel, then it again buffers until the HV is high enough(compared to the panel charge) to drop another crackle into the panel until the panel is fully charged. then the crackling stops since the voltage difference is near 0. then after time it loses charge a bit this is normal, when it loses enough it triggers the crackling again until it is fully charged again etc.
I hope you got you old panels still because it seems they where perfectly fine 🙁
Last edited:
Hi WrineX, that helps explain - thanks 🙂
I did check the board during power-up this evening after nightfall, but must admit that I'm not sure I saw any blue sparks during the crackling. What however does not happen is that the crackling returns once it has stopped. I listened over an hour to music without noticing any crackling noise... it is really just a first burst of crackling noise as soon as the Music begins, which goes on for maybe 10-5 seconds or so and then gradually decays with a last pop here and there before it is completely gone for the entire listening session.
I did check the board during power-up this evening after nightfall, but must admit that I'm not sure I saw any blue sparks during the crackling. What however does not happen is that the crackling returns once it has stopped. I listened over an hour to music without noticing any crackling noise... it is really just a first burst of crackling noise as soon as the Music begins, which goes on for maybe 10-5 seconds or so and then gradually decays with a last pop here and there before it is completely gone for the entire listening session.
I agree with Wrinex. It makes sense that the crackling only occurs when the music starts and the HV power supply is turned. This is when the panel is being charged and the current draw from the supply is the highest, and the voltage difference between the two ends of the resistor string is the highest. Once the panel is fully charged, there is very little current draw and voltage difference across the resistors. The added piece of information that you hear short crackling when you disconnect the power points more firmly to the resistors being the problem. When you disconnect the power, you are now discharging the panel, and again the voltage difference between the two ends of the resistor string momentarily increases.… the crackling noise only appears within the first 15-20 seconds after the music starts and then gradually decays with a last crackle or two and then disappears completely for the entire listening session. You only hear a short crackle again when you disconnect the speakers from power… Wouldn't a defective HV bias resistor cause crackling all the time or are these only active at power-up?
Note that even if you leave the speaker powered on, when the LED light turns red about 10 – 15min after the music stops the speaker enters standby mode and the HV power supply is turned off and the static charge on the diaphragm is no longer maintained. The HV power supply is only active when the LED light has turned blue.…which I do regularly after every listening period to avoid the speakers remaining statically charged for too long a time... they are hooked up to a good power rail, where I just flip the switch).
Martin Logan uses common 1/4 Watt Carbon Film resistors. Some people say they prefer the sonic characteristics of carbon film while others promote metal film or other resistor types. Personally, I have not found resistor type to be critical in this application because once the panels are charged there isn't any current flow and the resistors are effectively no longer in the circuit.… do you know the make and type of these HV bias resistors? If they are the issue I'll probably go ahead and place an order for these now. Would you recommend replacing them on both boards prophylactically?
If one resistor is found to be faulty, I would recommend replacing all 6 resistors on that board.
I don't see a reason to replace them on the other good board though.
25 x 10M Ohm Carbon Film Resistors - 1/4 Watt - 5% - 10M - Fast USA Shipping | eBay
Attachments
Dear bolserst, dear WrineX,
Thanks ever so much for all your help - can't tell you how much I appreciate all your advice!!! I owe you 🙂
I'll replace the resistors as per your advice with carbon film resistors and report if this has fixed the issue.
Warm regards and the best wishes for an enjoyable and relaxing weekend,
André
Thanks ever so much for all your help - can't tell you how much I appreciate all your advice!!! I owe you 🙂
I'll replace the resistors as per your advice with carbon film resistors and report if this has fixed the issue.
Warm regards and the best wishes for an enjoyable and relaxing weekend,
André
Dear bolserst, dear WrineX,
I exchanged all resistors today and resoldered all spots on the Voltage Multiplier section where I wasn't sure if they looked ok, but ... alas... to no avail, the crackling is still there :-/
Do you have any other idea what it could be?
Kind regards,
André
I exchanged all resistors today and resoldered all spots on the Voltage Multiplier section where I wasn't sure if they looked ok, but ... alas... to no avail, the crackling is still there :-/
Do you have any other idea what it could be?
Kind regards,
André
Last edited:
A quick update / addition: I've been listening attentitively to the bugged speaker and noticed that the crackling after the initial louder rush at power-up doesn't 100% disappear as initially assumed, but there is a very, very slight crackling that continues in a pulsating fashion... it is so faint, it is barely audible and you need to hold your ear to the speaker to hear it. As said, it comes in comes in regular pulses of a second or two. Maybe this additional bit of info helps locate the bugger?
Sorry to hear that the most likely faulty parts are not the problem. 🙁...it comes in comes in regular pulses of a second or two. Maybe this additional bit of info helps locate the bugger?
Your description of regular pulses is very common in low current HV applications where the voltage builds up to a threshold where a small arc occurs that discharges the supply below the threshold. The supply slowly starts to build up in level and the cycle repeats. Usually the problem is in the panel, but since you have swapped supplies and the problem followed the supply to the other speaker, it has to be on the board somewhere.
Here are the next things I would check.
1) There is one more resistor in the HV circuit, this is R2 and it goes in between the HV supply ground and the HV connector ground that goes to the transformer secondary center tap. Check that the solder joints are good and that the resistor measures 30K. You could also try temporarily jumping across it with a wire or a resistor(value not critical 1K – 100K) soldered in place to see if this makes the crackling go away.
2) The next likely faulty parts are voltage multiplier parts.
- The 8 diodes(D203 – D210) are 1kV fast recovery types F107 or similar…UF4007 is often easier to find.
- The 4 capacitors (C210,211,213, 214) are 2kV 470pF.
Diodes generally fail before capacitors, so you might try those first.
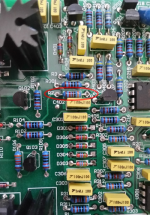
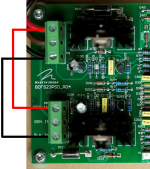
3) One other item that might be causing the sound is the series pass portion of the Limiter. The limiter also has a controlling signal that charges up at power on, and discharges at power off. I think it is not likely the problem, but it is easy to test. Bypass the limiter by adding jumper wires from the Red-IN to the Red-OUT connector, and from the BLK-IN to the BLK-OUT connectors as shown.
Good Luck!
Hopefully we can locate the fault without having to purchase a new board.
Attachments
Dear bolserst,
Thanks for sticking this through with me and for your additional recommendations! Bear with me as I'll need to wait again at least until tomorrow to give the speakers some time to discharge before I can safely take out the board. I'll check the items you indicated.
The caps (C210 et al.) are tantalum type caps, I suspect?
With regards to your suggestion no. 3, do you mean running the speaker with the jumpers in place (an the usual wires attached in these clamps)? Sorry for the maybe naive question, I just want to ensure I do it right and don't damage the speakers.
Kind regards,
André
I forgot to mention that you can safely discharge the power supply and panels in a few minutes.… Bear with me as I'll need to wait again at least until tomorrow to give the speakers some time to discharge before I can safely take out the board.
- Disconnect power and wait 1 minute.
- Then, use jumper clips two short the two wires from the HV connection block. I usually just hold the tips of the jumper clips to the screws on top. There may be a small spark when you first touch the clips to the connection block, but it will not cause any damage. Hold the clips in place for 1 minute.
- Remove jumper clips and work on your safely discharged ESL.
The multiplier caps are ceramic type.The caps (C210 et al.) are tantalum type caps, I suspect?
10x 470pf 2KV Hochspannung Keramik Scheibenkondensator 471 2000V Capacitor | eBay
Correct, leave the usual wires attached to the clamps.With regards to your suggestion no. 3, do you mean running the speaker with the jumpers in place (an the usual wires attached in these clamps)?
Add the two additional wires shown in the pic(post#18) to bypass the series element of the limiter circuit.
Attachments
Last edited:
- Status
- Not open for further replies.
- Home
- Loudspeakers
- Planars & Exotics
- Need help with a crackling ML Spire