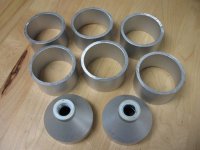
The platform riser material. As you can see, I have two pieces of different shape, just the left over of the aluminum case I cut in pieces.
To have enough risers, I need to use them as well. I'll place one up side down under the armboard, the other behind the table. The one under the armboard will give a special look. It is a feature. 🙂
The top smaller section will be inserted into a hole of the exact diameter into the base plate.
To have enough risers, I need to use them as well. I'll place one up side down under the armboard, the other behind the table. The one under the armboard will give a special look. It is a feature. 🙂
The top smaller section will be inserted into a hole of the exact diameter into the base plate.
Attachments

Looking great Algar....
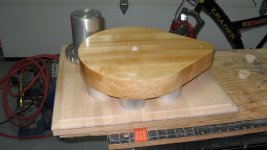
Here are some pics of the TT with and without platter in place. I also have an original Teres platter from a model 265. The one shown here is my own version. Its made of a composite of plywood, MDF and a big steel flywheel. Its also damped with lead shot and has about an inch of cocobolo at the top. Excuse the dust (one of the issues with black) and the smudges - I've been doing some maintenance on it and it al needs a good clean down:
(you can just see the side of the shigaclone in the pics!)
Fran
Here are some pics of the TT with and without platter in place. I also have an original Teres platter from a model 265. The one shown here is my own version. Its made of a composite of plywood, MDF and a big steel flywheel. Its also damped with lead shot and has about an inch of cocobolo at the top. Excuse the dust (one of the issues with black) and the smudges - I've been doing some maintenance on it and it al needs a good clean down:
An externally hosted image should be here but it was not working when we last tested it.
An externally hosted image should be here but it was not working when we last tested it.
An externally hosted image should be here but it was not working when we last tested it.
(you can just see the side of the shigaclone in the pics!)
Fran

Thanks - but really the only thing I have more than you is both wood and metal lathes - and these really are handy things to have. I would only love to also have a milling machine though!!
I made a jig to hold the platter for turning - fairly simple but yes, you would need a lathe capable of swinging 15 or 16". Isnt that cocobolo a simply beautiful timber? I know it fades over time (as will all wood) but here, freshly sanded and oiled, ain't it just gorgeous?
BTW, I found this pic when I went back to add some more to the folder here where I keep my build pics. you can see the supports and the lead shot etc before the plinth went on:
Fran
I made a jig to hold the platter for turning - fairly simple but yes, you would need a lathe capable of swinging 15 or 16". Isnt that cocobolo a simply beautiful timber? I know it fades over time (as will all wood) but here, freshly sanded and oiled, ain't it just gorgeous?
An externally hosted image should be here but it was not working when we last tested it.
BTW, I found this pic when I went back to add some more to the folder here where I keep my build pics. you can see the supports and the lead shot etc before the plinth went on:
An externally hosted image should be here but it was not working when we last tested it.
Fran
Yes superb wood. I love wood. Thanks for the last picture, very informative. I'll do the same.
My father in law used to have (a long time ago in the 50's) a fairly large wood factory and was making furnitures and subcontract parts. He moved house and then past away last year. I'm the one that took all his left over wood pieces that he kept in his basement for years. I'm still using them in my project here and there and also to built furniture for us.
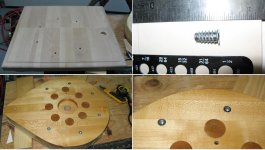
The base plate will be made using one of his furniture top piece. It is all maple and oak, perfect finish. He was a real artist and knew his stuff. He has a few lathes (metal and wood) but left them at the factory when he sold it.
My father in law used to have (a long time ago in the 50's) a fairly large wood factory and was making furnitures and subcontract parts. He moved house and then past away last year. I'm the one that took all his left over wood pieces that he kept in his basement for years. I'm still using them in my project here and there and also to built furniture for us.
The base plate will be made using one of his furniture top piece. It is all maple and oak, perfect finish. He was a real artist and knew his stuff. He has a few lathes (metal and wood) but left them at the factory when he sold it.
All great work guys.I enjoy the pictures,the comments,the how to tips.I am going to add some constructive criticism here if you don't mind.I believe a metal lathe capable of turning a 12" piece ,costs at least $4500.I checked Busy Bee tools here in Toronto and the prices were about there ,maybe more I can't remember exactly it's been a while sine I looked.Now,Busy Bee Tools are cheaper line of tools ,made in India I believe and good enough I guess for the hobbyist like us.For serious quality metal lathes and mill machines,I am sure you looking at spending 10000-15000 or more.Does it make economical sense to buy a lathe to build a turntable.Besides these machines are big and heavy and require proper placement .Do we have the space?
Personally I think a machinist is the best alternative for parts required.Having though about all that,I ended up buying the most critical parts for my table ,the platter and bearing from Scheu Analog. I haven't finalized the plinth yet,but I do have some stainless steel plates on hand.I was on a job this summer,installing glass as usual,and a company there was installing commercial kichens for a cooking school,I asked for some stainless sheets and they gave me two scrap plates cutouts that measure 16x20 .They are polished on one surface and very heavy being 1/4" thick plates.I am thinking of using 1-1/2 maple sandwiched between those plates.I don't really want to glue them as I don't trust any glue would hold that well into the future,so some kind of mechanical fastening is required.But I hate having exposed screw heads on my plinth.Even if they are flush sunk on the stainless plate,the look will be compromized.
Woodturner Fran,I love the cocobolo ,gorgeous wood.I couldn't hepl but notice on your pictures of your table,the screw pattern is not regular,some spots have two screws some don't,and the spacing is not accurate,other than that it looks great.
Algar.Your maple plinth as good or better than what I would of been able to achieve.I understand it was made by a skilled woodworker.However one thing I noticed ,the plinth is made of laminating dimensional maple pieces together,obviously that is the only method,but on your pictures the end grain on some pieces is showing on the big 12" radius on the teardrop and it ruins the look in my opinion.I think if the woodworker guy had placed the pieces in a different pattern,it would of resulted in an even better looking plinth.I am not the authority in woodworking and not sure if glueing wood pieces that way results in a good strong structure,but I would say yes.
George
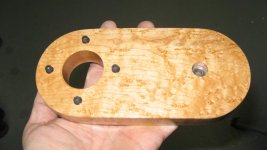
Hi Yioryos. I agree with your comments on my wood plinth. An addition to that the armboard and its spacer are made of bird eye maple, not the same of the plinth. But really, I don't mind because I got it for so cheap.
The reason the woods are different, is a good one. As asked the guy for maximum rigidity and stability. He went next door his shop, and there is a small firm specialized in wood mold. They make them using special grade very dry maple. His asked them from scrap parts, like your SS and he used that for the plinth. Then he used their 30'' wide wood planer to make it perfectly flat and uniform (an other expensive machine!). Then he make the armboard with some other small nice pieces of wood he had.
I ended paying 85$ for the complete plinth and armboard, including wood and work! He said he may this strange job as much for fun than for work. At this price, for a one time, very accurate custom job done from an ACAD file, I was very please with the result 😀
Indeed you are correct too about the screw pattern in the platter! What happened there was that the cocbolo in the top layer warped a bit and started to tear away a little from the rest of the platter. I had to do a repair job on it which meant adding the screws and also injecting some glue under the cocobolo layer. Not ideal, but I wanted to salvage the platter. I concentrated more screws where the warp was worse, so the pattern is uneven. So the pattern is skewed towards one side a bit. I had left it repaired inside in a cool place in the house to let it acclimatise to the house slowly and have only recently mounted it up. The original idea was not to have any screws - like in the pic where its mounted on the lathe.....
In real terms its my "spare" platter anyway and I normally have the original teres one on the TT. I'm not sure that its as nice a sound as the teres. Having said that, I haven't paid great attention to the cart alignment yet either. I'm waiting another week or 2 to make sure its stable before going through that pain!! I use one of the hifi news test records.... with just a quick and dirty alignment I can have it pass tracking test level 2 and only barely buzz on level 3. It takes a lot of care to get it to pass track 3 and only with a linear tracker can I get it right on track 4.
I would love one of those feickert alignment gauges but find it hard to shell out for what I would only use very occasionally. I wish you could rent them!
Algar - the grain may well have looked nicer with different orientation, but long term it was probably better to use the super stable maple in that way than prettier cuts which often are much more unruly wrt stability - if thats any consolation!!!
Such is DIY!!!!
Fran
EDIT: thanks for the comments, keep 'em coming!
Don't worry, I don't need the consolation 😉. I like the look of wood, and there is a lot to look in this one. The table is very nice looking the way it is. Much prettier than some other of my other DIY stuff. So nice in fact, that my wife agreed to let me install it later in our living room. That is a real test 😀
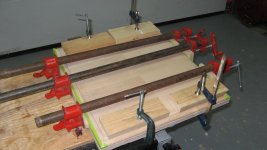
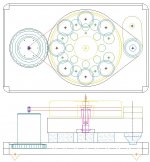
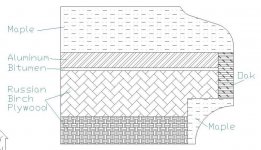
My platform is completed, I'm varnishing it right now. Well, it end up been much more complex than expected. I ended up with a constrained layers of 3/4 maple, then a plate of 1/4" aluminum for strength and weight loading. This plate is screwed into the maple using 14 wood screws and glued using "No Nail" Lepage universal adhesive. Then a small layer of loaded bitumen, sandwiched with a layer of 3/4" Russian birch plywood. The plywood is screwed into the aluminum plate using 14 hex head stainless steel bolts, drilled into taped aluminum plate holes. Finally, there is a final layer of 1/2" birch plywood again to cover all these holes. It is glued to the previous layer using wood glue. To cover all these layers from the side view, there is a 3/4" insert of oak, then a 3/4" maple groove for a nice finish.
The end result is a very strong, rigid and heavy platform, a perfect base to mount the turntable, its risers and the motor pod. The multi constrained layers of different materials should iprovide some vibration control/absorption as well.
The plate is drilled from side to side with the turntable upcoming platform risers. The turntable, the risers then the platform will be all screw together using 4-1/2", 1/4" bolts to produce a complete assembly. It took me two days to build it.
it.
The bottom plywood layer has metal inserts to receive 1/4-20 bolts or screws feet or cones, such as the Diamond cones I bought for this table. They will also allow table leveling. Pictures are coming, in the meantime here a cross section of the platform.
The end result is a very strong, rigid and heavy platform, a perfect base to mount the turntable, its risers and the motor pod. The multi constrained layers of different materials should iprovide some vibration control/absorption as well.
The plate is drilled from side to side with the turntable upcoming platform risers. The turntable, the risers then the platform will be all screw together using 4-1/2", 1/4" bolts to produce a complete assembly. It took me two days to build
it.The bottom plywood layer has metal inserts to receive 1/4-20 bolts or screws feet or cones, such as the Diamond cones I bought for this table. They will also allow table leveling. Pictures are coming, in the meantime here a cross section of the platform.
Attachments
Hi Algar
Thanks for the update.Nice work.I always use PL Premium adhesive for projects,I find it to be the best glue.Did you use standard maple cove trim on the base as shown on your drawing?
Also what is loaded bitumen and where can I get it?
Thanks
George
Thanks for the update.Nice work.I always use PL Premium adhesive for projects,I find it to be the best glue.Did you use standard maple cove trim on the base as shown on your drawing?
Also what is loaded bitumen and where can I get it?
Thanks
George
I recycled nice furniture top wood panels from my father in-law longtime gone production as the top layer. They were too small, but I glued two panels back to back.
Bitumen sheets are from Solen south of Montreal, see their website:
www.solen.ca
I bouhgt them long time ago, I don't know if they still carry them.
Bitumen sheets are from Solen south of Montreal, see their website:
www.solen.ca
I bouhgt them long time ago, I don't know if they still carry them.
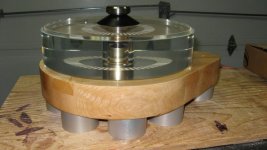
I first made my ACAD drawing to make sure the top platform would be big enough, it was, then I glued the two panel together. This is the test setup. I printed out a drawing to scale of the risers position. I used it to position them on the platform. I fine tuned the position of two of them to allow enough free space for the my motor pod base ring.
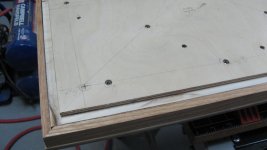
The oak 3/4" trimming bar is already fixed to top on this picture
The oak 3/4" trimming bar is already fixed to top on this picture
Attachments
Once the risers were correctly positioned, I drilled the 1/4" holes for the big bolts, marking the turntable base at the same time insuring correct alignment. I inserted solid bolt threaded insert into the turntable to receive the platform bolts.
Attachments
From the left to right in clockwise direction, first, the back of the top layer. It has a lot of pre-drilled holes. then the second layer, the 1/4" aluminum sheet, glued and screwed in place. Third the bitumen layer, then the fourth layer, the 3/4" Russian Birch Plywood.
Attachments

- Status
- Not open for further replies.
- Home
- Source & Line
- Analogue Source
- My DIY Teres Turntable