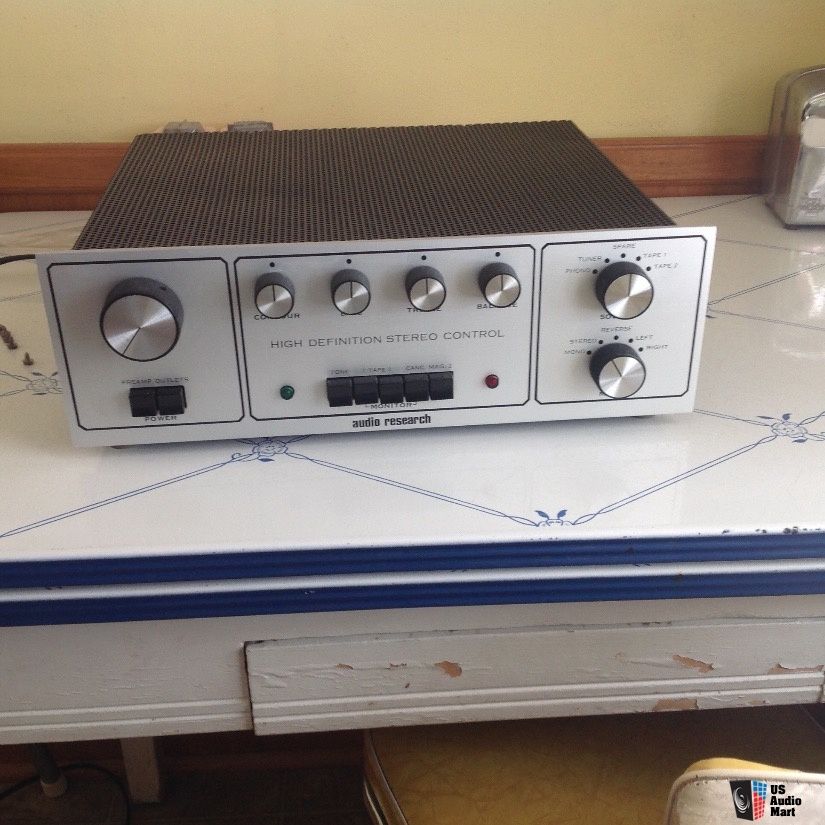
Going to use this thread as a documentary for all of the stuff, info, rebuilds, and modifications that I'll be doing to my recently acquired ARC SP-3. This is the A-1 model that retailed for $795 in 1975. AR has a fantastic reputation for sonic excellence, customer support, and - probably most important for me - this preamp has tone controls and variable loudness (ARC calls it contour, but the curves in the manual are classic loudness contours for sure). I tried going toneless, but - nope couldn't do it. Not being able to compensate for bad recordings just made me unhappy.
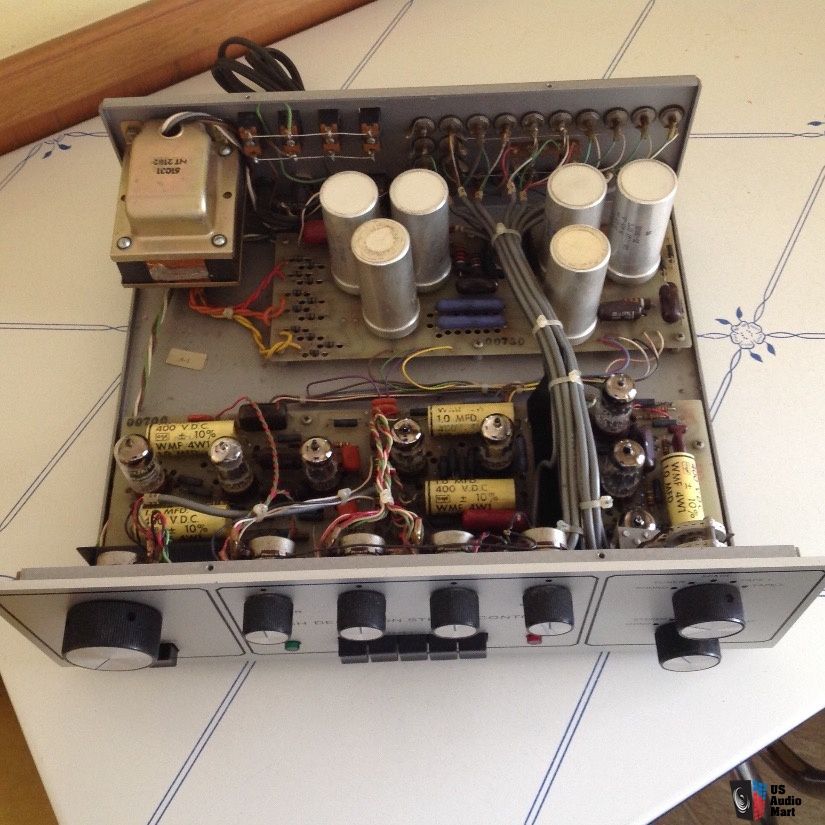
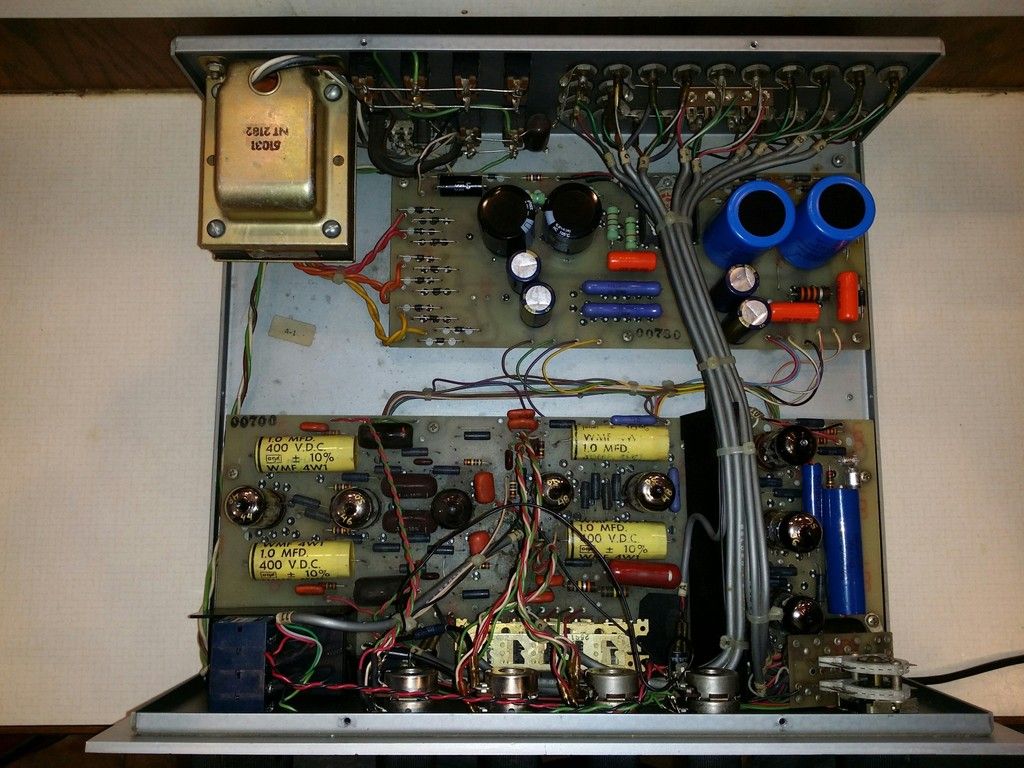
So I found this guy after watching all of the usual places where such things are posted for sale, and I think I snapped it up about 30 minutes after it had been posted. Came with 8 pretty lively 'nos' tubes, although one has already bit the big one... the others look pretty good. I've ordered a sleeve of NOS Raytheons to fill up some of the less critical sockets. Looking for something special for V1 and V4. The faceplate is in nearly perfect condition, and there have been absolutely no modifications that I can see - bone stock. And grimy. This unit had definitely been owned by a smoker at some point - it has the brown, sticky, grungy residue all over everything inside. So I sat down with some deoxit and q-tips and paper towels, and I've cleaned part of the interior out. Still have most of the main board to go, but I've cleaned up the phono section pretty nicely. Here are some of the sellers shots from the ad.
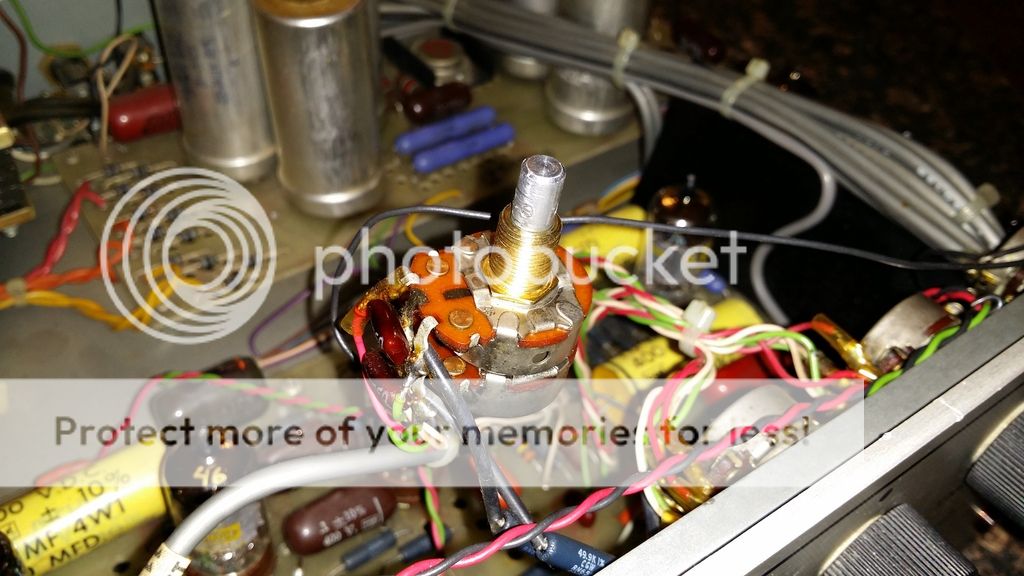
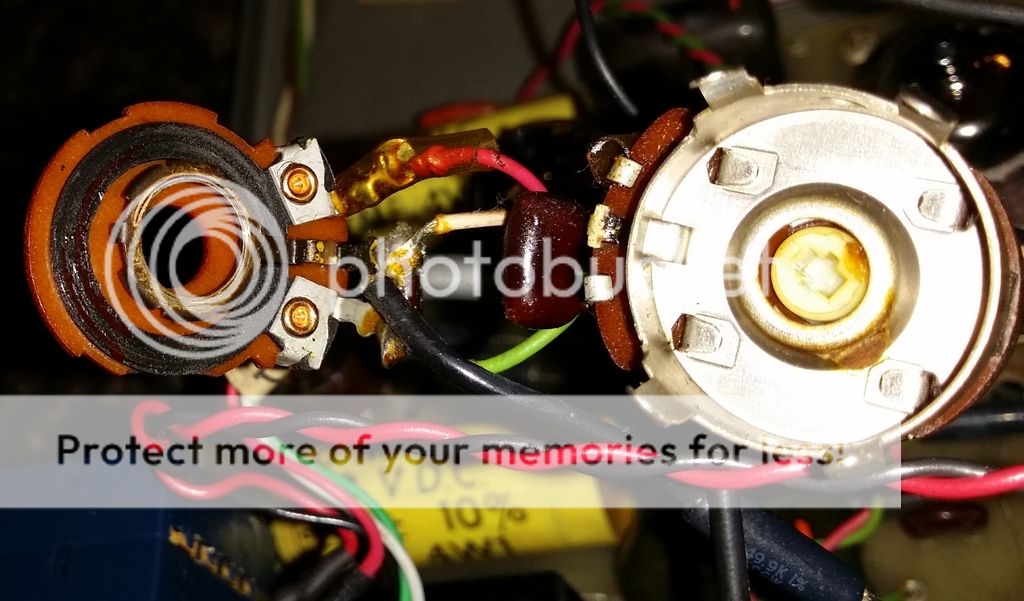
It sounded pretty darn nice as it arrived. I took my Marantz 2250 out of preamp duty and plugged the phono in and routed the outputs through my Citation II, and man, did it sound nice. The seller had told me that the green pilot light was out - found some little replacements on fleapay. Easy replacement - just unscrew the lamp housing from the front right through the faceplace. Then I started playing with settings and controls. The seller said the pots had been cleaned - I don't buy it. Scratcy, scratchy, scratchy. So on the counter it went and the pots got a thorough cleaning with deoxit. While cleaning, I noticed that the volume pot had some funny behavior. I'd turn it and there was resistance from the front pot as there should be, but the back pot seemed to be 'slipping'. So I emailed the folks at ARC, and asked them about a replacement, and they sent out a new Alps blue that is custom manufactured for them. This pot has a very nice feel to it. It doesn't feel like a potentiometer at all, but more like a stepped attenuator. It has a series of steps as you rotate the shaft - 40 in all (yes, I counted them!). This is what the replacement looks like next to the original.
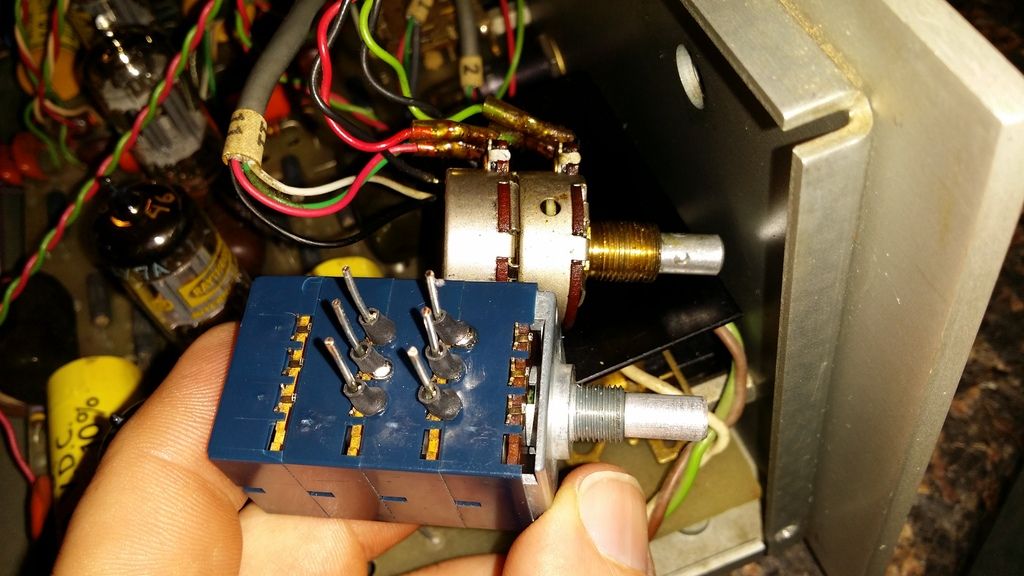
They really didn't give me too much info, but I though it would be a drop in replacement. I measured the resistance and found it to be (near) 100k - so that was okay. But, as you can see in the photo above, the threaded part of the replacement's shaft was quite a bit shorter. In fact it didn't even protrude past the face plate! So I covered all of the holes in the pot body with electrical tape, crossed my fingers that I'd have enough threads after modification (ARC charges $100 bucks for these!), and out came the dremel and the hand file. I filed off the ~1/4" cast on aluminum 'bushing' at the front of the pot, and about an hour later I had this...
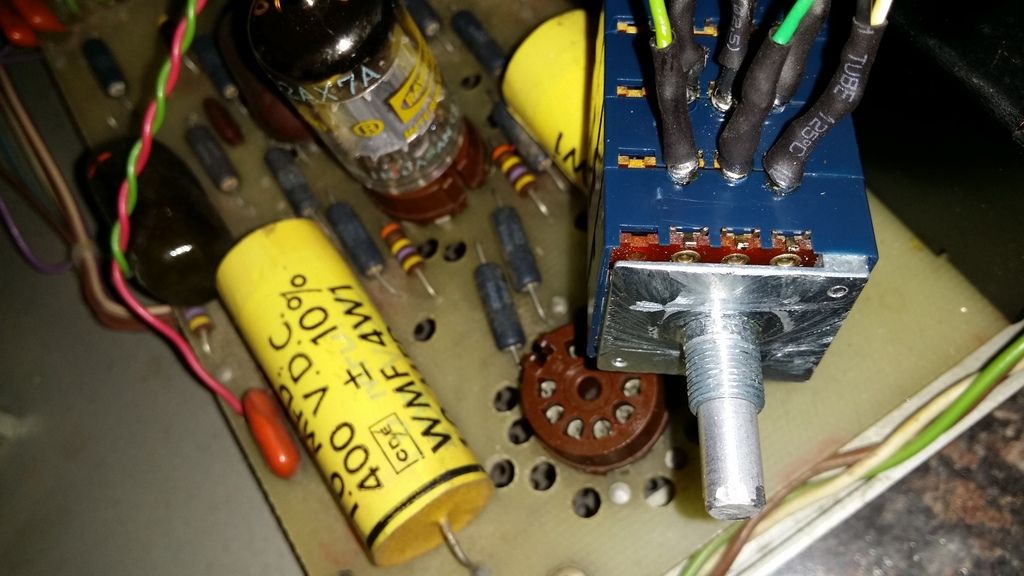
Okay, well maybe more than an hour later. As you can see, I'd already soldered it in in this photo. Had to check the old pot to see which pins were which - and they were all the same on the new one. So, in it went. The original pot had a 250k value - the replacement from ARC has a value of 100k ohms, but everything sounded good when I fired it up. Well sorta. When I switched it back on the first time, I had no source output. There was definitely volume control getting to my speakers when I turned the potentiometer up, and the balance was working. So I disconnected it, back on the counter it went and I took a look to make sure I hadn't inadvertently pulled a wire out somewhere. Nope - everything looked good. So I put it back in to my system and powered it up again. Nothing but a bit of hum at high volume levels. Then I noticed the center tube in the phono section wasn't aglow. I guess in futzing around with the switch, I must have hit that tube a bit harder than I should have. Shame too - it was a nice 'nos' GE long grey plate 12AX7. Bummer - live and learn. Turned it off, stuck in an nos Sylvania, powered it back up, and all is well. Better than well, actually! The volume control is now smooth as bumpy butter (40 bumps!).
However, now that the volume is working properly, I am noticing that the contour pot is intermittent in one channel. So this week, it's tracking down a linear Alps pot to replace that with. So here's a question for you all: the original is 250k ohms, is there any reason to stick with that value in the tone control circuit, or should 100k be okay? Many thanks in advance!
Future plans for this preamp include fabricating a reproduction of the ARC WC-1 walnut case using some highly figured solid walnut, and replacing the capacitors and all of the old zener diodes in the power supply. I will probably re-stuff the old can capacitors carefully to retain the stock look. I've already found some dual section 75uF caps that should work for C45 and C46...
So I found this guy after watching all of the usual places where such things are posted for sale, and I think I snapped it up about 30 minutes after it had been posted. Came with 8 pretty lively 'nos' tubes, although one has already bit the big one... the others look pretty good. I've ordered a sleeve of NOS Raytheons to fill up some of the less critical sockets. Looking for something special for V1 and V4. The faceplate is in nearly perfect condition, and there have been absolutely no modifications that I can see - bone stock. And grimy. This unit had definitely been owned by a smoker at some point - it has the brown, sticky, grungy residue all over everything inside. So I sat down with some deoxit and q-tips and paper towels, and I've cleaned part of the interior out. Still have most of the main board to go, but I've cleaned up the phono section pretty nicely. Here are some of the sellers shots from the ad.
It sounded pretty darn nice as it arrived. I took my Marantz 2250 out of preamp duty and plugged the phono in and routed the outputs through my Citation II, and man, did it sound nice. The seller had told me that the green pilot light was out - found some little replacements on fleapay. Easy replacement - just unscrew the lamp housing from the front right through the faceplace. Then I started playing with settings and controls. The seller said the pots had been cleaned - I don't buy it. Scratcy, scratchy, scratchy. So on the counter it went and the pots got a thorough cleaning with deoxit. While cleaning, I noticed that the volume pot had some funny behavior. I'd turn it and there was resistance from the front pot as there should be, but the back pot seemed to be 'slipping'. So I emailed the folks at ARC, and asked them about a replacement, and they sent out a new Alps blue that is custom manufactured for them. This pot has a very nice feel to it. It doesn't feel like a potentiometer at all, but more like a stepped attenuator. It has a series of steps as you rotate the shaft - 40 in all (yes, I counted them!). This is what the replacement looks like next to the original.
They really didn't give me too much info, but I though it would be a drop in replacement. I measured the resistance and found it to be (near) 100k - so that was okay. But, as you can see in the photo above, the threaded part of the replacement's shaft was quite a bit shorter. In fact it didn't even protrude past the face plate! So I covered all of the holes in the pot body with electrical tape, crossed my fingers that I'd have enough threads after modification (ARC charges $100 bucks for these!), and out came the dremel and the hand file. I filed off the ~1/4" cast on aluminum 'bushing' at the front of the pot, and about an hour later I had this...
Okay, well maybe more than an hour later. As you can see, I'd already soldered it in in this photo. Had to check the old pot to see which pins were which - and they were all the same on the new one. So, in it went. The original pot had a 250k value - the replacement from ARC has a value of 100k ohms, but everything sounded good when I fired it up. Well sorta. When I switched it back on the first time, I had no source output. There was definitely volume control getting to my speakers when I turned the potentiometer up, and the balance was working. So I disconnected it, back on the counter it went and I took a look to make sure I hadn't inadvertently pulled a wire out somewhere. Nope - everything looked good. So I put it back in to my system and powered it up again. Nothing but a bit of hum at high volume levels. Then I noticed the center tube in the phono section wasn't aglow. I guess in futzing around with the switch, I must have hit that tube a bit harder than I should have. Shame too - it was a nice 'nos' GE long grey plate 12AX7. Bummer - live and learn. Turned it off, stuck in an nos Sylvania, powered it back up, and all is well. Better than well, actually! The volume control is now smooth as bumpy butter (40 bumps!).
However, now that the volume is working properly, I am noticing that the contour pot is intermittent in one channel. So this week, it's tracking down a linear Alps pot to replace that with. So here's a question for you all: the original is 250k ohms, is there any reason to stick with that value in the tone control circuit, or should 100k be okay? Many thanks in advance!
Future plans for this preamp include fabricating a reproduction of the ARC WC-1 walnut case using some highly figured solid walnut, and replacing the capacitors and all of the old zener diodes in the power supply. I will probably re-stuff the old can capacitors carefully to retain the stock look. I've already found some dual section 75uF caps that should work for C45 and C46...
the original is 250k ohms, is there any reason to stick with that value in the tone control circuit, or should 100k be okay?
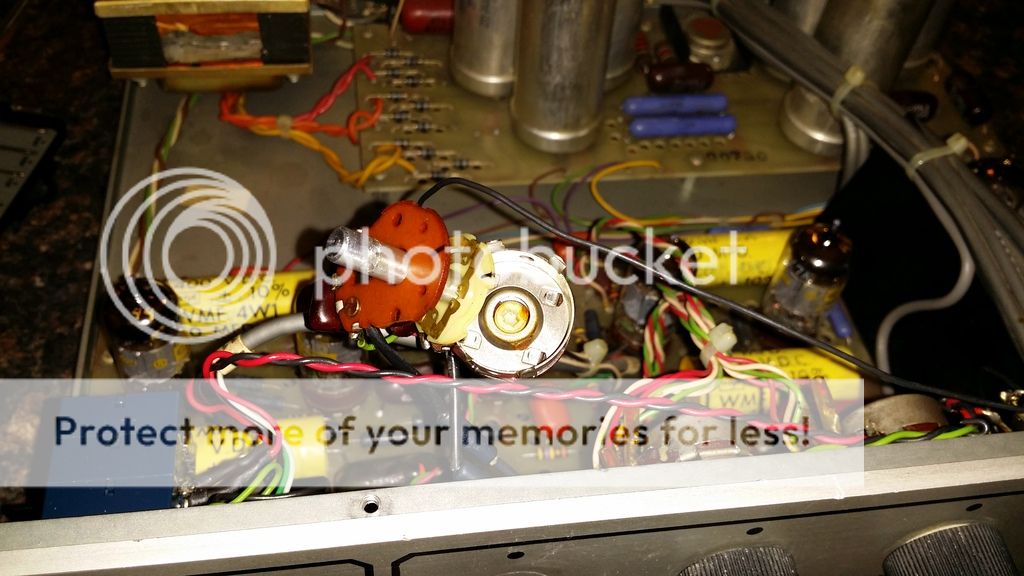
According to the schematic, the Contour pot is 500k, does the 250k pot look original?
The offending 500k ohm potentiometer
So just awhile ago, I decided to take apart the contour pot to see if a cleaning might save it. I figured I would document my efforts here in case anyone else ever needed to take apart one of these older Alps dual channel pots. It's pretty straight forward as long as you mark everything for reassembly. I was hoping that it was just grimy wipers and not damage to the carbon material that was effecting this pot. I took the knob, the nut and washer off and pushed the pot through to the inside of the preamp. Luckily there is enough wire so things don't have to be desoldered for cleaning - at least for this pot.
When you look at the pot from the front, there are four little tabs - bend these out of the way with a small screw driver.
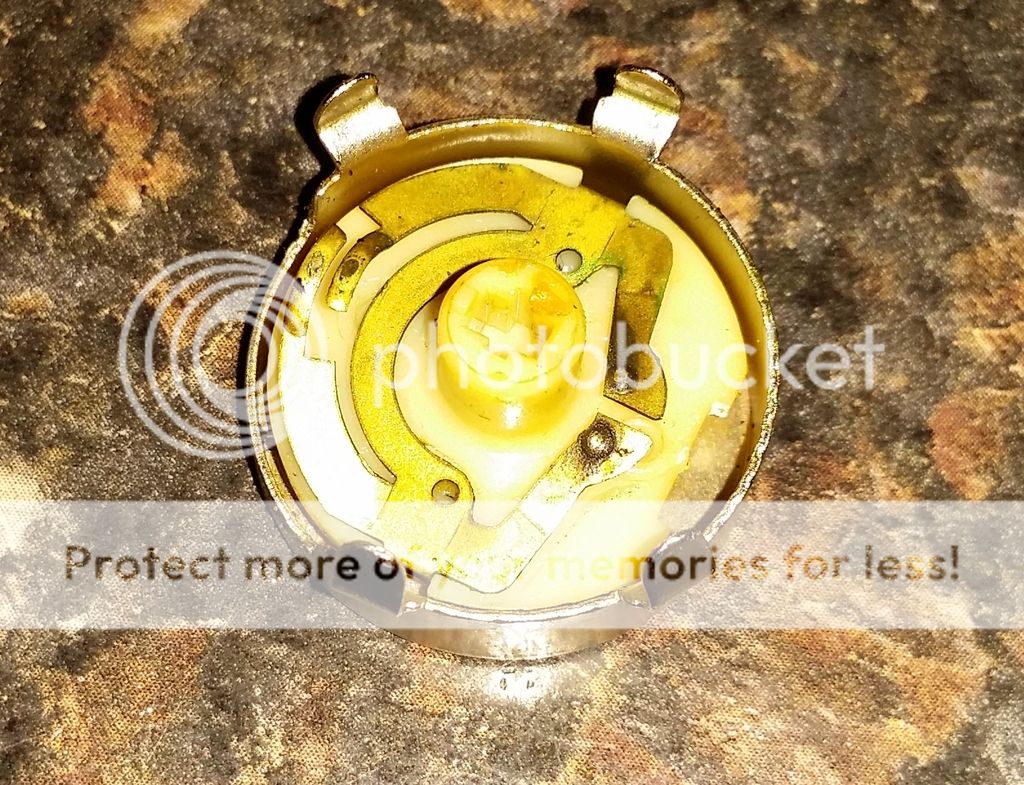
Then you can slide the front plate off of the shaft exposing the front resistance pad and the shaft/wiper assembly. The back pot is still completely assembled now. I took out the shaft and looked at the wipers - and they looked pretty good. Cleaned the wipers with a q-tip and some deoxit and set it aside. Here is what it looked like cleaned up. You can see the outer wipers in this pic.
Then I flipped the resistance pad over to see the condition of the carbon resistance coating. Yikes... See that brown? The carbon has nearly completely worn away from those spots. There is no saving this pot.
What the heck. I was already in here, so I decided to pull the back channel and see how it looked too. There are four tabs at the back of the rear of the front pot, bend these up and the rear pot assembly will slide off.
Then bend up the four corner tabs again, and you're inside. The wipers looked good on this one as well, but unfortunately, the resistance pad and the carbon trace was just as bad on the rear as it was on the front. I'm hoping I cleaned it up enough that I can continue to use it for the interim until I find a replacement that will work. It had been working in a few positions, so now I need to look for a replacement.
Q: Has anyone used the Alpha pots that Antique Electronic Supply sells for tone controls? They have a dual 500k (thanks Jazbo8) that looks like it might fit... Any suggestions other than the Alpha pots? I've been looking for an Alps pot, but I'm not sure which are real and which are Chinese. I've emailed ARC service - am hoping they will have a replacement part, as I was expecting I might have to replace. No word back yet.
So just awhile ago, I decided to take apart the contour pot to see if a cleaning might save it. I figured I would document my efforts here in case anyone else ever needed to take apart one of these older Alps dual channel pots. It's pretty straight forward as long as you mark everything for reassembly. I was hoping that it was just grimy wipers and not damage to the carbon material that was effecting this pot. I took the knob, the nut and washer off and pushed the pot through to the inside of the preamp. Luckily there is enough wire so things don't have to be desoldered for cleaning - at least for this pot.
When you look at the pot from the front, there are four little tabs - bend these out of the way with a small screw driver.
An externally hosted image should be here but it was not working when we last tested it.
Then you can slide the front plate off of the shaft exposing the front resistance pad and the shaft/wiper assembly. The back pot is still completely assembled now. I took out the shaft and looked at the wipers - and they looked pretty good. Cleaned the wipers with a q-tip and some deoxit and set it aside. Here is what it looked like cleaned up. You can see the outer wipers in this pic.
An externally hosted image should be here but it was not working when we last tested it.
Then I flipped the resistance pad over to see the condition of the carbon resistance coating. Yikes... See that brown? The carbon has nearly completely worn away from those spots. There is no saving this pot.
An externally hosted image should be here but it was not working when we last tested it.
What the heck. I was already in here, so I decided to pull the back channel and see how it looked too. There are four tabs at the back of the rear of the front pot, bend these up and the rear pot assembly will slide off.
An externally hosted image should be here but it was not working when we last tested it.
Then bend up the four corner tabs again, and you're inside. The wipers looked good on this one as well, but unfortunately, the resistance pad and the carbon trace was just as bad on the rear as it was on the front. I'm hoping I cleaned it up enough that I can continue to use it for the interim until I find a replacement that will work. It had been working in a few positions, so now I need to look for a replacement.
Q: Has anyone used the Alpha pots that Antique Electronic Supply sells for tone controls? They have a dual 500k (thanks Jazbo8) that looks like it might fit... Any suggestions other than the Alpha pots? I've been looking for an Alps pot, but I'm not sure which are real and which are Chinese. I've emailed ARC service - am hoping they will have a replacement part, as I was expecting I might have to replace. No word back yet.
Last edited:
According to the schematic, the Contour pot is 500k, does the 250k pot look original?
Woops, you're right. Damn - stupid mistake! Thanks for catching that before I started ordering things!
AR does have the replacement part for the tone control pots. The original part number of the 500k linear pots is 45017 - the replacements that AR currently offers are p/n 45500517, and the cost is $9.00 each. They should be here tomorrow - I'm curious if they're just Alpha pots, but we'll see.
How did your replacement tone control pots work out from ARC? I'd be interested to know as I also own a 3A-1.
The SP-3, regardless of which version,has one fatal flaw, the use of the 12AX7 in the line stage, it uses lots of feedback, and the output impedance is brutal in mating it with a solid state amplifier! The RCA tube manual has a very interesting line stage with tone controls using a 12AU7!
The SP-3, regardless of which version,has one fatal flaw, the use of the 12AX7 in the line stage, it uses lots of feedback, and the output impedance is brutal in mating it with a solid state amplifier! The RCA tube manual has a very interesting line stage with tone controls using a 12AU7!
@jcoll good stuff and thank you for the info and the pictures too. It always helps to see pics. I've got a SP3A and made it into a 1. I did a Danish stepped attenuator for it similar to yours but had to drill and file out the face plate as the attenuator was metric and wouldn't fit. Also had to add resistance to the output of the pre amp to the tune of 1Meg per channel.
I'd like to upgrade the balance pot and work the contour a little bit.
But maybe denny's changes might work w/o changing out the above.
@denny, as you are the knowledgeable one on this would you be kind enough to share the information with us?
Also, did you mod your sp-3 to use the 12AU7 and how did that go?
Cheers,
Sync
Last edited:
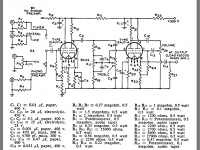
As far as I haven't owned an SP-3 but if I had a choice, and could find one for a reasonable price, I would get one, and do the mods I spoke of, one would have to make a new PC board to use the 12AU7's. I've done some simulations on the Phono stage, and with just a few component changes in the eq. It really is a great phono stage, It's my understanding that when David Wilson, aka Wilson Audio, began making recordings, He simply took an SP-3 and bypassed the RIAA and used it as a microphone pre. Anyway shown below is the schematic from the RCA manual. One could probably substitute a 12BH7 which I believe is a much better tube, and a dropping resistor to bring down the 440VDC B+
Attachments
Last edited:
That is interesting Denny, when you did the simulations which components and values did you find were best for the 12Au7s?
Then, what were your findings if you used the 12BH7?
Is the actual layout of the board for the 12Au7, that different than the 12AX7s that we couldn't use the board any longer?
Then, what were your findings if you used the 12BH7?
Is the actual layout of the board for the 12Au7, that different than the 12AX7s that we couldn't use the board any longer?
Finally getting around to doing some more work on this preamp.
The $9 pots from ARC worked out just fine. I replaced the contour an bass pots and all controls work perfectly now.
I've decided that it's time to take care of the electrolytics in the P/S next. There are 6 big electrolytics that need replacement. C29 and C30 are dual section 1500uf 50V caps, C43 and C44 are 300uf 300V, and C45 and C46 are dual 75uf 375V caps.
Subs are pretty easy for C45&46 - I'm going to order 2 of the dual section JJ 100uf 400V caps.
But figuring out what to use for the others has me thinking too much. I don't want to deviate too much from the original values, and I've found some Nichicon KG 1500uf 50V caps that I will probably end up re-stuffing the original C29&30 cans with. Is it worth it to go higher in capacitance here (as long as the new caps will fit in the old cans)?
The 300uf 300V caps are proving difficult to find in something that will fit inside of the original cans. Anyone have any ideas for these? Have been looking at Panasonic TS-HC 330uf 350V, but they're ~1.2" in diameter and getting close to the width of the original cans (1 3/8"). I *think* they'll fit, but it'll be close. As an added benefit with these - they're higher temp 105C caps.
Anything else I should be thinking about?
For anyone who might be doing work on an SP-3-A1, there is a guy who put together a couple of very informative, quite thorough videos detailing the restoration and repair process on a poorly modified example. The videos are really thorough and quite long and he details everything he does and why.
https://www.youtube.com/watch?v=91BYfKl03-k
I sourced a lot of my parts by listening to where he got his parts from. Really great video. I should have all of the parts to do my power supply over this weekend.
https://www.youtube.com/watch?v=91BYfKl03-k
I sourced a lot of my parts by listening to where he got his parts from. Really great video. I should have all of the parts to do my power supply over this weekend.
Last edited:
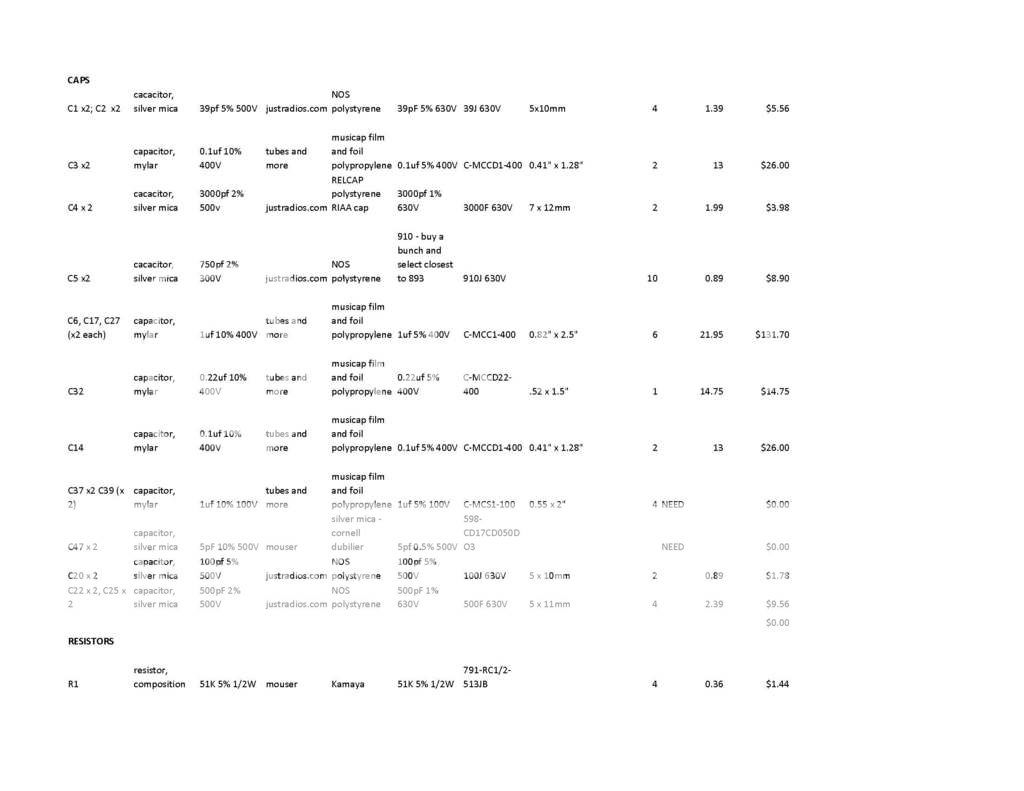
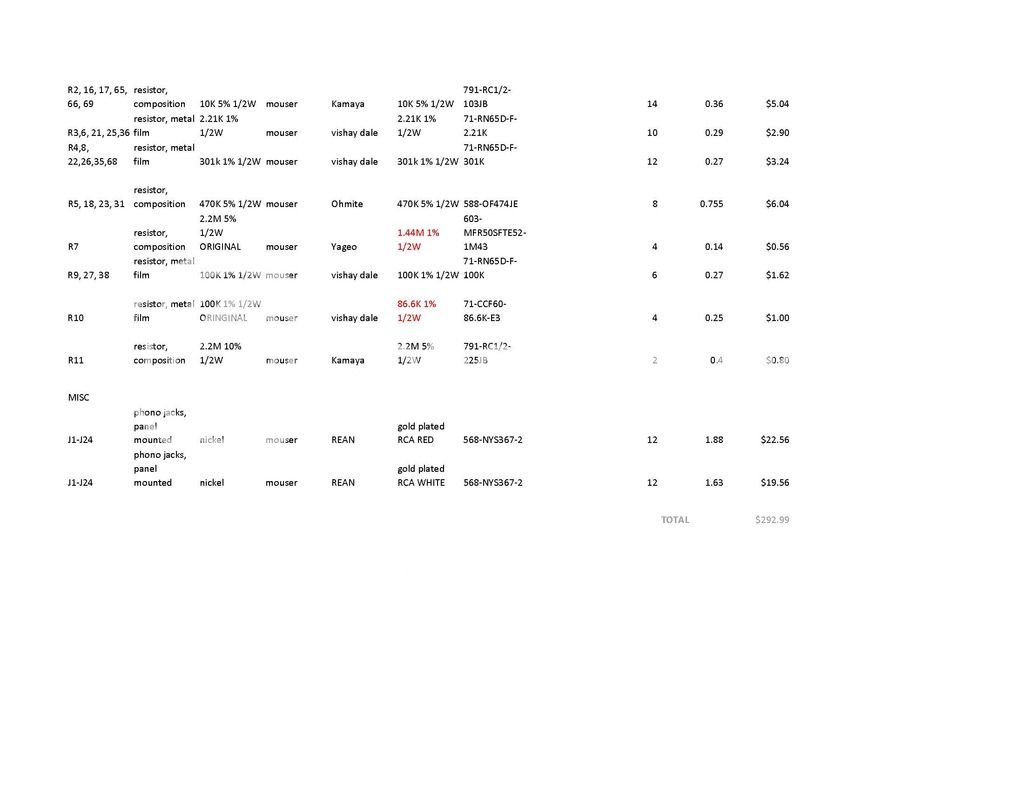
I've now rebuilt the entire power supply, most of the phono section and bits of the rest of the board. The BOM that I've used is very similar to the parts used in the youtube video linked above. The bill of materials for the power supply is below.
After I rebuilt the PS, I plugged it in and powered it up and the tubes failed to start up - so I immediately powered it off, rechecked cap polarity, and found I hadn't connected the negatives together when replacing C29 and C30 - they went from dual section 1500uf 50V to 2 individual caps replacing each of the cans. The original cans had the positives in the middle and 4 negatives around the edges of the can. I had the polarity right with the 2 positives where they should be and the 2 negatives where they should be, but didn't tie the two negatives together. Fixed that up, and it powered right up. I do think that it sounded a little quieter. I checked the capacitors later on, and there were 2 sections that were dead - like completely lacking any output dead. Makes me wonder how it was running!
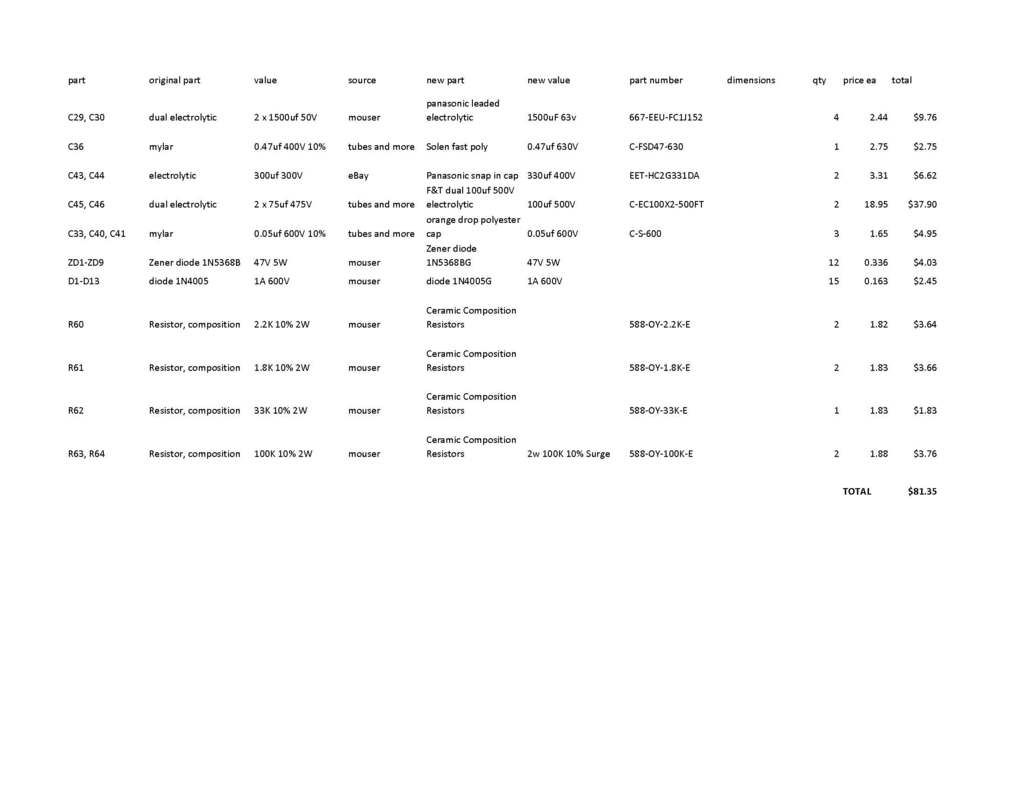
After I rebuilt the PS, I plugged it in and powered it up and the tubes failed to start up - so I immediately powered it off, rechecked cap polarity, and found I hadn't connected the negatives together when replacing C29 and C30 - they went from dual section 1500uf 50V to 2 individual caps replacing each of the cans. The original cans had the positives in the middle and 4 negatives around the edges of the can. I had the polarity right with the 2 positives where they should be and the 2 negatives where they should be, but didn't tie the two negatives together. Fixed that up, and it powered right up. I do think that it sounded a little quieter. I checked the capacitors later on, and there were 2 sections that were dead - like completely lacking any output dead. Makes me wonder how it was running!
Phono section
All I play through my system is vinyl - that's it. So I wanted the phono section as quiet as possible and I wanted to improve the RIAA eq based on Brian Clark's work on this and similar phono stages. I've only found snippets of that article online, but I have also found a few folks who have done the cap and resistor replacement on the RIAA part of the circuit in the SP-3A, and the values are given below:
R7 - original value -2.2M 5% 0.5W; new value - 1.44M 1% 0.5W
R10 - original value - 100K 1% 0.5W; new value - 86.6K 1% 0.5W
C5 - original value - 750pf 2% 300V (silver mica); new value - 893pf 630V (polystyrene)
C4 - original value - 3000pf 2% 500V; new value - same (but in polystyrene).
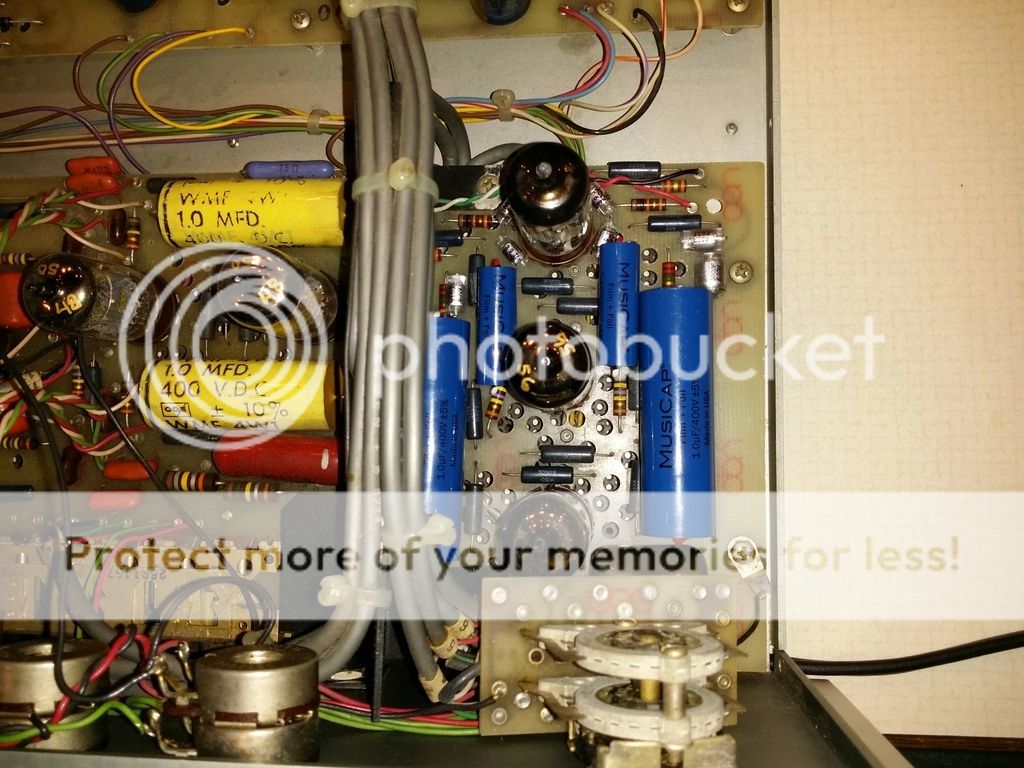
I also replaced all of the small value caps with polystyrenes, and the larger coupling caps with Musicaps. I wanted to go with Auricaps originally, but they have been discontinued and there really isn't a lot of user data on the new XO version yet. I decided on Musicaps because I saw some pretty good write ups and they are fairly affordable polypropylene and foil (not metallized poly). All of the silver micas I took out were within tolerance after 40 years! The one critical value I needed for the RIAA cap was 893pf, so I ordered 10 x 910pf caps and chose values closest to 893 - I ended up with one 886 and one 894. I still have to source 2 Musicaps 100V 1uf coupling caps to go in there - they are harder to find in stock at a decent price. I buttoned it all back up after just replacing the caps (resistor order doesn't get here until tomorrow), and powered it up and put on my first evaluation LP.
I have 3 LPs that I play more than most, and used these as evaluations of any sonic changes. 1) Cake's 'Pressure Chief', 2) Dave Brubeck's 'Time Out', and CCR's 'Chronicle'. After about 12 seconds of the first track on Pressure Chief - 'Wheels', I had to pick my jaw out of my lap. I though that there had to be something to the whole boutique cap craze, but I never expected that much of a change. The music was clearer, the lower notes and bass much cleaner and way more impactful. The stereo image seemed to be much more clearly defined, although I'm not sure this LP was recorded in such a way to allow that... Put on Brubeck and the difference was still in my face. The bass (instrument, not Hz) was stronger, more authoritative. The piano seemed mostly unchanged, but the piano on that recording is a bit dull on all of the tracks. But the sax - oh, my - the sax. The guitar work in Chronicle was better than I've ever heard it before, but the vocals were a bit harsher. The detail seemed better as well. I couldn't put my finger on it, but I thought there was maybe a bit more resolution too.
Then I put on side D of Moby's Play. Quieter backgrounds - probably from the PS recap. Nothing other than that struck me until 'The Sky Is Broken' came on. It was good, the vocals maybe a tiny bit harsher than I recall previously, but then I heard something I had never heard before - I heard Moby turning pages. Now, I'm not sure if this is additional resolution that I'm only now hearing for the first time, or if I'm listening more closely because I want there to be some difference. My first impressions having listened to this change for less than 3 hours is that there is certainly a fairly significant improvement in sound, and probably more resolution. The bit of harshness in the vocals is hopefully due to the caps needing to 'burn in'... I left the preamp on for about 5 hours this afternoon and I'm going to take another listen in a few. Will add some photos to this in a few days, along with an update BOM for the phono section. I'm pretty happy.
All I play through my system is vinyl - that's it. So I wanted the phono section as quiet as possible and I wanted to improve the RIAA eq based on Brian Clark's work on this and similar phono stages. I've only found snippets of that article online, but I have also found a few folks who have done the cap and resistor replacement on the RIAA part of the circuit in the SP-3A, and the values are given below:
R7 - original value -2.2M 5% 0.5W; new value - 1.44M 1% 0.5W
R10 - original value - 100K 1% 0.5W; new value - 86.6K 1% 0.5W
C5 - original value - 750pf 2% 300V (silver mica); new value - 893pf 630V (polystyrene)
C4 - original value - 3000pf 2% 500V; new value - same (but in polystyrene).
I also replaced all of the small value caps with polystyrenes, and the larger coupling caps with Musicaps. I wanted to go with Auricaps originally, but they have been discontinued and there really isn't a lot of user data on the new XO version yet. I decided on Musicaps because I saw some pretty good write ups and they are fairly affordable polypropylene and foil (not metallized poly). All of the silver micas I took out were within tolerance after 40 years! The one critical value I needed for the RIAA cap was 893pf, so I ordered 10 x 910pf caps and chose values closest to 893 - I ended up with one 886 and one 894. I still have to source 2 Musicaps 100V 1uf coupling caps to go in there - they are harder to find in stock at a decent price. I buttoned it all back up after just replacing the caps (resistor order doesn't get here until tomorrow), and powered it up and put on my first evaluation LP.
I have 3 LPs that I play more than most, and used these as evaluations of any sonic changes. 1) Cake's 'Pressure Chief', 2) Dave Brubeck's 'Time Out', and CCR's 'Chronicle'. After about 12 seconds of the first track on Pressure Chief - 'Wheels', I had to pick my jaw out of my lap. I though that there had to be something to the whole boutique cap craze, but I never expected that much of a change. The music was clearer, the lower notes and bass much cleaner and way more impactful. The stereo image seemed to be much more clearly defined, although I'm not sure this LP was recorded in such a way to allow that... Put on Brubeck and the difference was still in my face. The bass (instrument, not Hz) was stronger, more authoritative. The piano seemed mostly unchanged, but the piano on that recording is a bit dull on all of the tracks. But the sax - oh, my - the sax. The guitar work in Chronicle was better than I've ever heard it before, but the vocals were a bit harsher. The detail seemed better as well. I couldn't put my finger on it, but I thought there was maybe a bit more resolution too.
Then I put on side D of Moby's Play. Quieter backgrounds - probably from the PS recap. Nothing other than that struck me until 'The Sky Is Broken' came on. It was good, the vocals maybe a tiny bit harsher than I recall previously, but then I heard something I had never heard before - I heard Moby turning pages. Now, I'm not sure if this is additional resolution that I'm only now hearing for the first time, or if I'm listening more closely because I want there to be some difference. My first impressions having listened to this change for less than 3 hours is that there is certainly a fairly significant improvement in sound, and probably more resolution. The bit of harshness in the vocals is hopefully due to the caps needing to 'burn in'... I left the preamp on for about 5 hours this afternoon and I'm going to take another listen in a few. Will add some photos to this in a few days, along with an update BOM for the phono section. I'm pretty happy.
Amp boards/phono section bill o f materials.
Listened to Jeff Buckley's 'Grace' and I was astounded with the difference.
Then I listened to Band of Horses 'Everything All the Time' and I was equally astounded, but with how bad it sounded. That had always been one of my favorite albums, and folks had told me that they thought it was poorly recorded, or poorly mixed - and I didn't believe them - it sounded pretty good to me, maybe a bit echoey. But it sounds quite flat now. I still have not installed the new value resistors in the phono section yet, so perhaps the slight increase in capacitance there was enough to throw off the RIAA EQ enough for my ear to pick up on it? I don't know, but that was the first album that did not sound significantly better with the new caps in the phono section only.. The rest of the coupling caps come in later in the week.
An externally hosted image should be here but it was not working when we last tested it.
An externally hosted image should be here but it was not working when we last tested it.
Listened to Jeff Buckley's 'Grace' and I was astounded with the difference.
Then I listened to Band of Horses 'Everything All the Time' and I was equally astounded, but with how bad it sounded. That had always been one of my favorite albums, and folks had told me that they thought it was poorly recorded, or poorly mixed - and I didn't believe them - it sounded pretty good to me, maybe a bit echoey. But it sounds quite flat now. I still have not installed the new value resistors in the phono section yet, so perhaps the slight increase in capacitance there was enough to throw off the RIAA EQ enough for my ear to pick up on it? I don't know, but that was the first album that did not sound significantly better with the new caps in the phono section only.. The rest of the coupling caps come in later in the week.
Last edited:

An externally hosted image should be here but it was not working when we last tested it.
Finally some photos. I've done a bit more work tonight, starting on the phono section resistors - got about half of them replaced tonight, will probably do the other half of the phono section tomorrow and then give it another listen. Here's a comparison of the size of the new Musicaps to the original Cornell Dubilier caps. So far, the silver micas have been nearly perfect. Some of the old carbon comps were off a bit - some a bit more than tolerance, and the 1% metal films were very close to original spec. But, this amp will be my daily driver until I snuff it, so the rebuild is to make sure I get things before they ever have a chance to go bad. So I don't have to worry down the road, I suppose. Giving the boards a good thorough cleaning on the topside as I replace things, and will clean the traces after I have the work on the underside done. What do you'all use for a flux remover? I'm going to use what I have before - isopropyl and a stiff brush. But I'm always open to try something better...
An externally hosted image should be here but it was not working when we last tested it.
Last edited:
Does anyone have an original Audio Research SP-3 walnut case? In the next week or two, I'd like to put one together, but I would like to the dimensions from the original instead of just kind of making it look 'right'. All I need is the length and width of one of the side boards and the width of the top board - I can figure out the dado depths on my own.
I did a couple ARC upgrades for a friend a long time back. I do remember on one preamp there was a cheap op-amp in the power supply. It might have been an SP-6 tho. Anyway, if the SP-3 has an op-amp in the regulated supply it might be worthwhile to change it out. It did make a difference.
Phil
Phil
if the SP-3 has an op-amp in the regulated supply it might be worthwhile to change it out.
No op amp, just a Zener string buffered with a Delco emitter follower.
- Status
- Not open for further replies.
- Home
- Amplifiers
- Tubes / Valves
- My Audio Research SP-3-A1 Restoration and Questions Documentation