what about the rpi.gpio library?
could it be installed by default, so that when we upgrade moode version, we'd just have to put the scripts there and they will just work? I mean for buttons etc
could it be installed by default, so that when we upgrade moode version, we'd just have to put the scripts there and they will just work? I mean for buttons etc
Hi Tim,
Here's another 'feature' request. Would it be possible to update shairport-sync to the latest version (2.4) and compile it with these additional options: --with-stdout --with-configfile
I currently have it running, and it works fine at least from commandline. Many nice updates in the recent versions including config file similarly to mpd.conf.
The resason for the stdout is to pipe raw pcm data to ecasound
Hi,
I can do that 🙂
Send email to tim at moodeaudio dot org so I can send u a 2.4 test release to try out, might be a week or two.
Regards,
Tim
Hi,Hi Tim,
you already mentioned that showing the bitrate is on your to-do-list.
Question from my side is if this will also be shown in the "Library" once an album has been clicked on.
Maybe below the tracks and running time information?
And maybe it would also be possible to add the genre of the chosen album there, too?
In another row or maybe next the bitrate information?
Just a thought.
Cheers,
M.
The challenge with showing bit rates on the Browse and Library panels is that MPD does not maintain a "bitrate" tag in its tag cache (database). This means that some other API has to be used to extract the bit rate from a song files as they are being loaded into the Browse or Library panels. Not sure how or whether it can be done.
Once the song or radio station starts play back, the decode bit rate is available from MPD via the "status" command, and the output bit rate is available by querying ALSA. This is what is shown on the Audio Info popup.
Regards,
Tim
Hi,
Successful build of Mike Brady's wonderfully improved shairport-sync version 2.4 🙂
root@moode:~# /usr/local/bin/shairport-sync --version
2.4-openssl-Avahi-ALSA-stdout-soxr-metadata
Regards,
Tim
Successful build of Mike Brady's wonderfully improved shairport-sync version 2.4 🙂
root@moode:~# /usr/local/bin/shairport-sync --version
2.4-openssl-Avahi-ALSA-stdout-soxr-metadata
Regards,
Tim
Hi,
Successful build of Mike Brady's wonderfully improved shairport-sync version 2.4 🙂
root@moode:~# /usr/local/bin/shairport-sync --version
2.4-openssl-Avahi-ALSA-stdout-soxr-metadata
Regards,
Tim
Nice!!!! 😀 This will open up some good new stuff for the future
what about the rpi.gpio library?
could it be installed by default, so that when we upgrade moode version, we'd just have to put the scripts there and they will just work? I mean for buttons etc
Hi,
What is rpi-gpio being used for?
Moode has WiringPi GPIO if that can be of use.
Regards,
Tim
oh well, I missed that. Yes wiringpi is more than enough!
rpi gpio is a python module that enable access to gpio pins, used to make python scripts handle gpio pins e.g. shutdown button etc
IIRC wiringpi do mainly the same thing, except wiringpi is much more powerful.
Long time since I've used wiring pi, I'll have to read about it.
BTW I think I tried all the available players for the pi... Moode as today is in pole position 😉 good job. Curious about moode 3!
Last edited:
Alright, Tim.Hi,
The challenge with showing bit rates on the Browse and Library panels is that MPD does not maintain a "bitrate" tag in its tag cache (database). This means that some other API has to be used to extract the bit rate from a song files as they are being loaded into the Browse or Library panels. Not sure how or whether it can be done.
Once the song or radio station starts play back, the decode bit rate is available from MPD via the "status" command, and the output bit rate is available by querying ALSA. This is what is shown on the Audio Info popup.
Regards,
Tim
Maybe it will be possible in the future ;-)
Guys,
Following situation: i continued with a song from my playlist this morning where i stopped last evening and once the last song was played from the same album it stopped.
A new album wasn't played.
So i did the following without any luck:
- refresh
- reboot (didn't connect anymore) therefore i powered off the Pi and restarted it
- add &play some new Songs from the "browse" page
- deleted the whole playlist and added new songs
- again reboot.
As i said no succces so far. The playing time is always 0:00, doesn't matter if i Click on another song. Songs won't be played anymore.
I had this situation before but if i recall correctly i "solved" it with a reboot an a deleted playlist.
But not this time.
Anybody else faced this? Any tip what i can do?
Radios
A little late but there is the ZIP file.
Hi,
Yes please zip up the Absoluteradio pls files, and also the French and Belgian stations. If the zip is small just email to tim at moodeaudio dot org, otherwise email me a download link.
Logo is not so easy to configure because it requires entry in a sqlite database table. This will b easier in future release 🙂 but if you have logos for these stations, send them in the zip and I'll make the table for u.
Btw, filename of the logo is same as the filename of the pls. The logos that come with Moode are located in "/var/www/images/webradio-logos"
Regards,
Tim
A little late but there is the ZIP file.
Attachments
A little late but there is the ZIP file.
Hi,
Many thanks! Looks like a really nice set of radio stations and logos. I'll include them in release 2.4 🙂
Regards,
Tim
Guys,
Following situation: i continued with a song from my playlist this morning where i stopped last evening and once the last song was played from the same album it stopped.
A new album wasn't played.
As i said no succces so far. The playing time is always 0:00, doesn't matter if i Click on another song. Songs won't be played anymore.
I had this situation before but if i recall correctly i "solved" it with a reboot an a deleted playlist.
But not this time.
Anybody else faced this? Any tip what i can do?
Update mpd database....this fixes it for me.
Thanks drone7,
but didn't work for me.
Odd, I've been having the same problem using ncmpcpp as the client.
When I run 'u' for the database update it clears the 'frozen' items from the current playlist and all is then sweetness and sounds.
Last edited:
Guys,
Following situation: i continued with a song from my playlist this morning where i stopped last evening and once the last song was played from the same album it stopped.
A new album wasn't played.
So i did the following without any luck:
- refresh
- reboot (didn't connect anymore) therefore i powered off the Pi and restarted it
- add &play some new Songs from the "browse" page
- deleted the whole playlist and added new songs
- again reboot.
As i said no succces so far. The playing time is always 0:00, doesn't matter if i Click on another song. Songs won't be played anymore.
I had this situation before but if i recall correctly i "solved" it with a reboot an a deleted playlist.
But not this time.
Anybody else faced this? Any tip what i can do?
I had this when I used an USB card reader with a large sdcard to store music on. After reboot, the card reader would sometimes be mounted with a different name, preventing Moode from finding the files.
To fix your issue, try to rebuild the library with <menu> -> configure -> sources -> click 'Update MPD DB', wait for the process to complete. Now the playlist is empty, add the songs again and try playing.
Hope this helps
Rob
Tried that too, Rob.I had this when I used an USB card reader with a large sdcard to store music on. After reboot, the card reader would sometimes be mounted with a different name, preventing Moode from finding the files.
To fix your issue, try to rebuild the library with <menu> -> configure -> sources -> click 'Update MPD DB', wait for the process to complete. Now the playlist is empty, add the songs again and try playing.
Hope this helps
Rob
But again no success. Once I click on a song the remaining playing time is still shown as 0:00.
Guess there is no way than format the SD card and write the image again.
Tried that too, Rob.
But again no success. Once I click on a song the remaining playing time is still shown as 0:00.
Guess there is no way than format the SD card and write the image again.
Hi,
In troubleshooting the reletivly rare "UI behaving really oddly" issue for users, it appears to be due to corrupted SD Card. Suggest swapping cards.
After u re-image SD Card and configure Moode, I would suggest applying the "MPD excessive logging" patch described in the following post:
http://www.diyaudio.com/forums/pc-based/271811-moode-audio-player-raspberry-pi-66.html#post4453071
Regards,
Tim Curtis
Thanks Tim,
will check if the SD is corrupted but will try another one in addition, too.
I willl also give the patch a try. Will do that tomorrow.
In case this kind of issue will occur again I´ll - definitely - let you know ;-)
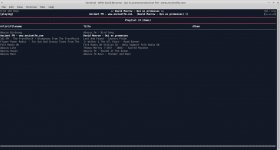
Local display and control.
“Mechanics Radio” (with apologies to Warren Zevon)
I live at the bottom of the world in a rural valley with a radio reception problem.
I spend my working day listening to webradio on my PiB running MoOde.
I don't have the time or clean enough hands to be hauling out my phone (or tablet) to change stations, and the workshop is too dusty to want to run a laptop in.
I just want to bash on an old keyboard.
Hit a key, change the station, back to work with all the MoOde goodness!.
Until recently I have used the Pi, with a playlist of favourite stations preloaded, and a keyboard to type mpc commands to navigate. It works, but multiple keystrokes are needed,use is very basic, and there's no visual feedback.
A remote could be nice but I still can't get one configured and there's only so much a remote can do.
So I installed ncmpcpp on the Pi as a local client and connected a monitor. Problem solved !
It's not pretty but it does most of the basics, and then some, including creating playlists, database updates, file searches and if you only want to run from local attached drives without any network it will do that too. Additionally single keystrokes do most navigation and control tasks.
Installation is pretty simple (and, as I know less than zip about programming and code, is reasonably well documented.)
I have put together a very simple guide, for anyone as ignorant about computing as I am, to get the local display running.
Along the way I did find out how to get a reliable connection to an Android device to use as a local Pi-screen substitute.That was a lot trickier but may have uses, perhaps to ssh in or for a screen in an appliance.
Tested Local Display options for MoOde using ncmpcpp for music playback and file navigation.
Download and setup MoOde ….
Set preferences for time zone, audio device and driver, volume control, and configuration for NAS, sources, radios. Then expand the filesystem.
Option A) Monitor connected to the Pi Hdmi port and a usb keyboard.
Option B) Usb tethered Android Phone or Tablet with on-screen keyboard.(and/or bluetooth keyboard)
Option A) Firstly, if you have a monitor with Hdmi input then you're good to go, just connect it to the Pi's Hdmi out and skip to step 3
Otherwise some set-up is needed...
1) If your monitor is Dvi input you will need a cheap Hdmi-Dvi adaptor.
If it is Vga then look for a not so cheap Hdmi-Vga adaptor like this....
Universal HDMI to VGA Adapter Kit with Audio | Belkin Business
For both Dvi and Vga you will have to change the bootconfig.txt file in Moode to get useable output.
2) From another computer, on the same network as the running Pi, open a terminal and..
(password=moode)
and change the line hdmi_drive=2 to read hdmi_drive=1
save and exit (Ctrl+o...enter...Ctrl+x)
reboot with
Your Pi will reboot and there will now be output on the attached display.
3) From a computer, on the same network as the running Pi, open a terminal and..
(password=moode)
then run...
when that completes reboot with shutdown -r now
4) When your Pi has finished booting run..
This will use the default configurations for ncmpcpp but you can easily change them to suit your colour and use preferences... you might want to run with the default a couple of times until you are used to how ncmpcpp behaves before customising it. So skip to step 5.
or
When you are ready to customise ...
From another computer, on the same network as the running Pi, open a terminal and..
(password=raspberry)
here you can copy and paste ncmpcpp configurations you have found and like...(Google will find several sites.)
Edit out anything to do with mpd or ports as all you want here are the display configurations. (MoOde has the others covered by default)
Here is an example of mine you can copy and paste to get the idea of the sorts of changes that work. Give it a try and observe what is different from the default. Then modify it to suit.
save and exit (Ctrl+o...enter...Ctrl+x)
This config is useful if you use playlists with several radio streams. It displays each station name as well as song title and artist. It also displays bitrate, volume setting, elapsed time, and a progress bar.
(it doesn't display lyrics, bouncing balls, music visualisers or fresh-fried fruit salad.. things I can happily live without.)
Some items are duplicated in the headers but that, so far, is the only way I could get Radio stations and tracks from usb drives to all display consistent information. Feel free to tidy it up and if you do let me know what you did.
5) Once ncmpcpp starts use 1 (or F1) to bring up the keyboard menu and start exploring.
At any time hit s for stop and q for quit . After quitting you can restart with...
ncmpcpp
When you want to shutdown the Pi then s to stop ncmpcpp and q to quit.
You will see a prompt at the bottom of the screen and type....
and wait a few minutes until your Pi has well and truly shutdown before unplugging it.
OptionB) From another computer, on the same network as the running Pi, open a terminal and..
password=moode
and add
save and exit (Ctrl+o...enter...Ctrl+x)
exit the ssh session.
Now,ncmpcpp, when used from a connected Hdmi screen and keyboard, opens and finds the custom config file in pi/.
However,for some strange reason,when opening from an ssh session ncmpcpp needs to find the config file in the users home directory otherwise it defaults to it's own (some would say..'less than sweet') configuration.
User pi does not have a home directory so we need to make one and write the config there.
(password=raspberry)
and copy the sample file from step 4 above.
save and exit (Ctrl+o...enter...Ctrl+x)
sudo shutdown -h now
and wait a few minutes until your Pi has well and truly shutdown before switching it off.
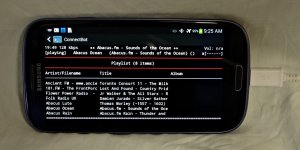
Meanwhile on your Android device go to the Google Play Store and download and install ConnectBot
https://play.google.com/store/apps/details?id=org.connectbot&hl=en
(there is a fork called VX Connectbot some users prefer but Connectbot works fine for me and seems to be more recently updated)
then install Hackers keyboard..
https://play.google.com/store/apps/details?id=org.pocketworkstation.pckeyboard&hl=en
On the Android device go to settings=> language and input and enable the Hackers keyboard then go to it's settings where you want to enable 5 row keyboard (for portrait and landscape modes to give access to the scroll arrow keys) .
Open Connectbot and go to settings
Select 'on' for 'Volume keys change font size' , 'Remember keys in memory','Rotation mode Automatic', and 'Persist connections'
Think about whether you want the display to be always on or for it to sleep, and select your preference.
Connect a powered USB hub to your Pi..
Without this your Android device will draw too much current causing the Pi to randomly drop connection and other odd behaviours. This was the case with my PiB.
I haven't tried a Pi2 but if your experience is other than totally smooth then suspect the power supply and use a powered hub.
Connect the Android phone/tablet via a usb cable to the usb hub.
You might want to turn off wifi, Bluetooth, and phone services too.
Perhaps even activate airplane mode, particularly if you don't want to be disturbed while listening..
(I have an old Galaxy S3 with no sim so it is permanently in airplane mode and kept for tasks just like this)
If you want to use a Bluetooth keyboard to control ncmpcpp instead of the onscreen one reactivate Bluetooth and pair it now.
Now power the Pi and on and wait until it has booted.
On the Android device go to settings=>networks=>more networks and activate usb tethering.
Open Connectbot on your android device and type...
pi@192.168.42.42
then hit enter.....
Wait for the password prompt and enter..
raspberry
Once connected run....
ncmpcpp
and there it is...
If you have a bluetooth keyboard you will find navigation much easier and can use Connectbot fullscreen. The device's onscreen keyboard will be reset to the stock qwerty version.
One problem I found is that despite initially configuring the interface with <allow-hotplug usb0> the connection does not come back up when hotplugged (auto usb0 only works at boot).
To fix this ssh into pi@moode
and add packages...
when that completes reboot, with your Android device attached...
Activate usb tethering and open Connectbot on your android device and type..
pi@192.168.42.42
then hit enter.....
Wait for the password prompt and enter..
raspberry
Once connected run ncmpcpp, set up a playlist and start playing.
Now hit q to quit ncmpcpp (mpd should continue in the background playing your selections)
and 'disconnect' Connectbot using it's own menu.
De-select usb tethering on the Android device then, and only then, unplug the usb cable from your Android device.
You can now use your Android device for other purposes and your playlist will continue until it is exhausted.
When you are ready to make changes or create a new playlist... plug the usb cable back into the Android device and activate usb tethering.
Here is a small problem I have not yet found a way around. You need to bring the usb network interface up from the Pi before you can reconnect... you will have to have a usb keyboard attached to the Pi for this one command (anyone solving this please post the fix, thanks)
On a usb connected keyboard type...
and hit enter.
Now open Connectbot and reconnect using the stored login.
Type your password at the prompt and when you're connected run ncmpcpp to return to the player. Done.
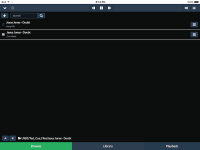
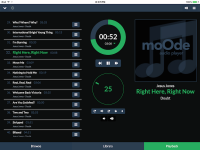
Because ncmpcpp is just another client for MoOde it can be run in conjunction with, and mirroring to, other clients.
If your Pi is network connected and you run ncmpcpp on it locally you can, at the same time, be running the full MoOde interface somewhere else, on your smart-phone, and on a laptop, and on a desktop, and be running ncmpcc from an ssh session on other laptops/desktops and any selections/changes made in any instance will be mirrored in all other instances.
Or you just might be out in the workshop with no network whatsoever, a usb flashdrive full of your favourite tunes, and controlling MoOde with ncmpcpp and a keyboard. Enjoy.
“Mechanics Radio” (with apologies to Warren Zevon)
I live at the bottom of the world in a rural valley with a radio reception problem.
I spend my working day listening to webradio on my PiB running MoOde.
I don't have the time or clean enough hands to be hauling out my phone (or tablet) to change stations, and the workshop is too dusty to want to run a laptop in.
I just want to bash on an old keyboard.
Hit a key, change the station, back to work with all the MoOde goodness!.
Until recently I have used the Pi, with a playlist of favourite stations preloaded, and a keyboard to type mpc commands to navigate. It works, but multiple keystrokes are needed,use is very basic, and there's no visual feedback.
A remote could be nice but I still can't get one configured and there's only so much a remote can do.
So I installed ncmpcpp on the Pi as a local client and connected a monitor. Problem solved !
It's not pretty but it does most of the basics, and then some, including creating playlists, database updates, file searches and if you only want to run from local attached drives without any network it will do that too. Additionally single keystrokes do most navigation and control tasks.
Installation is pretty simple (and, as I know less than zip about programming and code, is reasonably well documented.)
I have put together a very simple guide, for anyone as ignorant about computing as I am, to get the local display running.
Along the way I did find out how to get a reliable connection to an Android device to use as a local Pi-screen substitute.That was a lot trickier but may have uses, perhaps to ssh in or for a screen in an appliance.
Tested Local Display options for MoOde using ncmpcpp for music playback and file navigation.
Download and setup MoOde ….
Set preferences for time zone, audio device and driver, volume control, and configuration for NAS, sources, radios. Then expand the filesystem.
Option A) Monitor connected to the Pi Hdmi port and a usb keyboard.
Option B) Usb tethered Android Phone or Tablet with on-screen keyboard.(and/or bluetooth keyboard)
Option A) Firstly, if you have a monitor with Hdmi input then you're good to go, just connect it to the Pi's Hdmi out and skip to step 3
Otherwise some set-up is needed...
1) If your monitor is Dvi input you will need a cheap Hdmi-Dvi adaptor.
If it is Vga then look for a not so cheap Hdmi-Vga adaptor like this....
Universal HDMI to VGA Adapter Kit with Audio | Belkin Business
For both Dvi and Vga you will have to change the bootconfig.txt file in Moode to get useable output.
2) From another computer, on the same network as the running Pi, open a terminal and..
Code:
ssh root@moode
Code:
nano /bootconfig.txtsave and exit (Ctrl+o...enter...Ctrl+x)
reboot with
Code:
shutdown -r now3) From a computer, on the same network as the running Pi, open a terminal and..
Code:
ssh root@moodethen run...
Code:
apt-get update
apt-get install ncmpcpp4) When your Pi has finished booting run..
Code:
ncmpcppThis will use the default configurations for ncmpcpp but you can easily change them to suit your colour and use preferences... you might want to run with the default a couple of times until you are used to how ncmpcpp behaves before customising it. So skip to step 5.
or
When you are ready to customise ...
From another computer, on the same network as the running Pi, open a terminal and..
Code:
ssh pi@moode
Code:
sudo mkdir  /.ncmpcpp
sudo touch  /.ncmpcpp/config
sudo nano /.ncmpcpp/configEdit out anything to do with mpd or ports as all you want here are the display configurations. (MoOde has the others covered by default)
Here is an example of mine you can copy and paste to get the idea of the sorts of changes that work. Give it a try and observe what is different from the default. Then modify it to suit.
Code:
user_interface = "alternative"
alternative_header_first_line_format ="$b$8«« {%a}|{%t} »»$9$/b"
alternative_header_second_line_format ="$b$8 {%b}|{%f}  {%b} ({%t}) ({%y})$9$/b"
song_columns_list_format = "(30)[white]{a|f} (40)[white]{tE} (30)[white]{bE}"
#song_columns_list_format = "(6f)[white]{l} (25)[white]{a} (40)[white]{t|f} (30)[white]{b}"
now_playing_prefix = "$b"
now_playing_suffix = "$/b"
playlist_display_mode = "columns" (classic/columns)
autocenter_mode = "yes"
centered_cursor = "no"
ignore_leading_the = "yes"

song_status_format = "$8%a $7- $3%t $7- $4%b {(Disc %d) }$7($5%y$7)"
progressbar_look = ">=="
progressbar_boldness = "yes"

playlist_show_remaining_time = "no"
titles_visibility = "yes"
statusbar_visibility = "yes"
jump_to_now_playing_song_at_start = "yes"
browser_playlist_prefix = "$2plist »$9 "
browser_display_mode = "columns" (classic/columns)
 cyclic_scrolling = "yes"
song_window_title_format = "MPD: {%a > }{%t}{ [%b{ Disc %d}]}|{%f}"
search_engine_display_mode = "columns" (classic/columns)
display_remaining_time = "no"
display_screens_numbers_on_start = "yes"
display_bitrate = "yes"
clock_display_seconds = "yes"
ignore_leading_the = "yes"
colors_enabled = "yes"
alternative_ui_separator_color = "red"
discard_colors_if_item_is_selected = "yes"
header_window_color = "white"
volume_color = "white"
state_line_color = "white"
state_flags_color = "white"
main_window_color = "white"
color1 = "default"
color2 = "green"
main_window_highlight_color = "yellow"
progressbar_color = "white"
statusbar_color = "green
save and exit (Ctrl+o...enter...Ctrl+x)
This config is useful if you use playlists with several radio streams. It displays each station name as well as song title and artist. It also displays bitrate, volume setting, elapsed time, and a progress bar.
(it doesn't display lyrics, bouncing balls, music visualisers or fresh-fried fruit salad.. things I can happily live without.)
Some items are duplicated in the headers but that, so far, is the only way I could get Radio stations and tracks from usb drives to all display consistent information. Feel free to tidy it up and if you do let me know what you did.
5) Once ncmpcpp starts use 1 (or F1) to bring up the keyboard menu and start exploring.
At any time hit s for stop and q for quit . After quitting you can restart with...
ncmpcpp
When you want to shutdown the Pi then s to stop ncmpcpp and q to quit.
You will see a prompt at the bottom of the screen and type....
Code:
sudo shutdown -h nowOptionB) From another computer, on the same network as the running Pi, open a terminal and..
Code:
ssh root@moode
Code:
nano /etc/network/interfaces
Code:
allow-hotplug usb0
auto usb0
iface usb0 inet static
        address 192.168.42.42
        netmask 255.255.255.0
        network 192.168.42.0
        broadcast 192.168.42.255
save and exit (Ctrl+o...enter...Ctrl+x)
exit the ssh session.
Now,ncmpcpp, when used from a connected Hdmi screen and keyboard, opens and finds the custom config file in pi/.
However,for some strange reason,when opening from an ssh session ncmpcpp needs to find the config file in the users home directory otherwise it defaults to it's own (some would say..'less than sweet') configuration.
User pi does not have a home directory so we need to make one and write the config there.
Code:
ssh pi@moode
Code:
sudo mkdir /home
 sudo mkdir ~/.ncmpcpp
 sudo touch ~/.ncmpcpp/config
 sudo nano ~/.ncmpcpp/config
and copy the sample file from step 4 above.
save and exit (Ctrl+o...enter...Ctrl+x)
sudo shutdown -h now
and wait a few minutes until your Pi has well and truly shutdown before switching it off.
Meanwhile on your Android device go to the Google Play Store and download and install ConnectBot
https://play.google.com/store/apps/details?id=org.connectbot&hl=en
(there is a fork called VX Connectbot some users prefer but Connectbot works fine for me and seems to be more recently updated)
then install Hackers keyboard..
https://play.google.com/store/apps/details?id=org.pocketworkstation.pckeyboard&hl=en
On the Android device go to settings=> language and input and enable the Hackers keyboard then go to it's settings where you want to enable 5 row keyboard (for portrait and landscape modes to give access to the scroll arrow keys) .
Open Connectbot and go to settings
Select 'on' for 'Volume keys change font size' , 'Remember keys in memory','Rotation mode Automatic', and 'Persist connections'
Think about whether you want the display to be always on or for it to sleep, and select your preference.
Connect a powered USB hub to your Pi..
Without this your Android device will draw too much current causing the Pi to randomly drop connection and other odd behaviours. This was the case with my PiB.
I haven't tried a Pi2 but if your experience is other than totally smooth then suspect the power supply and use a powered hub.
Connect the Android phone/tablet via a usb cable to the usb hub.
You might want to turn off wifi, Bluetooth, and phone services too.
Perhaps even activate airplane mode, particularly if you don't want to be disturbed while listening..
(I have an old Galaxy S3 with no sim so it is permanently in airplane mode and kept for tasks just like this)
If you want to use a Bluetooth keyboard to control ncmpcpp instead of the onscreen one reactivate Bluetooth and pair it now.
Now power the Pi and on and wait until it has booted.
On the Android device go to settings=>networks=>more networks and activate usb tethering.
Open Connectbot on your android device and type...
pi@192.168.42.42
then hit enter.....
Wait for the password prompt and enter..
raspberry
Once connected run....
ncmpcpp
and there it is...
If you have a bluetooth keyboard you will find navigation much easier and can use Connectbot fullscreen. The device's onscreen keyboard will be reset to the stock qwerty version.
One problem I found is that despite initially configuring the interface with <allow-hotplug usb0> the connection does not come back up when hotplugged (auto usb0 only works at boot).
To fix this ssh into pi@moode
and add packages...
Code:
sudo apt-get update
sudo apt-get install mode-switchActivate usb tethering and open Connectbot on your android device and type..
pi@192.168.42.42
then hit enter.....
Wait for the password prompt and enter..
raspberry
Once connected run ncmpcpp, set up a playlist and start playing.
Now hit q to quit ncmpcpp (mpd should continue in the background playing your selections)
and 'disconnect' Connectbot using it's own menu.
De-select usb tethering on the Android device then, and only then, unplug the usb cable from your Android device.
You can now use your Android device for other purposes and your playlist will continue until it is exhausted.
When you are ready to make changes or create a new playlist... plug the usb cable back into the Android device and activate usb tethering.
Here is a small problem I have not yet found a way around. You need to bring the usb network interface up from the Pi before you can reconnect... you will have to have a usb keyboard attached to the Pi for this one command (anyone solving this please post the fix, thanks)
On a usb connected keyboard type...
Code:
sudo /etc/init.d/networking restartNow open Connectbot and reconnect using the stored login.
Type your password at the prompt and when you're connected run ncmpcpp to return to the player. Done.
Because ncmpcpp is just another client for MoOde it can be run in conjunction with, and mirroring to, other clients.
If your Pi is network connected and you run ncmpcpp on it locally you can, at the same time, be running the full MoOde interface somewhere else, on your smart-phone, and on a laptop, and on a desktop, and be running ncmpcc from an ssh session on other laptops/desktops and any selections/changes made in any instance will be mirrored in all other instances.
Or you just might be out in the workshop with no network whatsoever, a usb flashdrive full of your favourite tunes, and controlling MoOde with ncmpcpp and a keyboard. Enjoy.
Attachments
Last edited:
- Home
- Source & Line
- PC Based
- Moode Audio Player for Raspberry Pi