I saw a post about the Modushop charge for making a CAD file. I think the price is very reasonable considering a graphics programmer is probably making it. You can also make your own CAD file and only pay for the machining. I recall that they will accept three different types of CAD file formats. They have made two custom back plates for me and they arrived dimensionally and visually perfect.
I saw a post about the Modushop charge for making a CAD file. I think the price is very reasonable considering a graphics programmer is probably making it.
Exactly. Some people have this strange idea that others should perform skilled work for them for free. I've never quite understood that. My auto mechanic doesn't work for free. My doctor doesn't work for free. My plumber doesn't work for free. Why should I work for free?
I actually see that in quite a few contexts. I'm a bit curious where the expectation of free labour comes from.
I should probably also note that many do have a good grasp of reality and are more than willing to pay for work performed as long as they get quality work in return.
Tom
CHINA? Their cases and shipping are, in many instances, more than Modushop and don't give one the flexibility. I think they are expensive considering the source.
Last edited:
Exactly. Some people have this strange idea that others should perform skilled work for them for free. I've never quite understood that. My auto mechanic doesn't work for free. My doctor doesn't work for free. My plumber doesn't work for free. Why should I work for free?
I actually see that in quite a few contexts. I'm a bit curious where the expectation of free labour comes from.
I should probably also note that many do have a good grasp of reality and are more than willing to pay for work performed as long as they get quality work in return.
Tom
Indeed. Tom and I have discussed this before. Some strange phenomenon here in diyaudio.com where you are supposed to get something for nothing. As if the buyer is 'entitled' to a discount just because you are a boutique manufacturer...
Best,
Anand.
If you expect others to value your time and skills you should also value theirs. It's really a pretty basic concept.
I think it's a bias that converting a drawing to a CAD file isn't tangible work therefore shouldn't cost money. To adapt a meme of skilled labor: It's 50¢ for doing the mouse button clicking. It's another $40 for knowing where to click.
why isn't it tangible? The drawing is just that, a drawing. The CAD file drives the machine tools.
Yeah, but the buyer doesn't see it that way. "It's only two holes. They can just drill those by hand. It'll take, like, two minutes for them to do. It should be free!" They don't realize that someone needs to grab a blank, insert it in the milling machine, ensure that it is true to the mill, code the hole locations into the CAD tool, run the CNC, and clean up the mess. I'd be hard pressed to do that in an hour. I'm sure the pros are faster than I am, but they still can't do this in zero time. $40 or 35 Euro is pretty cheap given the kind of work and amount of time involved.
Re. China: It is truly remarkable the circuit boards that come out of there. In some cases I can't even ship a board across town for the cost, including shipping, of one of the assembled boards from China. You've gotta wonder what you're really getting. It can also be enlightening to compare the 1k volume pricing on the chips used with the sales price of the boards.
Tom
CHINA? Their cases and shipping are, in many instances, more than Modushop and don't give one the flexibility. I think they are expensive considering the source.
That's precisely why I now point people to ModuShop. Lower cost, better product.
The BZ4309 I bought on eBay was pretty decent. Some of the holes should have been de-burred from the manufacturer and everything was coated in cutting fluid. Not the end of the world, but my next purchase will be from ModuShop.
Tom
Continuing this aside, I do wonder if it's a similar thing to feeling nickel and dimed by airlines for this or that fee. But, yes, absolutely, people deserve to earn money for their work.
my mod 86 build
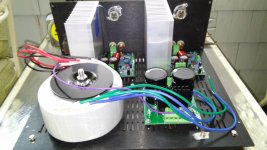
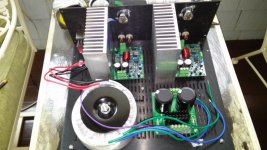
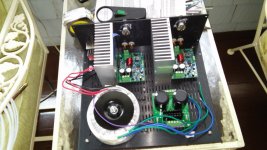
Here are some pics of my partial build. I'm posting this as a heads-up.
I bought a Modushop case with fully ventilated top and bottom covers, because I'm using internal heatsinks, and wanted the most airflow. These covers have many openings, hence they are quite flexible.
Once all components were attached to the bottom cover it sagged, near the center, from the weight. I added a fifth foot near the center and that solved the problem when it is resting on all five rubber feet
However, when lifting it by the sides, the center sags down about 1/4", near the center, over the 12" width. I doubt that is good for the boards so I'm screwing an 11" long piece of metal to the inside of the bottom cover. It will run from side to side across the center to eliminate the sagging. I will also be screwing small L brackets from the bottom cover to the front and back panels at the mid-point and these won't be visible.
I believe this has nothing to do with Modushop quality. If I bought the standard covers, with just one group of ventilation slots, I probably wouldn't be writing this.
Attachments
Nice job Henry! It's often necessary to reinforce the bottom panel, but the ventilation is important.
Continuing this aside, I do wonder if it's a similar thing to feeling nickel and dimed by airlines for this or that fee. But, yes, absolutely, people deserve to earn money for their work.
There's definitely some consumer psychology there. I have the same beef with MiniDSP. Spend $500 on a DSP ... but to use it you have to buy a $10 piece of software. Seriously?! The funny thing is that had they made their software available for free and charged $510 for the DSP, I would have been okay with it. I suspect I'm not alone in this.
I much prefer AP's business model. You can download their excellent software from their website and play with it. It even runs in a demo mode without the hardware. You basically get noise, but you can try all the functions in the software. Of course, the software is practically useless without their hardware and they do charge for the hardware!
Tom
Here are some pics of my partial build.
Nice work Mr. Henry.
Once all components were attached to the bottom cover it sagged, near the center, from the weight. I added a fifth foot near the center and that solved the problem when it is resting on all five rubber feet
However, when lifting it by the sides, the center sags down about 1/4", near the center, over the 12" width.
Dang! Is the bottom panel steel or aluminum? I'm guessing the latter.
You could use the heat sinks as stiffeners. Just drill a couple of holes into the 10 mm thick heat spreader portion of it and tap for some M3 machine screws. A piece of aluminum L or U channel will stiffen up the chassis quite nicely as well without blocking too many of the ventilation holes.
Tom
I find the best approach to obtaining a thin and consistent coating of heat sink compound and keeping that gooey stuff off my fingers is by using a latex glove. Get a small dab of compound on your gloved fingertip, the wipe the compound on a paper towel until you have a thin layer left on the gloved fingertip. It is then very easy to evenly wipe the compound onto the mating surface of the chip in a very thin and consistent layer without having gooey streamers hanging off.
As I have been told and it makes sense: putting a full thin layer of thermal grease on a component is a sure way to get air pockets. The right way to do it is to place a small blob in the middle of the component and squeeze it till it comes out from all sides. Then clean off, if needed, the residue that came out.
Yes.As I have been told and it makes sense: putting a full thin layer of thermal grease on a component is a sure way to get air pockets. The right way to do it is to place a small blob in the middle of the component and squeeze it till it comes out from all sides. Then clean off, if needed, the residue that came out.
Capilliary action helps as well.
I also increase the bolt fixing tension in steps as I rotate the device, to and fro, under that pressure.
This wipes the excess paste out from the middle towards the edges and to the corners.
If possible one is looking for a paste thickness that allows metal to "hard surface" contact on all the high spots and the valleys completely full of paste, not air.
Panel sag
Its aluminum. Each heatsink is drilled and tapped two places, for 6-32 screws, in the 10mm wide area. That will add some stiffness, however, the transformer is the primary cause. I plan to use some square channel Al I have for the crosswise brace. Its blockage will be negligible and away from the heatsinks.
If any sagging remains I will use 1/4" X 1/4" L brackets at the center, near the bottom edges, of the front and back panels to secure the bottom panel to them. All very easy to do and the combination of the crosswise brace and front and back L brackets should completely eliminate the sag.
Henry
Dang! Is the bottom panel steel or aluminum? I'm guessing the latter.
You could use the heat sinks as stiffeners. Just drill a couple of holes into the 10 mm thick heat spreader portion of it and tap for some M3 machine screws. A piece of aluminum L or U channel will stiffen up the chassis quite nicely as well without blocking too many of the ventilation holes.
Tom
Its aluminum. Each heatsink is drilled and tapped two places, for 6-32 screws, in the 10mm wide area. That will add some stiffness, however, the transformer is the primary cause. I plan to use some square channel Al I have for the crosswise brace. Its blockage will be negligible and away from the heatsinks.
If any sagging remains I will use 1/4" X 1/4" L brackets at the center, near the bottom edges, of the front and back panels to secure the bottom panel to them. All very easy to do and the combination of the crosswise brace and front and back L brackets should completely eliminate the sag.
Henry
I plan to use some square channel Al I have for the crosswise brace. Its blockage will be negligible and away from the heatsinks.
If any sagging remains I will use 1/4" X 1/4" L brackets at the center, near the bottom edges, of the front and back panels to secure the bottom panel to them. All very easy to do and the combination of the crosswise brace and front and back L brackets should completely eliminate the sag.
Sounds like a plan.
Tom
I got some IC socket connectors as part of the Mouser order. I've never used them before ( but that's not surprising as I dont have that much Hi fi DIY experience) so would be interested in the views of those with more experience re the pros and cons of using them.
Experienced builders won't see any benefit from using IC sockets. Some beginner builders take a bit too long to complete a solder joint, so they do risk overheating the IC when they solder them in. The risk is small but there nonetheless. The sockets avoid having to solder directly on the IC leads, except on the TO-99 version of the LME49710 as there's no socket for that. The sockets also allow for piecewise debugging as one can unplug the DC servo and the THAT1200. The drawback of the sockets is that it is possible to have one or more pins of the ICs miss the socket and just fold up under the IC package as the IC is inserted. That has generated a few support emails. 🙂 It's easy to fix once you've spotted the error, though.
I'll leave it up to you whether you want to use sockets or not. If you're confident that you can get the ICs populated on the board in the correct orientation and solder them without applying too much heat, go ahead and put the ICs directly into the board. Do beware that if you ever have to remove the ICs, you're in for quite a bit of work. It's usually easier to cut the leads and desolder each lead than it is to try to save the IC.
I've built the MOD86 both with and without sockets. The circuit performs well either way.
Tom
- Home
- Amplifiers
- Chip Amps
- Modulus-86 build thread