I would expect the UHP-750 to be fine. Mean Well recommends a sizeable aluminum plate (3 mm thick) in the data sheet. Granted, they also assume one power supply per plate, so I wouldn't expect your supplies to be able to deliver the full output current continuously.
Thankfully they won't have to. The crest factor of music will ensure that the supplies only have to deliver a relatively small fraction of the max output current even if the amp is driven to clipping.
Another trick that you can employ to get more mileage out of the power supplies is to run the two channels in opposite phase. Invert the phase on the input and the output of one channel. That'll balance the load on the power supplies.
Tom
Newbie question: is the 2 in the denominator of your formula because it's a BTL setup? Normally, we just do V^2/R for power, right?BTL gives you twice the output swing for the same rail voltage. So the math should be P = (2*Vs)^2/(2R). That works out to 72^2/8 = 648 W into 4 Ω for a ±36 V power supply.
The LM3886 can't swing all the way to the supply rail, so you're probably looking at more like 60^2/8 = 450 W into 4 Ω at hard clipping. I measure 360 W into 4 Ω at <0.1% THD+N. If I rated the amp at 10% THD+N like many other manufacturers I could claim 400+ W into 4 Ω.
Tom
P = V^2/R if V is an RMS or DC voltage.
For a sine wave, the RMS voltage is the peak voltage divided by sqrt(2). Since the peak output voltage (Vp) is generally pretty close to the power supply voltage (Vs), I often calculate the power from the peak voltage. So:
P = V_RMS^2/R; V_RMS = Vp/sqrt(2)
<--> P = (Vp/sqrt(2))^2/R <--> P = (Vp^2/sqrt(2)^2)/R <--> P = (Vp^2/2)/R <--> P = Vp^2/(2R)
Then assuming zero saturation voltage in the output stage (which is a stretch, but allows for quick math): Vp = Vs
--> P = Vs^2/2R
Or if you want more precision: Vp = Vs-Vsat
--> P = (Vs-Vsat)^2/2R
Similarly, P = I^2*R if I is an RMS or DC current. I'll leave it as an exercise for you to show that P = Ip^2 * R/2 when Ip is the peak amplitude of a sine wave current. This equation can be handy if you're trying to determine the amount of power in Class A or whether the output power is current limited or voltage limited.
Tom
Last edited:


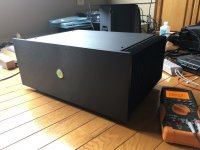
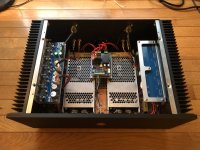
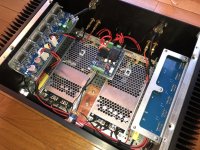
I FINALLY got around to finishing my build. Two Modulus-686 boards in a Deluxe 4U chassis with heatsinks CNC drilled/tapped to my custom spec to mount the boards and a thermal cutoff switch on both sides. The Modulus-686 boards are powered by dual Meanwell UHP-750-36 power supplies. Unfortunately, the idle current draw of both Mod-686 was JUST below the threshold required to keep the power supplies out of "frequency skipping" mode, so I had to add a couple of ballast resistors to keep the supplies awake. No big deal - it works out to only a couple of watts.
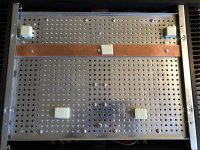
I had to do some tweaks to help dissipate the heat from the bottom plate to the outer chassis better. I added a copper bar to couple the bottom plate to the front panel, and some thermal gap filler pads on the bottom to couple it to the outer bottom cover. With these mods, the power supplies sit at around 40C after idling for an hour, and the resistors get to about 45C. Interestingly, the power supplies don't really get any hotter when the amp is under load. My guess is that they're really inefficient at idle, and much more efficient under load.
Power is controlled by an ISS module, with 65C thermal shutoff switches in series with the power switch.
Attachments


After having several friends recommend it, I've just ordered the parts for a dual mono Modulus-686 build.
I've built eight other amps before this, primarily based upon Avondale boards, including stereo NCC200 amps, dual mono NCC220/QUDOS, QUDOS Voyagers, NCC300 dual monos and monos, and a "FrankenAmp" with a bunch of spare bits including the salvaged NAPA boards from my upgraded Naim NAP110.
For this Modulus-686 build, I'm sticking primarily with Neurochrome's own modules, along with a Dissipante 3U/400 case, two AnTek 400VA 22-0-22VAC transformers, and various connectors. I'll keep you updated as I progress.
Cool - same here and I will also post up results. If you need rectifier diodes for Power686 from STMicroElectronics try the STBR3008WY it’s the only one that seems to be in stock anywhere…After having several friends recommend it, I've just ordered the parts for a dual mono Modulus-686 build.
I've built eight other amps before this, primarily based upon Avondale boards, including stereo NCC200 amps, dual mono NCC220/QUDOS, QUDOS Voyagers, NCC300 dual monos and monos, and a "FrankenAmp" with a bunch of spare bits including the salvaged NAPA boards from my upgraded Naim NAP110.
For this Modulus-686 build, I'm sticking primarily with Neurochrome's own modules, along with a Dissipante 3U/400 case, two AnTek 400VA 22-0-22VAC transformers, and various connectors. I'll keep you updated as I progress.
Nice build! I'm considering including an RCA input alongside the XLR, as you've done. I'm trying to figure out how you have everything connected, especially with that switch involved. Can you provide any further specifics?Here's a few pictures of the completed build. I have tested a few sine wave in unbalanced mode, from 10Hz to 120KHz with 1V and everything is clean. Square wave stays pretty sharp until a little over 20KHz but I'm guessing the power supply is probably the issue and using balanced signal it would be better also.
View attachment 735566View attachment 735567View attachment 735568View attachment 735569View attachment 735570
I also tested with some music on my test speaker (very cheap speaker). This week will be connected to my main system.
All the best!
Do
Mike
I've received the package from Tom, with everything appearing safe and sound. Here's my tentative layout:

I think this layout allows for enough space around the various connection points to make wiring a straightforward task.
The last amp I built for him had a big DPDT rocker switch to toggle between power inputs, but this time I've decided to alternate by swapping the wires internally. It's less holes to cut, and fewer connections inline. Both the powerCON and IEC plug use the same size Fast-on spades, so swapping two connectors is a simple task. The earths for both will be connected permanently to the chassis.
Any thoughts or concerns?
Mike
I think this layout allows for enough space around the various connection points to make wiring a straightforward task.
- As you can see, it's a dual mono, with a shared Neurochrome Intelligent Soft Start module and Power-686 boards. The input power will run straight along the bottom of the case to the ISS, with a pushbutton switch front and center to control it.
- I'm using a Modushop Dissipante 3U/400mm case, so the heatsinks should handle it. My mains often drift as high as 125VAC, so I'm using 400VA 2x22VAC AnTek transformers, just in case. The transformers are stand-ins, as I wait for the AnTek (which might be a bit smaller).
- I haven't decided yet whether to include thermal switches to shut off the amp at 65°C.
- I considered using a single Guardian-686 module, but decided that It would be easier for the layout if I had the two smaller Guardian-86 boards.
- Neutrik NC3FD-LX-B XLRs are on order, so I used RCAs to hold their spot.
- After discussing it with Tom, I'll likely forego optional RCA inputs, but that could change if I determine a "good" way to do it.
The last amp I built for him had a big DPDT rocker switch to toggle between power inputs, but this time I've decided to alternate by swapping the wires internally. It's less holes to cut, and fewer connections inline. Both the powerCON and IEC plug use the same size Fast-on spades, so swapping two connectors is a simple task. The earths for both will be connected permanently to the chassis.
Any thoughts or concerns?
Mike
Take Tom's advice and just make a pseudo balanced cable to use with anything that has an RCA plug.After discussing it with Tom, I'll likely forego optional RCA inputs, but that could change if I determine a "good" way to do it.
Yeah, that's my current plan. I just ordered some Mogami 3173 cable and Neutrik XLR and RCA connectors to do that (as well as build some interconnects between my Benchmark DAC2 and the Modulus-686).Take Tom's advice and just make a pseudo balanced cable to use with anything that has an RCA plug.
You could put the Guardian-86 above the Modulus-686 on the heat sink. That's what I do in my (ongoing) MOD686 build. It makes for a nice and compact module.
Tom
Tom
I hadn't considered that, so I'll ponder it. Tapping holes is much more work than drilling holes, so I tend to prefer using the bottom or back plates.You could put the Guardian-86 above the Modulus-686 on the heat sink. That's what I do in my (ongoing) MOD686 build. It makes for a nice and compact module.
Tom
Yeah, but it makes wiring more of a hassle. I drill press and a tapping block makes quick work of tapping heat sinks. It is more work, I'll give you that. 🙂
Either way is good. You could possibly also squeeze it in on the rear panel.
BTW: Are you planning for both Neutrik PowerCon and IEC mains inlets? That seems like a peculiar choice. Be careful you don't end up with energized IEC power pins if you do that. Or is it a 4-pole speakON in the middle and 2-pole speakON on each side? The blue collar on one connector has be thrown off.
BTW II: If you don't need/like the LEDs on the Power-686, just solder a short piece of wire across the LED terminals on the bottom of the board. Or connect the two terminals in the plug with a short wire staple.
Tom
I'm planning to run two sets of speaker wires from the Guardian-86 board, one each to the speakON and binding posts (rather than going to the binding posts, then jumping to the speakON). Therefore, I'm trying to keep the G-86 board close to those output connectors. If I put it on the back panel, it could be difficult to fit a screwdriver in there horizontally. That's why the currently position (as shown in the photo) is the frontrunner. I'll ponder the path of the various cables thoroughly before making my final decision.Yeah, but it makes wiring more of a hassle. I drill press and a tapping block makes quick work of tapping heat sinks. It is more work, I'll give you that. 🙂
Either way is good. You could possibly also squeeze it in on the rear panel.
BTW: Are you planning for both Neutrik PowerCon and IEC mains inlets? That seems like a peculiar choice. Be careful you don't end up with energized IEC power pins if you do that. Or is it a 4-pole speakON in the middle and 2-pole speakON on each side? The blue collar on one connector has be thrown off.
BTW II: If you don't need/like the LEDs on the Power-686, just solder a short piece of wire across the LED terminals on the bottom of the board. Or connect the two terminals in the plug with a short wire staple.
Tom
Yes, I'm planning to include both powerCON and IEC C13 connectors for power input. As I tried to explain in my earlier message, internally the Live and Neutral lines will be connected to powerCON or IEC. (Earth will be permanently connected to both.) If I want to switch between them (only if I pass the amp on to my friend), I'll open the top panel and move the two Fast-on spades to the other power connector.
Thanks for the additional info regarding the LED on the Power-686 boards. I'll probably skip the LEDs, as they don't serve any purpose for me. I haven't had a chance to read the docs yet, but I believe your ISS can power the LED in my front panel switch.
Sorry if I missed the bit about the mains wiring. Sounds like you're on the right track.
You can skip the LEDs on the Power-686. Just make sure to connect the two terminals that's used for the LED. The LED is in series with the bleeder resistors on the board so without the LED (or a shorting staple) the bleeder won't be able to do its job.
The ISS does indeed provide both ON and STANDBY indication. It's intended for use with a two-pin bi-colour LED.
Tom
I decided to create some drilling templates to make my life easier. Tom provides one of the Modulus-686 itself, but I didn't spot any for the other components. I went ahead and wrote a little software program to create them, rather than using a drawing program. In case anyone's interested, here they are. Be sure to turn off scaling and double-sided printing.
The AnTek 400VA 22VAC transformers and XLR input connectors (Neutrik NC3FD-LX-B) arrived, and I think I've settled on the layout:

I'm going with Tom's suggestion: tapping a few more holes in the heatsinks to host the little Guardian-86 boards. (To make my tapping job easier, I decided to get a tap guide.) This location enables the speaker outputs in the middle of the Modulus-686 boards to run straight over to the sides, then into the speaker protectors. From there I can run two pairs of wires to the two speaker output connectors (Neutrik NL2MP speakONs and Keystone 4109 binding posts), which I've shifted to the outside of the back panel.
Given the distance between the two channels' speaker outputs, plus this being a dual-mono amp, I'm breaking my tradition of keeping the black binding posts toward the center of the amp. Instead, I'm configuring them as they seem to appear on all of my speakers, with the red post on the left. This also maintains orientation with the speakON connectors above them, so there's less chance of me accidentally swapping polarity.
The XLR signal inputs have shifted toward the center, for a fairly straight run back to the inputs on the amp boards. I'll be using Mogami 3173 cable, which I'm also using to build a set of interconnects to go between my Benchmark DAC2 and the new amp. I just received some Neutrik connectors for those (NC3MXX-B and NC3FXX-B). I'll also build a set of "psuedo-balanced" RCA-to-XLR cables, using Neutrik Profi phono plugs.
The only bit of assembly I've done so far is jumpering the Intelligent Soft Start for 120VAC and my toggling power switch with built-in LED. I'll try to squeeze some time in to continue before the weekend, but it may have to wait for that.
I'm a strong proponent of tapping blocks or tap guides. I made mine from a chunk of 1" thick aluminum flat bar that I happened to have kicking around.
Tom
Tom
- Home
- Vendor's Bazaar
- Modulus-686: 380W (4Ω); 220W (8Ω) Balanced Composite Power Amp with extremely low THD