Here's a little more break up taming attempts from start to finish:
Impulse:
start:
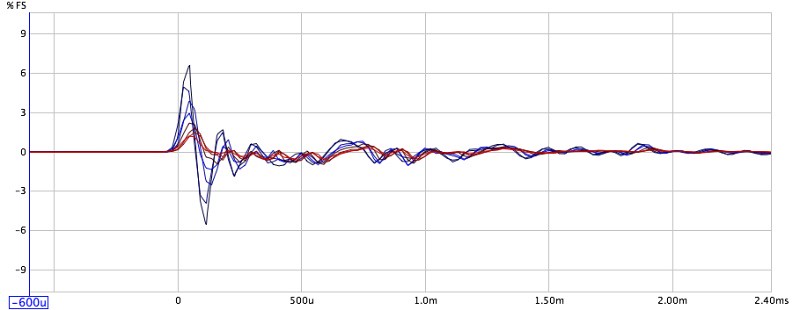
cone stiffened:
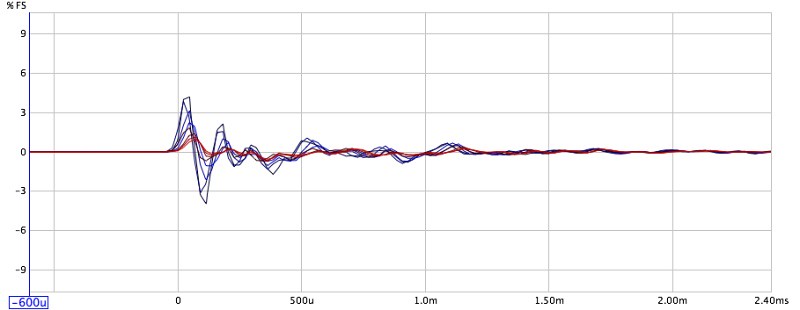
Damping compound added to surround:
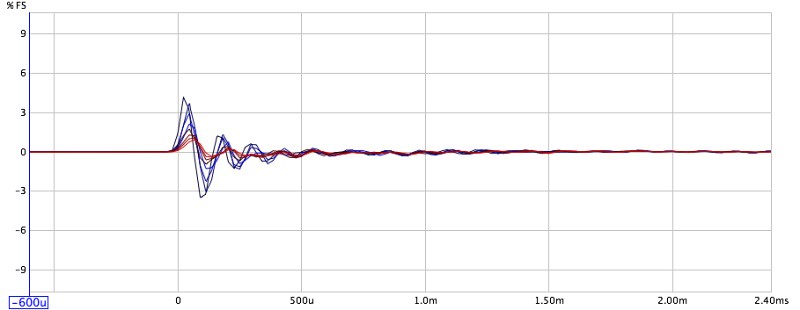
Corresponding polars:
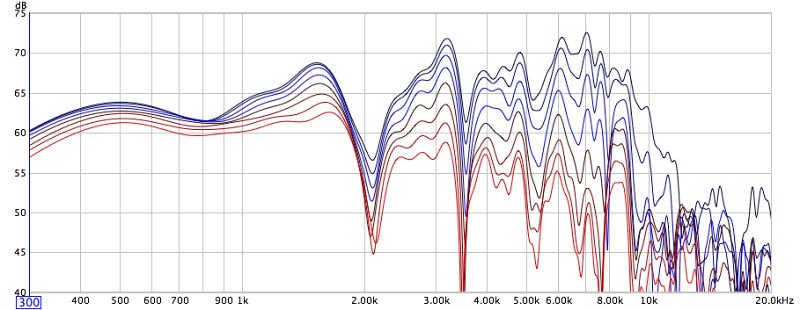
corresponding AVG:


Dan
Impulse:
start:
cone stiffened:
Damping compound added to surround:
Corresponding polars:
corresponding AVG:
Dan


I'd re rout the boxes and sell the JBLs.
I would, too, but I have what appears to be a hernia and that will put a huge crimp in what I am able to lift both before and after surgery for a number of months. 🙁

Nice job Dan! I wasn't expecting to be impressed when I poked my head in here, but you know what they say about assumptions...
Would you post details about your method/materials?
Would you post details about your method/materials?
Thanks Cuibono.
For cone stiffening I used modpodge hard coat. For surround damping I used Aileen's Flexible/stretchable. I painted four coats of the modpodge around the outer rim, three around the cone/dustcap connection, and then 1 over the whole cone, but not dust cap. Then I painted three layers around the surround/outer cone area and one around the cone/dust cap connection of the flexible/stretchable. I let all layers dry as directions say.
I would think anything that stays a bit tacky would work well on the surrounds. Aileens Tacky Glue may well be better or even a glue made for model building foam. These things put out less noise in model trains than say a white or yellow glue. That's where I got the idea. I just didn't want to buy a ton of glues not knowing the effectiveness when I was at Micheal's. The Flexible/Stretchable came in the smallest/cheapest container and it was on sale and seemed to fit the bill. Edit, I bought another one that didn't seem to work as well.
If you look earlier in the thread I did a different method that also yielded good results, but I like this one better.
If you should choose to try it, take measurements and post eh?
Dan
Last edited:
"Very interesting!" We all use a lot of the cheap automotive undercoat from Wallmart auto department on dust caps. Dust caps take a lot to tame. On JBL the whole cone gets undercoat lightly as they squawk so. Need to look into your goop. We also have a "special blend" polymer waterproofing used on all paper process and paper cones. I have seen Harmony use ceramic coating on cone for car audio. Very stiff and dead. The term "extensional damping" comes to mind. EAR Composites used to have a lot of application notes on damping. Humm. Cones do need to be waterproof. Thanks for the info. 🙂
Thanks SUM and you are welcome. Hopefully some others will realize the usefulness of this info as well. It's far from complete, but useful none the less.
Somehow I lost the first time I posted this.😕
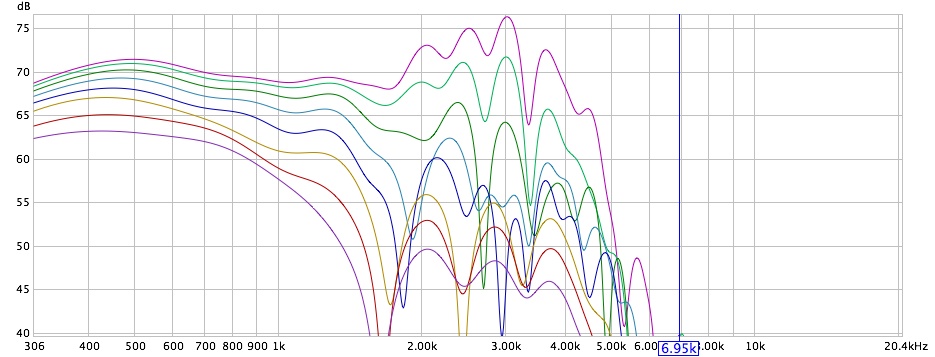
OK, here's my geometry intervention:


I also lost my other AVG graph.🙁 Oh well. They are nearly the same. I had to go with paper dust caps b/c the paper process ones I tried did not turn out similar enough. None the less, principle is demonstrated and I'm done fooling with cheap speaker cones. Rim resonance is indeed the highest its been!
interesting links on the topic:
mckenzie acoustical design: madspeaker
http://www.audioxpress.com/magsdirx/voxcoil/addenda/media/klasco409.pdf
The Art of Speaker Design, Part II
http://www.klippel.de/download/bin/AN31-Cone Vibration and Radiation diagnostics.pdf
http://www.klippel.de/pubs/Klippel papers/Measurement_and_Visualization_Cone_vibration_06.pdf
http://www.loudsoft.com/\loudsoft\my files\ALMA Paper 2003.pdf
Benefits of Acoustic FE/BE Analysis
Dan
Somehow I lost the first time I posted this.😕
OK, here's my geometry intervention:
I also lost my other AVG graph.🙁 Oh well. They are nearly the same. I had to go with paper dust caps b/c the paper process ones I tried did not turn out similar enough. None the less, principle is demonstrated and I'm done fooling with cheap speaker cones. Rim resonance is indeed the highest its been!
interesting links on the topic:
mckenzie acoustical design: madspeaker
http://www.audioxpress.com/magsdirx/voxcoil/addenda/media/klasco409.pdf
The Art of Speaker Design, Part II
http://www.klippel.de/download/bin/AN31-Cone Vibration and Radiation diagnostics.pdf
http://www.klippel.de/pubs/Klippel papers/Measurement_and_Visualization_Cone_vibration_06.pdf
http://www.loudsoft.com/\loudsoft\my files\ALMA Paper 2003.pdf
Benefits of Acoustic FE/BE Analysis
Dan
Last edited:
Yea. Got a little dose.
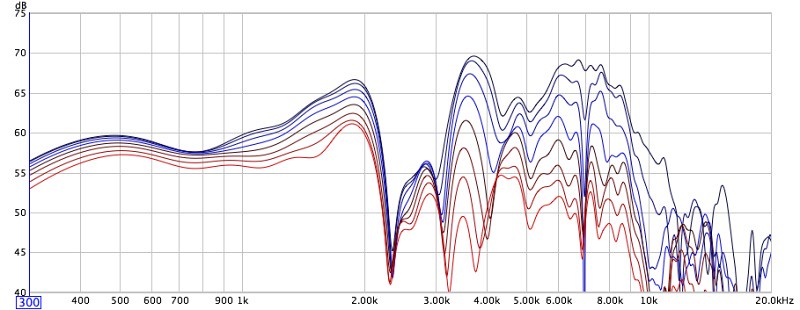
So I tried a similar thing on my Eminence woofers.
The speaker went from this:
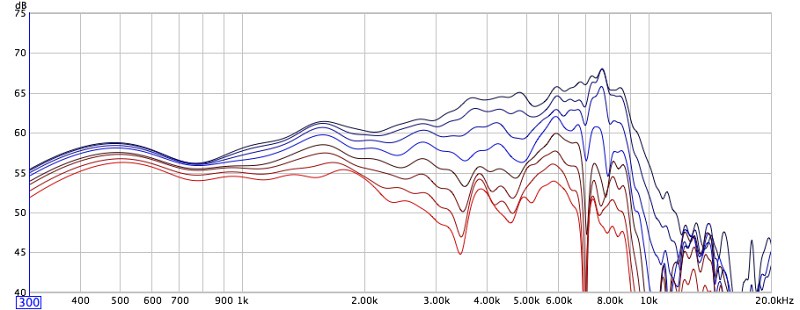
to this:

 I guess there's some improvement, but the break up frequency went a bit in the wrong direction and even increased a bit in amplitude.😱 Off axis looks way better. I haven't done as many layers of stiffening or dampening as the last, but it will have to wait. Ironing out the problems with cones isn't for the faint of heart.
 It's certainly interesting to see the changes as the process goes along.
Dan
So I tried a similar thing on my Eminence woofers.
The speaker went from this:
to this:
I guess there's some improvement, but the break up frequency went a bit in the wrong direction and even increased a bit in amplitude.😱 Off axis looks way better. I haven't done as many layers of stiffening or dampening as the last, but it will have to wait. Ironing out the problems with cones isn't for the faint of heart. It's certainly interesting to see the changes as the process goes along.Dan
Dan
What specifically are you doing? Sorry if you already went through this, but a short review would help. Your results are quite amazing. One thing to check is stability over time. This has been an achiles heal of these techniques over the years. A lot of that stuiff dries and hardens over time and the results are worse than what you started with.
What specifically are you doing? Sorry if you already went through this, but a short review would help. Your results are quite amazing. One thing to check is stability over time. This has been an achiles heal of these techniques over the years. A lot of that stuiff dries and hardens over time and the results are worse than what you started with.
Dan
What specifically are you doing? Sorry if you already went through this, but a short review would help. Your results are quite amazing. One thing to check is stability over time. This has been an achiles heal of these techniques over the years. A lot of that stuiff dries and hardens over time and the results are worse than what you started with.
Post 666. (..and no, I didn't just make that up. 😀 )
Try simulating the Nautilus(for example)
That's a unique exception although you may be able to get close. You don't really need to anyway. All you need is the measurements set and impedance runs with the drivers in the enclosure and you can do the crossovers from there.
Rob🙂
Actually EnclosureShop (Leap 5 component) can do that as well.
It's essentially a transmission line for each midbass driver with an exotic shell (for all drivers). (..that's if the "line" is open, if it's closed then it's just a long closed box, or "labyrinth".)
Other than the shell itself, it should be pretty easy.
The shell can be handled in Sketchup with an OBJ export plug-in (..or in Sketchup Pro, or Autodesk Maya).
I've been looking over various products recently and it looks like EnclosureShop for "box" + Room effects combined with SoundEasy for crossover modeling and real-time prototyping w/measurement is the most sophisticated combination available..
Frankly I keep expecting Bohdan to add the "shell" import feature for SoundEasy (..and also improving the number of drivers/ports for a model), but so far that hasn't happened yet.. (..so Enclosureshop is there to pick-up the slack).
One thing to check is stability over time.
I can speak to the stability of the PVA (puzzlecoat) that i use. I have drivers that i did over 30 years ago that are still fine.
dave
It's essentially a transmission line for each midbass driver with an exotic shell (for all drivers). (..that's if the "line" is open, if it's closed then it's just a long closed box, or "labyrinth".)
The Nautilus enclosures are sealed half-wave transmission lines. Because of the aspect ratio they do no act like a sealed enclosure, althou the high pass function is much the same.
The idea being that the lowest frequency in the passband of the driver has to travel in excess of 1 wavelength (thru damping material) before the reflection gets back to the driver.
dave
The "shell" import feature has been on my SoundEasy wish list for a few years as well. I think there are two issues after a "shell" import. Simulation of the internal transmission to the extent that higher than tuned frequencies can be simulated so that interior shape can be designed for minimum internal reflections, and simulation of the diffraction effects for more accurate polar calculations. I recall Enclosure Shop only does diffraction.Actually EnclosureShop (Leap 5 component) can do that as well.
It's essentially a transmission line for each midbass driver with an exotic shell (for all drivers). (..that's if the "line" is open, if it's closed then it's just a long closed box, or "labyrinth".)
Other than the shell itself, it should be pretty easy.
The shell can be handled in Sketchup with an OBJ export plug-in (..or in Sketchup Pro, or Autodesk Maya).
I've been looking over various products recently and it looks like EnclosureShop for "box" + Room effects combined with SoundEasy for crossover modeling and real-time prototyping w/measurement is the most sophisticated combination available..
Frankly I keep expecting Bohdan to add the "shell" import feature for SoundEasy (..and also improving the number of drivers/ports for a model), but so far that hasn't happened yet.. (..so Enclosureshop is there to pick-up the slack).
The development effort to add more extensive simulation to SoundEasy seems to be generation of 3D meshes for FEA, additionally, in order to do it right, the simulation would be integraded with the room FEM currently avalable. Although SE currently has capability to simulate some modes in the enclosure, but the element size limits it's frequency, and it's not integrated with th room analysis.
I've already been able to lower system Fs below F0 with enclosure design, but in order to fine tune the results in a reliable manner, simulation is really a more effective way than building hundreds of enclosures.
Last edited:
The "shell" import feature has been on my SoundEasy wish list for a few years as well. I think there are two issues after a "shell" import. Simulation of the internal transmission to the extent that higher than tuned frequencies can be simulated so that interior shape can be designed for minimum internal reflections, and simulation of the diffraction effects for more accurate polar calculations. I recall Enclosure Shop only does diffraction.
EnclosureShop - Enclosure Modeling
Bottom of page:
"Chambers can be represented using either a non-reflective lumped parameter model or a transmission line model which includes reflections. The primary parameter of importance here is Vab. A shape is always involved to facilitate the computation of the chamber volume.
A chamber can also include a portion of its volume occupied by a fibrous filling material. Parameters are provided for the type of media, density of media, and the percentage of volume filled. The material is used to absorb internal reflections."
Note the "transmission line model" is not limited to transmission lines (..as we think of them).
I don't know if fiber-filler density can be varied within a single chamber or not. That's pretty important IMO (especially for a closed acoustic labyrinth).
Last edited:
..but in order to fine tune the results in a reliable manner, simulation is really a more effective way than building hundreds of enclosures.
Amen to that! 😀
I think its interesting though that SoudEasy and LSPcad (Pro) have surpassed Linerx's crossover program.. particularly with the ability to hear crossover configurations "on-the-fly" (something Woofer Tester Pro has as well).
Last edited:
SPEAK is free and has been able to do all the enclosure types listed on the LinearX site. And as far as diffraction goes, no good designer is going to use square corners and those programs don't model rounded edges.
Simulations are good for rough designs - about 90% refined, but beyond that, as one gets into the details, they cease to be useful since the models take more time than just building it.
I do all my subs with models, and the early rough designs for my speakers were modeled. But then it all became simulation and measurements, then just measurements.
SPEAK is free and has been able to do all the enclosure types listed on the LinearX site. And as far as diffraction goes, no good designer is going to use square corners and those programs don't model rounded edges.
Simulations are good for rough designs - about 90% refined, but beyond that, as one gets into the details, they cease to be useful since the models take more time than just building it.
I do all my subs with models, and the early rough designs for my speakers were modeled. But then it all became simulation and measurements, then just measurements.
Actually even Soundeasy does different types of enclosure edges (..and EnclosureShop does as well):
EnclosureShop - Shell Modeling
Most importantly however, EnclosureShop allows you to *import* a highly detailed enclosure "shell" for diffraction analysis (..and even interaction in-room).
I can understand the move to just measurements, particularly if you are refining a design you have worked with over the years.
Last edited:
- Status
- Not open for further replies.
- Home
- Loudspeakers
- Multi-Way
- Measurements: When, What, How, Why