I wanted to share here my experience of building the Mark Audio Okapi with Alpair 7MS designed by Scott Lindgren. I was looking for a relatively compact (i.e. narrow) loudspeaker that I could use in my home office. The plan is to use it with an Audio Note Kits "Virtuoso" PP EL84 Headphone/Speaker amplifier that I built a few years ago. I am currently using a pair of Fostex FE83sol in tiny cabinets and I wanted to see if I could do better than that. After reading many posts in this forum I decided to give a self build a go.
Since I do not have a workshop I ordered my plywood (18mm baltic birch) pre-cut online from cutmy.co.uk. I could even specify the circular cut-outs for the drivers and the reflex tube. Here is what came in the package:

Since I do not have a workshop I ordered my plywood (18mm baltic birch) pre-cut online from cutmy.co.uk. I could even specify the circular cut-outs for the drivers and the reflex tube. Here is what came in the package:

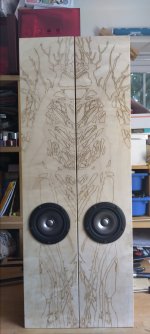
I then asked my daughter if she wanted to be involved and do a design for the front baffle. She was doing laser cutting and engraving in school and was allowed to engrave her design there. I sanded the front baffles finely before they went to the engraving. This is what came back:

Nice work -and your daughter's laser engraving design is stunning! Enjoy the process & hope you will enjoy the speakers when they're finished.
Thanks. I am still working at it and I will post pictures here of the different stages. Next stage for me was the chamfering of the holes for the driver. I used my Dremel tool for that. The results turned out a bit irregular.

A more interesting challenge was the second layer of the baffle. The inside of the enclosure is quite narrow, so a 45deg chamfer is not possible towards the sides. I first glued the second layer baffle to the outer layer.

And then used the Dremel tool again. The sides of the holes became quite thin.

A more interesting challenge was the second layer of the baffle. The inside of the enclosure is quite narrow, so a 45deg chamfer is not possible towards the sides. I first glued the second layer baffle to the outer layer.
And then used the Dremel tool again. The sides of the holes became quite thin.
+1 She certainly has mass quantities more patience than I've ever had.Nice work -and your daughter's laser engraving design is stunning! Enjoy the process & hope you will enjoy the speakers when they're finished.

The design is actually done digitally (from a photo) and then transferred to the CNC laser engraver. Some patience required, but not enormous amounts. 🙂
Gorgeous so far - what is the planned top coat? A big fan of NC lacquer or spar varnish myself, but the are some pretty user friendly wipe on polys these days
Thanks. I have not thought much about the finish and I am by no means an expert. My plan was to sand the box and apply a clear wax (e.g. Briwax). I like the natural look and feel of it. Happy to learn more about alternatives, though!
Some more build pictures here. Starting to put together the box...


A few more steps towards a working Okapi. Damping is glued to the inside. I got the damping material and glue from KJF Audio in the UK. Word of caution: This glue is the stickiest stuff in the universe and the coated damping material needs to be handled with care (and preferably rubber gloves)!

Next step (after soldering the wires to the terminals) was closing the box, sanding and applying some wax. One box finished:

one more to go...
Next step (after soldering the wires to the terminals) was closing the box, sanding and applying some wax. One box finished:
one more to go...
Looking good.
@kjf sells some neat little crimps, that work well to terminate the cable onto the driver and the terminals (Yantzen ones anyway), as I dislike soldering as I am terrible at it.
If you can possibly help it don't listen to them for at least a few days, they really do take 50-150hrs to open up.
@kjf sells some neat little crimps, that work well to terminate the cable onto the driver and the terminals (Yantzen ones anyway), as I dislike soldering as I am terrible at it.
If you can possibly help it don't listen to them for at least a few days, they really do take 50-150hrs to open up.
Thanks. The speaker have been completed (and listened to 🙂). I learned to solder when I was a teenager and I can still do it, but thanks for the tip. I have installed the speakers somewhat unconventionally in my bedroom/home office. I am aware that the location might not allow them to be used them to their best abilities, but that's where they need to go. With a bit of bass EQ in Volumio they seem to be doing fine.


Attachments
- Home
- Loudspeakers
- Full Range
- MarkAudio Okapi - Alpair 7MS build