I posted about these on the Multi-way forum, but then thought this might be a better place. And since I'm currently obsessed with diffusers and was recently making a new tall pair, I took photos during the assembly process to make a little article to show how easy they can be to build. These can be a nice one-day project and would almost certainly make more of a change to a system’s sound than changes to electronics or wiring, maybe even than speakers.
 Diffusers are a less often used, usually too-expensive type of room treatment. Absorbers are the more common type. Absorbers remove energy from sound waves that hit them, effectively smoothing responses and reducing specular reflections, and are usually the first choice. But after a point too much absorption starts to make the room seem dead or even downright uncomfortable to sit in. Diffusers break up specular reflections but don't absorb the energy. Instead, energy at different frequencies is scattered over a wide area and range of time delays. Diffusers don't kill the lively-ness of a room but can make it sound much richer and seemingly larger. Placed at reflection points or behind the listening chair, they make a dramatic and immediate effect, not one of those "I think I can hear it" kind of things.
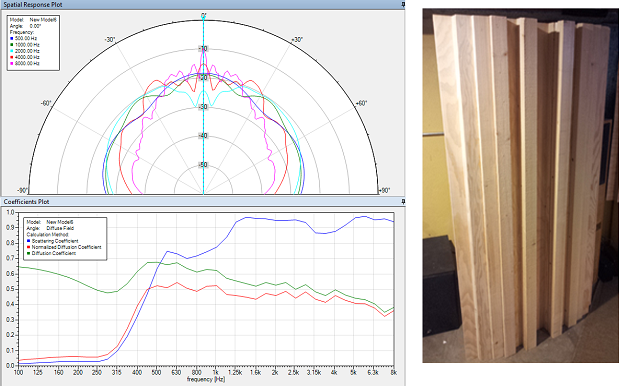
These ultra-easy, wideband, inexpensive diffusers perform well from about 400Hz to 8kHz. They are 1D "step” type diffusers, optimized using the diffusion simulator “AFMG Reflex”. They simulate well, even compared to the usual QRD diffusers you might be familiar with. Credit for the assembly concept and instruction on optimizing step diffusers goes to Tim Perry at Arqen Sonic.
 This design size is ~34.5" wide, and up to 96" tall (or roughly 3'x8'). Making them 96" tall is probably the easiest height choice since it uses most of the lumber in as-bought dimensions and avoids the majority of wood cutting. The thickness of the assembly is about 4.5 inches. The wood, other than a few plywood base pieces, is inexpensive spruce/pine/fir "furring strips", commonly available in US. Needed tools can be as little as a hammer and nails and a pencil, if you can get your lumber store (or big box store) to do some simple cuts of the wood pieces for you. Assembly time is on the order of an hour or two for a basic diffuser, using a #18 1” brad gun (which made it really easy), longer if using only a hammer and nails.
The total cost of wood for one 8ft tall diffuser should be around $92 for one 8ft diffuser, with left over plywood. Two would cost about $152, three would be about $212.
WAF might be a factor choosing to install these, but I think if they were near floor-to-ceiling sized and painted to match the wall colors they could look pretty nice, or at least inoffensive. I like the way they look, even without any finish at all (though I'll probably sand and urethane them sometime).
The first step is to get the wood, enough to build the height you want to make. Try to pick mostly un-warped, decent looking pieces if you can. Here is what you'd need for one 8ft (96", minimum wood cutting), 34.5" wide diffuser. Alter as needed for other heights or quantities:
*Qty 4 of 96" pieces of nominal "1x2" (~0.7"x1.5" actual) furring strips, about $1 each.
Plywood, from Home Depot 577138, or Lowes 12232 , or Menards 1251061; about $32 per 48”x96” sheet (you'd need two sheets to make one diffuser, or three for two diffusers). Home Depot cut mine to these sizes at no additional cost. You need:
*Qty 2 of 12.25"x96" plywood
*Qty 1 of 34.5"x96" plywood
______________
To assemble, first lay the big piece of plywood down, ugly (unsanded) side facing up. Take one of the 1x3 pieces and set it on the plywood, aligned all the way to one (long) side. Then set one of the narrower pieces alongside the 1x3, for positioning. Move the 1x3 back and pencil mark the big piece at the four corners of the narrower ply (4 places) - also run the mark down the edge (thickness) of the big ply.
 Repeat for 4 more marks, starting this time with the 1x3 aligning piece on the other long side of the big ply.
Then, mark and draw 4 full lines the length of the large ply, spaced about half the thickness of the 1x2 wood pieces (~0.35”) away and inward from the previous marks – that is, toward the centers of where the narrow ply pieces had been positioned. The full lines indicate where to nail or drive screws to connect the 1x2 wood to the large plywood piece.
 Line up all the 1x2 pieces narrow side down and about 7 inches apart, then put the large ply piece on top of them, ugly side up. Pull one of the 1x2s over so that its end is along a short line you marked and so that the full line is about in its center. Align both ends to those lines.
 Then drive a 1” nail or brad through the ply into the 1x2, along the long line. Repeat at the other end, and about every 8 inches or so between. Repeat for all 4 boards, when done it should look like the photo above.
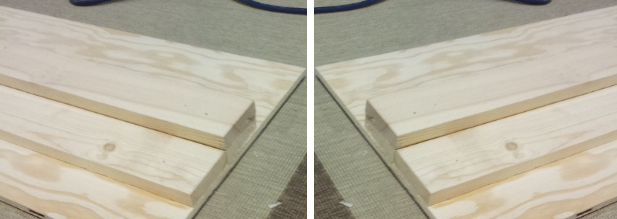
Move the large ply out of your way and lay down a narrow ply board “pretty side” up. Use one of the 1x3 boards to set spacing from one long edge of the ply, as before. Align another 1x3 next to it and nail that second one in place. Remove the spacing board. Align another 1x3 alongside the last one (toward the inside of the ply) and also nail it in place, then another one on top of that. Choose better looking 1x3 pieces to be the ones on top, where they will show, and use less nice ones as the covered-up pieces. Repeat with the other ply, remembering that these two ply pieces will be mirror images of each other.
 Now, lay down the large ply assembly, pretty side up and place the narrower ply pieces on top of it. Align the edges of the narrower assemblies as well as possible on top of the 1x2s of the large ply, with the 2-high stack of 1x3s toward the center, and nail the assemblies in place.
Lastly, nail a stack of three 1x3s on the narrow plywood pieces at the edges toward the center. And you’re done. That's it!

These ultra-easy, wideband, inexpensive diffusers perform well from about 400Hz to 8kHz. They are 1D "step” type diffusers, optimized using the diffusion simulator “AFMG Reflex”. They simulate well, even compared to the usual QRD diffusers you might be familiar with. Credit for the assembly concept and instruction on optimizing step diffusers goes to Tim Perry at Arqen Sonic.
The total cost of wood for one 8ft tall diffuser should be around $92 for one 8ft diffuser, with left over plywood. Two would cost about $152, three would be about $212.
WAF might be a factor choosing to install these, but I think if they were near floor-to-ceiling sized and painted to match the wall colors they could look pretty nice, or at least inoffensive. I like the way they look, even without any finish at all (though I'll probably sand and urethane them sometime).
The first step is to get the wood, enough to build the height you want to make. Try to pick mostly un-warped, decent looking pieces if you can. Here is what you'd need for one 8ft (96", minimum wood cutting), 34.5" wide diffuser. Alter as needed for other heights or quantities:
_____________ Wood List _________
*Qty 12 of 96" pieces of nominal "1x3" (~0.7"x2.4" actual) furring strips, about $2 each.Part numbers are 164704 at Home Depot, 13PFUR.8 at Lowes, 1031528 at Menards.
*Qty 4 of 96" pieces of nominal "1x2" (~0.7"x1.5" actual) furring strips, about $1 each.
Part numbers are 160954 at Home Depot, 128218 at Lowes, 1031515 at Menards.
Plywood, from Home Depot 577138, or Lowes 12232 , or Menards 1251061; about $32 per 48”x96” sheet (you'd need two sheets to make one diffuser, or three for two diffusers). Home Depot cut mine to these sizes at no additional cost. You need:
*Qty 2 of 12.25"x96" plywood
*Qty 1 of 34.5"x96" plywood
______________
To assemble, first lay the big piece of plywood down, ugly (unsanded) side facing up. Take one of the 1x3 pieces and set it on the plywood, aligned all the way to one (long) side. Then set one of the narrower pieces alongside the 1x3, for positioning. Move the 1x3 back and pencil mark the big piece at the four corners of the narrower ply (4 places) - also run the mark down the edge (thickness) of the big ply.
Then, mark and draw 4 full lines the length of the large ply, spaced about half the thickness of the 1x2 wood pieces (~0.35”) away and inward from the previous marks – that is, toward the centers of where the narrow ply pieces had been positioned. The full lines indicate where to nail or drive screws to connect the 1x2 wood to the large plywood piece.
Move the large ply out of your way and lay down a narrow ply board “pretty side” up. Use one of the 1x3 boards to set spacing from one long edge of the ply, as before. Align another 1x3 next to it and nail that second one in place. Remove the spacing board. Align another 1x3 alongside the last one (toward the inside of the ply) and also nail it in place, then another one on top of that. Choose better looking 1x3 pieces to be the ones on top, where they will show, and use less nice ones as the covered-up pieces. Repeat with the other ply, remembering that these two ply pieces will be mirror images of each other.
Lastly, nail a stack of three 1x3s on the narrow plywood pieces at the edges toward the center. And you’re done. That's it!

Woudn't it be better if you put saw cuts, random depth and random location, on those strips...
Gajanan Phadte
Gajanan Phadte
Nope. Random isn't optimum because actual random can be... well, anything, and unlikely to be particularly good. Play a little with a diffuser analysis program ("AFMG Reflex", demo version is free for a month trial) and see how hard it is to come up with something that actually works well over a wide bandwidth.
Not to mention, you'd need a table saw, a lot of time, and a random number generator to call the cuts (calling it by eye isn't going to be random).
Now, if you want just "some diffusion" and aren't concerned with minimizing physical depth and weight, or maximizing performance, a bookshelf of assorted sized books will give that.
edit: I think I might've misinterpreted your comment, sorry. If you mean doing that to each of the exposed strips of the design above, then yes, that would likely allow it to diffuse to even higher frequencies. Rather than "random" though, I'd use a known-good pattern such as mini-clones of the shape of Depot Diffuser shape (resulting in a fractal type arrangement) or (simpler) Tim Perry's "Leanfuser" (see: http://arqen.com/sound-diffusers/#101).
But doing that would require a lot of work and access to a well-equipped toolshop. And the Depot Diffuser, above, already performs well to better-than-decent high frequencies, and requires little work and almost no tools.
Last edited:
Very interesting, Bill, thanks for t5his.
But I'm scratching my head on how the trapped volumes can function acoustically.
Perhaps the two wide middle ones aren't meant to and are only there to create the depth at the center, but what all those behind the biggest piece of ply?
But I'm scratching my head on how the trapped volumes can function acoustically.
Perhaps the two wide middle ones aren't meant to and are only there to create the depth at the center, but what all those behind the biggest piece of ply?
Inside volumes are just a way to save wood! The functional part is the surface shape that sound waves bounce off of (at different time delays and diffused over an area). See Sound Diffusers 101: Free Designs for DIY Diffuser Panels for an animation, good explanation and other designs for diffusers. (Mine is hand-optimized to be a 3' wide design using least expensive US wood).
Ah, now I get it; I understand how diffusers work, but was thrown off by the short vertical red lines at the bottom, which I mistook as furring strips.
Do the 2.45 x 11/32 extensions really do anything?
I wonder what the resonant freq is of the mass of furring strips on the two pieces of ply supporting them; you could put fiberglass in the cavity and get some diaphragmatic absorption.
Another thought - any reason you couldn't do this with rigid foam and spray adhesive? Much lighter, and cheaper:
Search Results for*rigid foam*at The Home Depot
Wouldn't look so hot, but a simple cloth covered frame would take care of that.
Nice presentation, Bill, and thanks. How much does one of these weigh when assembled? I'm (getting) old, and, to boot, thinking of moving within the next year. Not much on lugging stuff these days.
Noah, paint it after assembly to match the room.
I've been looking at the 2" thick sheet foam at Lowes and Home Depot. You would need a Hot Wire cutter to cut it with. Hot Glue it to a section of paneling.
I've been looking at the 2" thick sheet foam at Lowes and Home Depot. You would need a Hot Wire cutter to cut it with. Hot Glue it to a section of paneling.
You would need a Hot Wire cutter to cut it with.
I'd use my bandsaw.
I really like this design for its simplicity and its frugality.
Off the top of my head, if you were to replace the smaller plywood panels with perforated board and fill the cavities with absorptive material it will become something of an 'abfuser'. Those cavities may resonate in a non complimentary way as they are. No?
The foam is a good idea, nice and light.
We cut dozens of sheets a day at work everyday with a table saw and band saws. We spray the table saw blade with a silicone lubricant every few cuts so the foam doesn't melt onto the blade and grab. Not a problem with band saw, much less friction. Hot wire is probably safest but not as ubiquitous as a table saw. A good band saw is my favorite so far.
I've never used a good, professional hot wire cutter so I can't really comment on that, we tried a a really cheap one for seat cushion foam once but it was a very poorly made tool and was promptly binned. I bet that a good one is the cat's meow for foam.
Hot glue melts the foam so we use a spray adhesive formulated for polystyrene (Sta-Put SPH2).
Off the top of my head, if you were to replace the smaller plywood panels with perforated board and fill the cavities with absorptive material it will become something of an 'abfuser'. Those cavities may resonate in a non complimentary way as they are. No?
You would need a Hot Wire cutter to cut it with
The foam is a good idea, nice and light.
We cut dozens of sheets a day at work everyday with a table saw and band saws. We spray the table saw blade with a silicone lubricant every few cuts so the foam doesn't melt onto the blade and grab. Not a problem with band saw, much less friction. Hot wire is probably safest but not as ubiquitous as a table saw. A good band saw is my favorite so far.
I've never used a good, professional hot wire cutter so I can't really comment on that, we tried a a really cheap one for seat cushion foam once but it was a very poorly made tool and was promptly binned. I bet that a good one is the cat's meow for foam.
Hot glue melts the foam so we use a spray adhesive formulated for polystyrene (Sta-Put SPH2).
I don't see why foam shouldn't work (might need to be sprayed with something to make to harden the surface?). I've just hated cuttinvg the stuff (its dust is a mess). Hot wire sounds good, but that's a lot of cutting, glue application, and cleanup, at least compared to just bringing home wood from the store and hitting it with a nailer!
But yeah they are kind of heavy. I can move my 6 footers around (at 61yrs and a year after major surgery) but wouldn't want to try carrying one up the basement steps by myself!
But yeah they are kind of heavy. I can move my 6 footers around (at 61yrs and a year after major surgery) but wouldn't want to try carrying one up the basement steps by myself!
... that's a lot of cutting, glue application, and cleanup, at least compared to just bringing home wood from the store and hitting it with a nailer!
good point 🙂
Cutting the heavy foam-core panels I had into all the pieces needed, then hot gluing them together was a chore I won't soon forgot. Bill's method looks a LOT less tedious
Snip!
I've never used a good, professional hot wire cutter so I can't really comment on that, we tried a a really cheap one for seat cushion foam once but it was a very poorly made tool and was promptly binned. I bet that a good one is the cat's meow for foam.
An upholsterer friend showed me a trick:
An electric carving knife works fantastic on soft foam. You can generate shapes or staring cuts with ease.
My2c
Jorge
Do you think these would work as a diffuser? Bamboo Fencing / UK Bamboo Supplies
or be so difficult to eliminate buzzes/rattles etc. as to not be worth a try?, Also have you found that putting dispersion panels at the first reflection point widens the ideal listening spot? At the mo only one person can hear the music properly in our house😡
many nthanks to you all for such a great forum😀
The bamboo is better than nothing but will be limited to upper frequencies. It's too thin for anything else
Hi Pano, and thanks for your reply. Diameters are available from 25mm - 90mm. I am thinking of using different diameters to get as near as the wooden diffuser specs, and possibly filling the tubes with expandin foam. Would be more attractive than the wooden monoliths! Big question for me as to if it's worthwhile is if it widens the 'sweet' spot. Trying to come up with something that swmbo will accept!
OK, that's bigger than I thought. You should be able to figure the effective range with those diameters. I was thinking of the thinner stuff.
Do you think these would work as a diffuser? Bamboo Fencing / UK Bamboo Supplies
I don't think any acoustic treatment will effectively widen the sweet spot. If you have direct radiators, crossing the listening axes in front of the listening position is probably the best option.
I think the bamboo is an interesting idea for diffusion, you could make a wave shape out of it and make a wider range diffuser, and put some insulation behind to add some absorption. Keeping it clean might be an issue - you might want to spray some sort of lacquer or varnish on it to make it easier to dust.
I don't think any acoustic treatment will effectively widen the sweet spot. If you have direct radiators, crossing the listening axes in front of the listening position is probably the best option.
Crossing the axis in front of the main seat gives a nice effect if you then put diffusers behind the main seat (several feet back), so the speakers fire into the diffusers. Expands the apparent room size, really transforms the entire system.
- Home
- General Interest
- Room Acoustics & Mods
- Making easy DIY "Depot" sound Diffuser panels, step by step