I'd never heard of a lock miter (mitre to me) bit until now. Nifty, kinda like having mitres and also doing biscuit-joinery....push your luck and use a lock miter bit.
Then again, the half-inch lock miter bit I looked up cost $72 at Lee Valley Tools. Almost as much as any router (not bit) at Harbor Freight! 😱 ( Search results for: 'router' )
-Gnobuddy
I'd never heard of a lock miter (mitre to me) bit until now. Nifty, kinda like having mitres and also doing biscuit-joinery.
It is a neat bit. A bit too advanced for me though. Another trick is that some track saws have adapters so that you can use a router with the track instead of the circular saw. This is useful for cutting through dados (housing to you) for interior braces.
I thought dados were extinct, how am I going to cut through one? And wouldn't cutting through the last living dado bird be a terrible thing to do?useful for cutting through dados
(Just kidding!)
-Gnobuddy
It seems the best way with the hand tools you have would be to rough cut the pieces to size. Then use the router with a guide to finish trim. With the guide inside the edge any slips will be over size and a repeat pass will fix them.
Same technique with a 45 degree bit. You can set the bit to do a shallow cut from the box inside edge. Then cut deeper with several passes. That should get you the edges you need to produce a seamless box.
The only caution is to keep the router base flat on the workpiece while cutting. Shallow cuts are your friend here. Also use sharp bits! Be sure the workpiece is well anchored and at a comfortable work height. Also use scraps on each edge to allow a smooth entrance and exit from the workpiece edge.
I have a piece of precision flat ground steel 36" long that makes a great straight edge on the side that wasn't screwed up by using it with a router guide collar. When using the router base as a guide be certain not to rotate the router while cutting. The edge of the base is not perfectly aligned with the collet!
Last edited:
Well, having made a hole cutting jig for my router (based on the jasper idea) and also a simple router bench with a fence, I have to say that things are already getting a lot more accurate. I only wish I’d created a home made table saw as well to start with. Maybe next time. I wonder if I can potentially fix my mitres with the table router?
An externally hosted image should be here but it was not working when we last tested it.
An externally hosted image should be here but it was not working when we last tested it.
Potentially.... 1.4xmaterial thickness is approximately the length of a full mitre. If routing 18mm with a 1/4" router, don't try full mitres.
Router bit must be perpendicular to the bed and parallel to the fence. Router table bed should be flat and work must be well presented to the bit. i.e. wotk piece should be flat or "manageably bowed". Use featherboards to apply pressure and manage kickback.
J.
Good tip, thanks! (And one that did not occur to me on my own.)...router...use scraps on each edge to allow a smooth entrance and exit from the workpiece edge.
-Gnobuddy
The other tip is to cut one piece for all the tops or sides and bevel the edges before cutting the pieces apart so you get not only the same bevel but perfect width matching.
The other tip is to cut one piece for all the tops or sides and bevel the edges before cutting the pieces apart so you get not only the same bevel but perfect width matching.
This is actually how I approached my cuts with the circular saw with a clamped guide.... the mitres are still out though unfortunately.
This is actually how I approached my cuts with the circular saw with a clamped guide.... the mitres are still out though unfortunately.
How are they out? Gaps at the pointy end or gaps towards the inside? I guess they could well be wobbly too. Unless you've a track saw which clips into the track, a 45 degree can cause the saw to wobble as it cuts.
07:45 into YouTube
J.
they are out at the outside corner unfortunately. I'm considering adding a round over to the edges of the box to disguise the error, so perhaps after some filler the problem might go away
Miter with a router. Multiple light cuts will get you to a tight seam. That gives you the best control. Bid you make a mistake move the fence in a hair and clean it up.
they are out at the outside corner unfortunately. I'm considering adding a round over to the edges of the box to disguise the error, so perhaps after some filler the problem might go away
Adjust the angle of the blade slightly and have another go. If the dimensions are accurate, you've not removed enough from the inside edge.
I don't recall if you've a router. With the right bit and setup you can bring the mitres closer... Or even out slightly the other way.
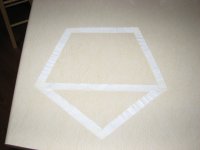
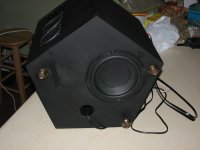
You saw my octagon boxes, here's the pentagons. I wouldn't think about using the good wood until I've done small mock ups with scrap. There's no reason or excuse for having bad mitre cuts. Sorry, no pics of the finished product, but close enough. It's not hard to do it right.
Attachments
b&q (diy.com) have changed their cutting policy since my last build. They won't put anything on the machine under 500x250mm. This had me driving home again. My cutting list for some small speakers that used a quarter board perfectly, wasn't even approachable.
They will take off strips, but once the board is down to 500x250 it's coming off the machine.
Getting your cutting list in order is vital. They will want to reduce that heavy board as quickly as they can.
Here is my latest build.

Here is the cutting drawing

As you can see from the build, The internal parts share common dimensions. Namely 610 high and 365 wide. The top and bottom are 365x510 and the sides 510x 650.
First up, the cutting order was changed as I arrived to confirm the 500x250 limit.
The board goes on, and the bottom 610 is kept, while the top is put aside. There is a little red number 1 indicating this. Next I took off some 140 strips, the full 610 high. I actually took all 4 that I needed. Then set the saw to 365 and took off the 5 bits I wanted at 610x365. Leaving next to no off-cut.
Then the other 2440x610ish bit goes on. With the saw still at 365, A couple more 610ishx365 bits come off. These will be shortened later, to be the 510x365 top&bottom boards. Then the saw is set to take off the 650 high sides. Finally, the saw is set for 510, to trim the sides and top&bottom panels.
This made one box, from one sheet, with around 95L inside.
The cutting order ensures all parts that should be the same size, are cut at the same time without resetting the saw or guides.
Construction from here, for me, involves putting the baffle face down on a flat surface. Then standing a side and end panel on there edges in place. So you know the edges and baffle align, on your flat surface. If the edges are not square, you can raise the baffle a tiny bit from the flat surface, using a few washers or packers, beer mats or whatever you have. The flat surface will keep everything squareat the front of your box, and the washers will ensure the front baffle is set back a fraction. Giving a little bit of material to sand away. I always build from the front this what as it's what you see. Any inaccuracies appear at the back, where again, you can set the rear baffle in a little to leave something to sand away. The only bit I cut oversize, is the 650 tall sides. Everything else is perfect or can be worked into shape easily if I must. With 5 internal baffles, I don't want to be trimming all them, so will choose now to trim the sides. Working in 18mm sheet as I do, it's only 4mm to remove from them. Sanding as usual, with 40 grit, it soon vanishes.
It really is all in the planning, if you want as little to do as possible, with room for error that's easily corrected.
I have two such boxes now, for jbl gto 1214 subs. The hardest part by far, is still not done. A recess for the port. I have summed up every plate and pan lid I have, but alas, no combination is working out so far.
edit: There is no doubt that box has gone together terribly. The baffle warped when I glued the pair of 18mm boards together. You never want to be sanding the face of a board as I will have to do here in the nearest corner. I should really of set the baffle in further but on this visit they cut everything like a banana and more trimming was going to effect my box volume. The other box is spot on but sealed shut now. It took days... 114 screws countersunk in. This box got the bang together treatment, so the screws will be coming out and the fit will need work. No gaps though, that's the important bit to me, using just normal wood glue.
They will take off strips, but once the board is down to 500x250 it's coming off the machine.
Getting your cutting list in order is vital. They will want to reduce that heavy board as quickly as they can.
Here is my latest build.
Here is the cutting drawing
As you can see from the build, The internal parts share common dimensions. Namely 610 high and 365 wide. The top and bottom are 365x510 and the sides 510x 650.
First up, the cutting order was changed as I arrived to confirm the 500x250 limit.
The board goes on, and the bottom 610 is kept, while the top is put aside. There is a little red number 1 indicating this. Next I took off some 140 strips, the full 610 high. I actually took all 4 that I needed. Then set the saw to 365 and took off the 5 bits I wanted at 610x365. Leaving next to no off-cut.
Then the other 2440x610ish bit goes on. With the saw still at 365, A couple more 610ishx365 bits come off. These will be shortened later, to be the 510x365 top&bottom boards. Then the saw is set to take off the 650 high sides. Finally, the saw is set for 510, to trim the sides and top&bottom panels.
This made one box, from one sheet, with around 95L inside.
The cutting order ensures all parts that should be the same size, are cut at the same time without resetting the saw or guides.
Construction from here, for me, involves putting the baffle face down on a flat surface. Then standing a side and end panel on there edges in place. So you know the edges and baffle align, on your flat surface. If the edges are not square, you can raise the baffle a tiny bit from the flat surface, using a few washers or packers, beer mats or whatever you have. The flat surface will keep everything squareat the front of your box, and the washers will ensure the front baffle is set back a fraction. Giving a little bit of material to sand away. I always build from the front this what as it's what you see. Any inaccuracies appear at the back, where again, you can set the rear baffle in a little to leave something to sand away. The only bit I cut oversize, is the 650 tall sides. Everything else is perfect or can be worked into shape easily if I must. With 5 internal baffles, I don't want to be trimming all them, so will choose now to trim the sides. Working in 18mm sheet as I do, it's only 4mm to remove from them. Sanding as usual, with 40 grit, it soon vanishes.
It really is all in the planning, if you want as little to do as possible, with room for error that's easily corrected.
I have two such boxes now, for jbl gto 1214 subs. The hardest part by far, is still not done. A recess for the port. I have summed up every plate and pan lid I have, but alas, no combination is working out so far.
edit: There is no doubt that box has gone together terribly. The baffle warped when I glued the pair of 18mm boards together. You never want to be sanding the face of a board as I will have to do here in the nearest corner. I should really of set the baffle in further but on this visit they cut everything like a banana and more trimming was going to effect my box volume. The other box is spot on but sealed shut now. It took days... 114 screws countersunk in. This box got the bang together treatment, so the screws will be coming out and the fit will need work. No gaps though, that's the important bit to me, using just normal wood glue.
Last edited:
I'd advise against rounding the edges and using filler, I think you'll not be 100% happy with the results. I've cut corners on a few projects and everytime I've looked at the job, have been dissatisfied. I had to start from scratch which took a hell of a lot longer than doing the job right in the first place.
Andy.
Andy.
I've built hundreds of pairs of speakers - in a commercial cabinet shop with all the right tools, which I'm soon gonna miss big-time 🙁 , and IMNSHO, mitres for loudspeaker enclosures are a waste of effort - a good dado will give you more glue surface area and make for easier assembly - but I guess that depends on how you plan to finish the boxes. I use baltic birch
When desired, they are probably most easily attainable with a table saw / sled, or even better a sliding table saw where the work piece can be clamped to prevent movement.
Since it sounds like you've committed the invested the materials and time, you're likely not going to have much better luck with sanding to tighten them up - I'd be inclined to secure the joints with internal cleats / battens if accessible, and fill any remaining gaps.
This is what I was trying to tell the OP, why mess around with mitres which aren't the strongest joints when if cut square aka B&Q, rebated joints are both more accurate and also stronger,
Every portable table saw or sliding chop saw I've used curved from start of cut to rear, for get them.
Square cuts, pro done, and the rest is maybe not easy but easier. Sorry OP, I now know you have the right gear, a router, just get the boards cut square in the first place and forget mitres.
No more input from me, opinions seem polarised.
Please resize your photos to forum and web friendly sizes before posting. 4000+ pixels wide is not handled well by the forum software and isn't needed anyway. 1024 or 1280 pixels wide is plenty. TIA
This is what I was trying to tell the OP, why mess around with mitres which aren't the strongest joints .................
I agree here....a true running, square joint, glued and clamped properly is going to be a better joint, than anything less than a perfectly done miter which are also much harder to clamp.
IMO, miters are for furniture work, which if that's what you want, excellent!!
If for some reason you don't feel a butt joint is strong enough...there's a whole lotta butt joint techniques.
I like biscuits when called for.....but which seem to be needed less and less ...even for bigger double 18" PA subs ...
....when they have good true running square joints 😀
- Status
- Not open for further replies.
- Home
- Loudspeakers
- Full Range
- Making a box is harder than one might think.