Talc powder is pretty common for polyester.
Man, I have used loads of that
Its a real pain to sand
I think you can get finer white glassfiber powder too
Also microball powder, but expencive
But I guess all kinds of "filler" will make it thicker and flow harder
Its a real pain to sand
Yes it makes for a very hard filler.
I think you can get finer white glassfiber powder too
How's that on the lungs?
I would never try to sand it but my most common filler for epoxy is either aluminium or stainless steel powder, so strong you can drill and tap it.
The aluminium powder is really cheap here because of its use in fireworks and :"Thermite"
The aluminium powder is really cheap here because of its use in fireworks and :"Thermite"
However, if I would choose material, it would be steel plates instead of hard board😎 Well, wishful thinking.....
Peter! Long time,
Steel is a beautiful thing but too heavy. Speaker building is about compromise and one of the things I wanted was relative light weight. These will be big, without any real hand-holds to grab onto so a pain to move if they are very heavy.
Talc powder is pretty common for polyester.
Talc is the filler in autobody filler. Polyester resin + talcum powder.
I made some more progress. I have the panels all glued together to form the box. A closeup of an inside corner:

I gave the panels a coat of urethane like I said I would and while that was drying I went and got some polyester resin and fiberglass mat. I decided to go with mat as it will give conform to the curves more easily than cloth. I did it out in my shop but it's too cold to leave there so I brought it in...wow, I'm high on the fumes now.
Anyway, here's how the corners look fiberglassed:
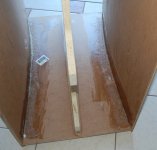
I went full value today (had to get out of here - the fumes!) and cut the front sub-baffle, the back and the brace that runs from front to back.
Here's it with the brace glued in:
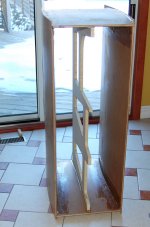
I used PL Premium urethane adhesive to cement that in. I have nothing but good things to say about that stuff - extra strong glue that fills a gap easily.
I put on the front sub-baffle too using the PL Premium:
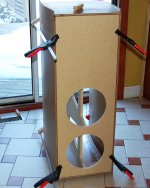
I need to do a few things before I put the back panel in. First, build and install a box for the midrange (it would help if I knew which one I am getting). I also need to calculate the internal volume accurately to determine the port length so that they can be installed in the back panel before I put it in.
This is the first time I have built speakers this way - one at a time. Usually I build both at the same time but these are just too complicated and large to do that. Hopefully I'm not totally sick of the experience for the second one. 🙂

I gave the panels a coat of urethane like I said I would and while that was drying I went and got some polyester resin and fiberglass mat. I decided to go with mat as it will give conform to the curves more easily than cloth. I did it out in my shop but it's too cold to leave there so I brought it in...wow, I'm high on the fumes now.
Anyway, here's how the corners look fiberglassed:

I went full value today (had to get out of here - the fumes!) and cut the front sub-baffle, the back and the brace that runs from front to back.
Here's it with the brace glued in:

I used PL Premium urethane adhesive to cement that in. I have nothing but good things to say about that stuff - extra strong glue that fills a gap easily.
I put on the front sub-baffle too using the PL Premium:

I need to do a few things before I put the back panel in. First, build and install a box for the midrange (it would help if I knew which one I am getting). I also need to calculate the internal volume accurately to determine the port length so that they can be installed in the back panel before I put it in.
This is the first time I have built speakers this way - one at a time. Usually I build both at the same time but these are just too complicated and large to do that. Hopefully I'm not totally sick of the experience for the second one. 🙂
Last edited:
Horn stuff moved: http://www.diyaudio.com/forums/cons...casting-experiment-elliptical-horn-flare.html
dave :cop"
dave :cop"
Very neat so far John 🙂 Actually i build speakers this way, one at a time. I find that the second one goes together much more rapidly with no messing about, simply because anything problematic has been taken care of building the first.This is the first time I have built speakers this way - one at a time. Usually I build both at the same time but these are just too complicated and large to do that. Hopefully I'm not totally sick of the experience for the second one. 🙂
You just need to get on with it 😀
Keep up the good work.
Mark.
A house reno project has distracted my attention lately, so I only stumbled across this thread today - bloody nice work John.
You just need to get on with it 😀
Keep up the good work.
Mark.
Thanks Mark,
I like that:"get on with it..." 😀
bloody nice work John.
Thanks Chris 🙂
Not much progress today - I did stop on my way home and bought a piece of 4" PVC pipe for the ports. Cut neat holes in the back panel and glued them in with silicone:
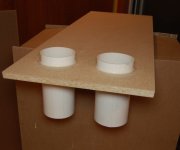
Once that was set I glued in the back panel:
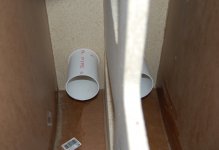
PL Premium again being the only fastening.
I have been thinking about the midrange enclosure. I have less volume in the main box than expected - the sides curving in really reduce the space so I want to make the midrange box as compact as possible. Originally it was going to be 9" high, 9" wide and 12" deep giving me about 15 litres internal and I'll stick with this but now I want to build it from metal. Using metal will save about 5 litres volume that is equivalent to using 3/4" plywood for the box. This is good.
I have several pieces of 16 gauge sheet metal that are just scrap - cut outs from a metal door, they are painted on one side. I don't even know why I kept them but they will be good to use here.
I see if I can find time tomorrow to cut and weld them together.
More fun...🙂

Once that was set I glued in the back panel:

PL Premium again being the only fastening.
I have been thinking about the midrange enclosure. I have less volume in the main box than expected - the sides curving in really reduce the space so I want to make the midrange box as compact as possible. Originally it was going to be 9" high, 9" wide and 12" deep giving me about 15 litres internal and I'll stick with this but now I want to build it from metal. Using metal will save about 5 litres volume that is equivalent to using 3/4" plywood for the box. This is good.
I have several pieces of 16 gauge sheet metal that are just scrap - cut outs from a metal door, they are painted on one side. I don't even know why I kept them but they will be good to use here.
I see if I can find time tomorrow to cut and weld them together.
More fun...🙂
I'm not 100% on my gauge to dimensional measurement conversion (~1/16"..?), but should you be concerned with that steel enclosure resonanting...?
A 12x9 panel could hum fairly well...
A 12x9 panel could hum fairly well...
It is around 1/16" thick. Like any enclosure, it will resonate if you let it. Bracing and damping goes a long way, especially when you start with a stiff material.
John, Im not messing with your nice project, just a small comment
Should anyone want to copy your work and do the same, but having fear of some of the details
It could be done as a MATRIX box, or braced if you like
And then mount the curved plywood with foam on the outside
Should anyone want to copy your work and do the same, but having fear of some of the details
It could be done as a MATRIX box, or braced if you like
And then mount the curved plywood with foam on the outside
Peter wanted steel:
Cut the parts and start tacking them together:
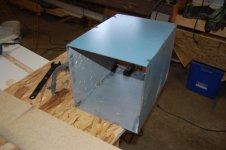
All done except the internal bracing:
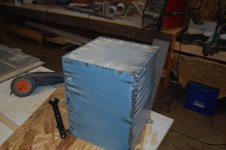
Going with how it will be mounted in the box, I feel this is adequate bracing, ugly but effective:
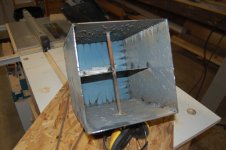
Caulk the corners to stop leaks and spray in some rubberized undercoating to make it look a bit better.

I see about getting it mounted tomorrow evening.
Cut the parts and start tacking them together:

All done except the internal bracing:

Going with how it will be mounted in the box, I feel this is adequate bracing, ugly but effective:

Caulk the corners to stop leaks and spray in some rubberized undercoating to make it look a bit better.

I see about getting it mounted tomorrow evening.
Did you just do that, impressive
Well, it could also me much thinner metal sheet, screwed and "glewed" together, with internal wood bracing
Glue some relatively hard isolating boards on the outside
Clothe it in something nice, and done
Well, it could also me much thinner metal sheet, screwed and "glewed" together, with internal wood bracing
Glue some relatively hard isolating boards on the outside
Clothe it in something nice, and done
Should anyone want to copy your work and do the same, but having fear of some of the details
It could be done as a MATRIX box, or braced if you like
And then mount the curved plywood with foam on the outside
A matrix box is uniformly braced and to add that much bracing to this would defeat the purpose. The idea befind this panel construction is to reduce internal bracing.
It took about 40 minutes to cut and weld that up, light after supper activity 😉Did you just do that, impressive
Well, it could also me much thinner metal sheet, screwed and "glewed" together, with internal wood bracing
Glue some relatively hard isolating boards on the outside
Clothe it in something nice, and done
Using a thinner material is fine as long as it is adequately braced. Adding wood to the outside once again defeats the purpose though. I want this enclosure to be stiff, strong and also take up less room inside the main enclosure.
No passive crossovers involved here - fully active. Digital crossover and 4 Abomination amps for each speaker.
Power baby!
😀
Power baby!
😀
Those curved panels would be ideal for a lightweight concrete mix instead of foam. 3 to 4 parts pumice aggregrate and pumice sand mix with 1 part Type "S" masonry cement...add water and mix well. You could add some of that white liquid acrylic bonding agent to the final mix as well. That stuff for tile mortar thinset. A bottle of white Weldbond or even yellow glue would serve the same purpose if that was what was on hand. Wrap some straps around your frames first as well until set.
A good industrial hand dolly with decent wheels and blanket wrap could still move them around reasonably well.
A good industrial hand dolly with decent wheels and blanket wrap could still move them around reasonably well.

Last edited:
- Status
- Not open for further replies.
- Home
- Loudspeakers
- Multi-Way
- Large 3-ways design / build