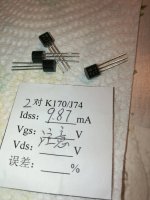
English please.Hi, my name is Ermanno, I also bought the card for M77, it will come in a month. In the meantime I ordered the components, and asked for advice regarding the transformer, the resistances, the valves ... etc ... etc .... that many users have found. Is it better to start going the card already with the changes or use the kit components? I bought that base without the capacitors. I am a basic expert, I am a great passionate. I built the large EKTA speakers, a pre phono, a DAC and finally the JC-2 LINE STAGE preamplifier and other components.
Thank you all.
Hi, I don't speak English, how do I write, the translator doesn't work.
bye thank you
dave

diyAudio moderation team
La traduction fonctionne bien: sélectionne le texte, et clique droit -> "Translate..."
The translation works well: selects the text, and right clicks -> "Translate..."
If you can, refrain from soldering until you're dead sure it's what you want. Desoldering plate-through holes is no fun.
The translation works well: selects the text, and right clicks -> "Translate..."
If you can, refrain from soldering until you're dead sure it's what you want. Desoldering plate-through holes is no fun.
still, the constantly on phono is not very good, but when this mode is turned on, the glow and the anode turn on immediately. which is not good. I think to leave the relay, but in the anode circuit, turn on the delay, well, for example, on the NE555 timer.
Puoi usare Google Translate per tradurre l'italiano in inglese.
Il mio italiano è rudimentale, l'ho dimenticato in gran parte.
Qui: https://translate.google.com/?sl=it&tl=en&op=translate
Dovrebbe sembrare come questo:

Il mio italiano è rudimentale, l'ho dimenticato in gran parte.
Qui: https://translate.google.com/?sl=it&tl=en&op=translate
Dovrebbe sembrare come questo:
Quindi parto a saldare con le resistenze modificate oppure no? Tipo la 33k con 50kLa traduction fonctionne bien: sélectionne le texte, et clique droit -> "Traduci..."
La traduzione funziona bene: seleziona il testo e clicca con il tasto destro -> "Traduci..."
Se puoi, evita di saldare finché non sei assolutamente sicuro che sia quello che vuoi. Dissaldare i fori passanti non è divertente.
Puoi usare Google Translate per tradurre l'italiano in inglese.
Il mio italiano è rudimentale, l'ho dimenticato in gran parte.
Qui: https://translate.google.com/?sl=it&tl=en&op=translate
Dovrebbe sembrare come questo:
Su questa pagina non traduce,non so perché
I'm not sure what you're trying to say, but the delay thingy needs a bit of care: it could affect significantly the value of the HV, and, to a lesser extend, the heaters. I decided to leave the phono on all the time.still, the constantly on phono is not very good, but when this mode is turned on, the glow and the anode turn on immediately. which is not good. I think to leave the relay, but in the anode circuit, turn on the delay, well, for example, on the NE555 timer.
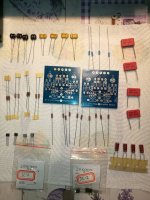
Hi Ermano, in my opinion it would be advisable to change the components in the RIAA section already now, while you are populating your new board. There is not a whole lot of place between the tube sockets etc, and desoldering later may be complicated. And this one is really worth it, the tonality is not so great with the original components.... And, while you are at it, do not mount the 2N3055 but put a good darlington instead, plus the zener diode, for the tube heater. I personally consider these two mods very worthwhile.
Next on the list would be "boutique" coupling caps and also the output stage modifications (different resistors), that will also contribute. If you know well how to handle a soldering iron, this could even be done from top, without taking the PCB out, a little tricky - with all the input and volume control and power transformer wiring, it took me an hour or so to take the PCB out and back in , while the modification itself was a 5minute job 😀
Let us know how it goes!

Yes, I do the same. Turning the tube heaters on and off all the time is not helpful for their lifetime. Plus, I splashed out a nice amount of money on non-microphonic, carefully matched input tubes and I want them to live as long as possible!I'm not sure what you're trying to say, but the delay thingy needs a bit of care: it could affect significantly the value of the HV, and, to a lesser extend, the heaters. I decided to leave the phono on all the time.
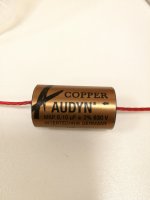
In fact, soldering the original and then unsoldering does not seem to me the case. For the transformer the 13v output is better instead of 12.6v. What do you recommend for the resistors? For the coupling capacitors I ordered the Russian k40y-9, For those smaller than 0.01 0.001 what do you recommend? Lastly, the 12ay7 tubes as a model without spending a fortune. Hello and thanks.Hi Ermano, in my opinion it would be advisable to change the components in the RIAA section already now, while you are populating your new board. There is not a whole lot of place between the tube sockets etc, and desoldering later may be complicated. And this one is really worth it, the tonality is not so great with the original components.... And, while you are at it, do not mount the 2N3055 but put a good darlington instead, plus the zener diode, for the tube heater. I personally consider these two mods very worthwhile.
Next on the list would be "boutique" coupling caps and also the output stage modifications (different resistors), that will also contribute. If you know well how to handle a soldering iron, this could even be done from top, without taking the PCB out, a little tricky - with all the input and volume control and power transformer wiring, it took me an hour or so to take the PCB out and back in , while the modification itself was a 5minute job 😀
Let us know how it goes!
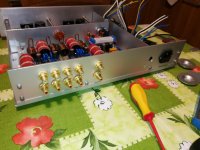
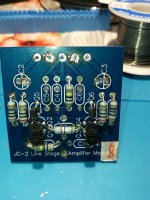
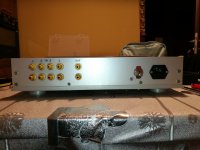
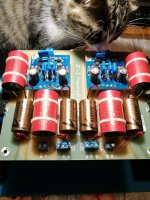
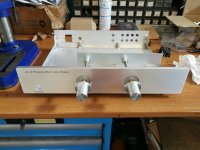
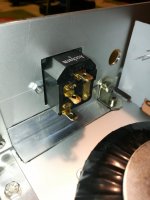
Hello, I am attaching photos of my last work with the various modifications. A greeting Ermanno
Hello Erman, please check https://www.diyaudio.com/community/...hone-preamp-clone-project.358732/post-6744203 for improved values for the RIAA section. In my build, I used Janszen silver caps (not expensive but good), and russian 10nF Silver Mica for the RIAA. And, I am using JJ tubes where the whole set cost me €160, not sure how much you want to spend (there seems to be very little limits....). Hope that helps you!
Ciao Erman, controlla https://www.diyaudio.com/community/...hone-preamp-clone-project.358732/post-6744203 per valori migliorati per la sezione RIAA. Nella mia build, ho usato i cappucci d'argento Janszen (non costosi ma buoni) e la mica d'argento russa 10nF per la RIAA. E sto usando tubi JJ dove l'intero set mi costa € 160, non sono sicuro di quanto vuoi spendere (sembra che ci siano pochissimi limiti ....). Spero che ti aiuti!
Thank you, for the transformer is the 13v output better instead of 12.6? I would like to attach photos of my latest work but I can't. Thank youHello Erman, please check https://www.diyaudio.com/community/...hone-preamp-clone-project.358732/post-6744203 for improved values for the RIAA section. In my build, I used Janszen silver caps (not expensive but good), and russian 10nF Silver Mica for the RIAA. And, I am using JJ tubes where the whole set cost me €160, not sure how much you want to spend (there seems to be very little limits....). Hope that helps you!
Grazie, per il trasformatore l'uscita 13v è migliore invece di 12,6? Vorrei allegare foto del mio ultimo lavoro ma non posso. Grazie
Attachments
-
 IMG_20201006_222138.jpg358.8 KB · Views: 176
 -
 IMG_20190802_215742.jpg361.4 KB · Views: 175
 -
 IMG_20200727_221101.jpg309.4 KB · Views: 165
 -
 IMG_20200802_224944.jpg506.8 KB · Views: 162
 -
 IMG_20201228_213212.jpg530.3 KB · Views: 173
 -
 IMG_20190716_133458.jpg327.5 KB · Views: 167
 -
 IMG_20200902_231045.jpg494.9 KB · Views: 182
 -
 IMG_20200902_132427.jpg172.4 KB · Views: 177
 -
 IMG_20190801_212821.jpg497.2 KB · Views: 168
 -
 IMG_20201006_222113.jpg470.2 KB · Views: 161
 -
 IMG_20190802_214929.jpg386.1 KB · Views: 146
 -
 IMG_20200804_180924.jpg369.9 KB · Views: 148
 -
 IMG_20200925_221818.jpg280.9 KB · Views: 174
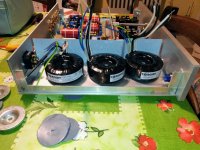
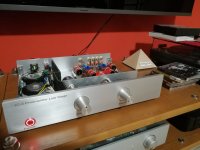
This is my latest work, JC-2 LINE STAGE preamp
Attachments
-
 IMG_20200925_221607.jpg365 KB · Views: 131
 -
 IMG_20210606_205338.jpg322.5 KB · Views: 140
 -
 IMG_20201026_231915.jpg291 KB · Views: 157
 -
 IMG_20201106_214343.jpg507.5 KB · Views: 149
 -
 IMG_20201228_225147.jpg319.2 KB · Views: 139
 -
 IMG_20201118_221040.jpg358.5 KB · Views: 138
 -
 IMG_20200902_231903.jpg375.9 KB · Views: 140
 -
 IMG_20210606_160056.jpg438.3 KB · Views: 134
 -
 IMG_20210606_162850.jpg519.7 KB · Views: 131
 -
 IMG_20200726_184833.jpg250 KB · Views: 131
Grazie, per il trasformatore l'uscita 13v è migliore invece di 12,6? Vorrei allegare foto del mio ultimo lavoro ma non posso. Grazie
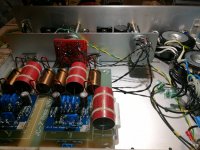
I cleaned the welds of the two modules well before assembling everything. Here in the photos they are ugly.This is my latest work, JC-2 LINE STAGE preamp
Member
Joined 2009
Paid Member
that's an impressive build you are putting together!
not sure it's going to get the attention it deserves, needs it's own thread because this one is for tubes and Kondo.....
not sure it's going to get the attention it deserves, needs it's own thread because this one is for tubes and Kondo.....
Yes yes I know it's not the right thread, it was just to show the last work I did. Thank you.that's an impressive build you are putting together!
not sure it's going to get the attention it deserves, needs it's own thread because this one is for tubes and Kondo.....
- Home
- Amplifiers
- Tubes / Valves
- Kondo KSL-M77 phono preamp clone project