That's interesting.
I was always planning to bevel the left and right edges of my baffle. Would cutting small strips for the bevel work, sanding the edges to get it to blend?
I've seen people veneer over baffles with curved edges, it looks quite nice but I am a fan of sharp angles.
I was always planning to bevel the left and right edges of my baffle. Would cutting small strips for the bevel work, sanding the edges to get it to blend?
I've seen people veneer over baffles with curved edges, it looks quite nice but I am a fan of sharp angles.
I've completed the port cut out for the rear panels, I've also sealed the inside of the rear panel (not the gluing surfaces). I'm basically ready to complete the box but before I do, I want to get the crossover built.
I have some very nooby questions in regards to crossover construction... Does it matter where I place the XO components in relation to other XO components, eg, should I try and place the inductors as far away from each other as possible?
The inductors I have look like this.
Do I leave the tape on them?
Do I untwist the leads, or doesn't it matter. Can I trim off excess (from the leads) if I need to or will this affect the inductance? The coppery coloured coating is an insulator as far as I have worked out, if the leads can be trimmed, do I simply scrape the coating off if I need to?
Think that's all I had to ask, thanks in advance.
I have some very nooby questions in regards to crossover construction... Does it matter where I place the XO components in relation to other XO components, eg, should I try and place the inductors as far away from each other as possible?
The inductors I have look like this.
An externally hosted image should be here but it was not working when we last tested it.
Do I leave the tape on them?
An externally hosted image should be here but it was not working when we last tested it.
Do I untwist the leads, or doesn't it matter. Can I trim off excess (from the leads) if I need to or will this affect the inductance? The coppery coloured coating is an insulator as far as I have worked out, if the leads can be trimmed, do I simply scrape the coating off if I need to?
Think that's all I had to ask, thanks in advance.
Place the inductors 75mm (min) apart and opposed at 90°. In other words one flat as in your bottom pic and the other standing up as in your top pic with the outside of the coil towards the other inductor. Look at Troels coil page.
Placement of coils in crossover networks
Leave the tape on if desired as it makes no difference. You can leave the wire twisted but I tend to install heatshrink over the area they touch just in case the enamel is missing in some places. You don't have to trim the excess lead and is a good idea to keep it as allows for more flexible placement as well as if the inductor has to be unwound for a new value. To tin the ends with solder after cutting you have to scrape off the clear enamel coating.
Looks like that's a WES XLA inductor.
I have to disappear for a while (going under the knife) so will not be able to make any comments in the near future..... I'll be back.
I have to disappear for a while (going under the knife)
May the force be with you.
dave
All the best. I've had the knife a few times and surgeons earn their keep, well and truly!
Hope to see your posts again soon.
Frank
Hope to see your posts again soon.
Frank
Thanks guys.
Plenty of long scars to make me windswept and interesting even though it's only minor arm surgery relocating and decompressing nerves. A bit like this but starting above the elbow and hopefully not so extreme. This terminator needs a rebuild.
Terminator just cut his arm open
When back I'll be able to view but unable to type for a while. Over and out.
rabbitz,
What do you mean by a "painted baffle which was glued on"?
An iron on veneer that was pre-painted, in some choice of colours?
If so, where can you get them, Bunnings?
What do you mean by a "painted baffle which was glued on"?
An iron on veneer that was pre-painted, in some choice of colours?
If so, where can you get them, Bunnings?
I could be entirely wrong, but I assumed that he painted the MDF baffle prior to gluing it to the rest of the box. That would mean that your cuts would have to be spot on though.
An externally hosted image should be here but it was not working when we last tested it.
An externally hosted image should be here but it was not working when we last tested it.
Feel free to laugh at my crossover. Need to work on my component placement a bit...
An externally hosted image should be here but it was not working when we last tested it.
An externally hosted image should be here but it was not working when we last tested it.
An externally hosted image should be here but it was not working when we last tested it.
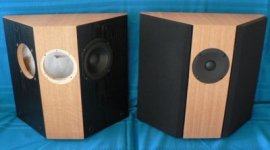
Still need to play with the port a bit, but from my first listening experience, I can't believe how good they sound. They put out more bass than I thought they would, actually has a fair bit of kick. They continue to impress the harder I push them. I can't really describe it any better as I don't have a trained ear, but the sound coming from them near convinces me that it is not coming out of a speaker at all.
Just have to decide on a veneer and final port length to complete them.
I'd just like to thank all that helped and encouraged me along the way. I'd particularly like to thank planet10 for providing the crossover details early on, saved me a lot of head scratching. Lastly, a HUGE thanks to rabbitz for persisting with endless questions from me, regardless of how stupid they would of seemed to those in the know. These speakers wouldn't of happened without the support of diyAudio's members.
I can't believe how good they sound.
🙂
A good start on your diy hobby.
dave
Make them look a little pretty then cross to the dark side and make a sub-woofer to suit, and you won't need stands if you build stereo subs either
Haha, I don't need to be convinced. I'll be building a sub for sure just because I have little else to do now.
So do you mean that if I build stereo subs, I can place the bookshelf speakers on top of them? I'm liking the sound of that, it would look impressive.
So do you mean that if I build stereo subs, I can place the bookshelf speakers on top of them? I'm liking the sound of that, it would look impressive.
Something like this
dave
An externally hosted image should be here but it was not working when we last tested it.
dave
- Status
- Not open for further replies.
- Home
- Loudspeakers
- Multi-Way
- Kit in Australia