Ok, back in action.
I have bought the MDF and a run of PVC pipe with an internal diameter of 51mm. I have started cutting the MDF into the small panels for the cabinet.
I'll post pictures as I go.
I have bought the MDF and a run of PVC pipe with an internal diameter of 51mm. I have started cutting the MDF into the small panels for the cabinet.
I'll post pictures as I go.
I spent the better part of today getting myself ready to router the speaker holes. I had to go out and buy a cheap ozito router as my Dad's old one does not plunge. I thought it would cause more pain trying mucking around with it rather than just buying a plunge router. I bought a plastic chopping board and made my own version of a jasper jig (Thanks for your guidance with that one, rabbitz).
I was very impressed as to how accurately it cuts after mucking around with some scrap wood. This is the first time I have ever used a router to do anything other than run along a straight edge. The rebating for the tweeters was very easy accomplished. Needless to say that I surprised myself.
Pics to come after I have a bit more of the build completed.
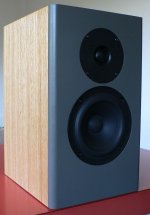
As promised.
Giving it a practise run
Same here, this is the point that I was amazed that all went together perfectly.
An externally hosted image should be here but it was not working when we last tested it.
An externally hosted image should be here but it was not working when we last tested it.
An externally hosted image should be here but it was not working when we last tested it.
Giving it a practise run
An externally hosted image should be here but it was not working when we last tested it.
Same here, this is the point that I was amazed that all went together perfectly.
An externally hosted image should be here but it was not working when we last tested it.
An externally hosted image should be here but it was not working when we last tested it.
An externally hosted image should be here but it was not working when we last tested it.
An externally hosted image should be here but it was not working when we last tested it.
An externally hosted image should be here but it was not working when we last tested it.
An externally hosted image should be here but it was not working when we last tested it.
An externally hosted image should be here but it was not working when we last tested it.
I have a question in regards to the box bracing.
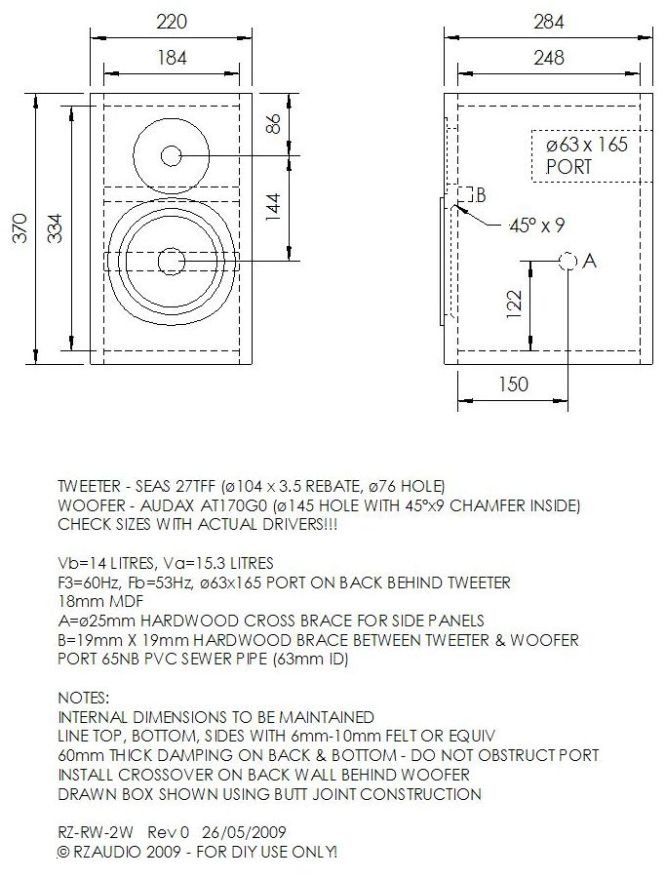
As my cabinet is slightly taller, do I place the round brace (labelled A) directly behind the centre of the woofer, or do I keep in the same location, measuring from the bottom?
As my cabinet is slightly taller, do I place the round brace (labelled A) directly behind the centre of the woofer, or do I keep in the same location, measuring from the bottom?
Rabbitz designed the box so he is the one to ask, but I would have said keep it as designed ( ie: in the same place as measured from the bottom of the box )
How many of these have been completed now??
Matt??
How many of these have been completed now??
Matt??
Thanks for the suggestion. I'm in no rush, I can start working on the back panel and the crossover in the meantime.
Keep the cross brace "A" behind the centre of the woofer or a bit below as it's more convenient for the damping material.
The idea is that it's not placed in the centre of the side panel in any direction so any resonances would be different and not similar in frequency. As drawn it's roughly about 0.36x the inside height of the box and the idea is to use irrational numbers and not numbers like 0.5x or 0.25x etc. With your higher woofer placement look at around 0.39x the inside height.
The idea is that it's not placed in the centre of the side panel in any direction so any resonances would be different and not similar in frequency. As drawn it's roughly about 0.36x the inside height of the box and the idea is to use irrational numbers and not numbers like 0.5x or 0.25x etc. With your higher woofer placement look at around 0.39x the inside height.
Last edited:
Thanks for the explanation rabbitz.
I recall reading that I don't have to use a round brace either, it can be square, with the narrower side facing the front/rear of the cabinet. Is that acceptable or would you really recommend using the circular brace instead?
Whilst on that topic, how do you glue the "A" brace in? Surely after applying glue to the edges of the brace, the glue would just run off whilst pushing it into the correct location?
I also bought the dampening material today from Jaycar, found the link provided earlier in the thread. I have some felt with an adhesive backing laying around, it's only 2-3mm thick though. Is this too thin to use to line the speaker enclosure with, if so, what is a good source to find something more suitable?
Thanks
Square, rectangular or circular braces are all fine. For square braces, install at 45° (corner up) as may or may not help with airflow. I used round because I had plenty of old hardwood broom handles laying around.
The brace is cut so it's a neat fit and not a tight fit so enough glue remains. I add a temporary block (for the correct brace location) for it to sit on while the glue dries.
2mm-3mm is too thin for the walls. For felt lining I use 5mm-10mm thick. Ironing board underlay is good for this purpose and can generally be found in supermarkets and hardware stores.
Last edited:
Understood.
I'll be making a trip down to the supermarket for an ironing board underlay then. Will PVA glue be enough to hold the lining to the cabinet?
I'll be making a trip down to the supermarket for an ironing board underlay then. Will PVA glue be enough to hold the lining to the cabinet?
This question probably doesn't have to be asked, but I just want to confirm as I haven't seen it mentioned in this thread yet. Sealing the box with a water based sealant, recommended? I can see that you have done it before Rabbitz but I can't tell if you have applied it to the enclosure that you were showing earlier.
Bracing is now installed.
(The camera lens makes the outer walls look bowed, they are nice and straight in real life)
An externally hosted image should be here but it was not working when we last tested it.
(The camera lens makes the outer walls look bowed, they are nice and straight in real life)
PVA works well for felt lining.... I've tried to remove some and had to use a chisel and scraper so it sticks well.
I use a clear water based paint to seal the inside of the enclosure and any raw MDF.... Estapol Clear water based. Wattyl recommends it be used on MDF as a primer before coating with any solvent based paints.
I use a clear water based paint to seal the inside of the enclosure and any raw MDF.... Estapol Clear water based. Wattyl recommends it be used on MDF as a primer before coating with any solvent based paints.
Cheers.
The water based clear sounds like the easiest way to go as I'm painting these cabinets (black, glossy), probably with a spray gun which will most likely mean that I'll be using paint with thinners. Was thinking of an enamel as I'm not really a fan of acrylic after using it once, it was my first attempt at spray painting with an air compressor driven gun. The clear coat was very average but came back ok after sanding with a high grit sandpaper. I've also used 2pac to spray an engine bay and it came up a treat.
The water based clear sounds like the easiest way to go as I'm painting these cabinets (black, glossy), probably with a spray gun which will most likely mean that I'll be using paint with thinners. Was thinking of an enamel as I'm not really a fan of acrylic after using it once, it was my first attempt at spray painting with an air compressor driven gun. The clear coat was very average but came back ok after sanding with a high grit sandpaper. I've also used 2pac to spray an engine bay and it came up a treat.
Last edited:
Painting boxes is an art and not easy. There is a very good thread around here on preparation and steps for painting. I cheat on most of mine and use timber veneered MDF which makes finishing easy but needs care during construction.
If you are painting them then a good water based primer should be fine but best to check with the information on your finishing paint to ensure compatibility.
You can get a lot of hints and advice from the guys in auto body shops.... if you know any at a personal level, otherwise they will tell you to bugger off.
Main problem with painting mdf is that it swells with almost any type of paint, but particularly with water based. Also if not sealed properly both in and out completely it moves with humidity. May not show up for some time Any cut edge then shows as a line. Hence rabbitz preference for veneer.
I have not found water-based primer suitable for a first coat because of that swelling and subsequent shrinking causing all square cut joints to show, but have had some success with a meths based sealer, in and out. However that may just have been luck. I suggest you research carefully. I think manufacturers use a two pot poly, with proper breathing gear!!! Its lethal stuff. Check with a furniture manufacturer if one is handy.
I have not found water-based primer suitable for a first coat because of that swelling and subsequent shrinking causing all square cut joints to show, but have had some success with a meths based sealer, in and out. However that may just have been luck. I suggest you research carefully. I think manufacturers use a two pot poly, with proper breathing gear!!! Its lethal stuff. Check with a furniture manufacturer if one is handy.
Thanks guys.
I spent a couple of hours this morning on the forum reading as much as I could about painting MDF, my head is swimming... Seems like it takes a lot of work, especially trying to prevent the cuts from showing through the paint.
I'm still want to try, even if it fails miserably. There is a lot of info here that I would like to put to use. I'm even thinking that if I stuff up the painting, I would probably be able to vener straight over the top. Not sure if that would work. Even still, I have enough MDF left over to build another couple of boxes.
I've sealed the inside of the box, I have a suitable foam to use as a liner and the dampening arrived today. I have everything I need to complete this project minus the paint.
The further I read, the less I want to paint. I enjoy the process, but the time it takes to get a proper finish is scaring me off. The amount of coats of primer, base coats, etc is unbelievable. I want to have these functional as soon as possible without having to rush them.
Veneering is starting to sound like a easy/less tedious route for me. The other factor is cost, paint isn't cheap and it sounds like MDF drinks a fair amount of it. I've already surpassed the amount I originally wanted to spend on a speaker kit (haha, funny how that happens so easily), so if veneering is a cheaper option I'll consider it. If I was to veneer, I'd probably just varnish the box, I'd already have a tin lying around. I'd possibly stain, try to get the wood as dark as possible to contrast the white woofer.
I have no idea how to veneer or how to cut holes in it, whether this is done by a router or a sharp knife. I have no idea whether it can be curved around corners or how it would work if I was to router a 45 degree bevel in the front edges of the box. I have some tutorials to read, haha.
Consolidated edgings market iron on veneers and are easy to apply. Used to be available at Bunnings and Nover. With holes already routed for the drivers you can use a sharp hobby knife to trim and then sand.
A good alternative is to veneer the sides, top and bottom and paint the baffle. I did one with a painted baffle which was glued on last.
A good alternative is to veneer the sides, top and bottom and paint the baffle. I did one with a painted baffle which was glued on last.
Attachments
- Status
- Not open for further replies.
- Home
- Loudspeakers
- Multi-Way
- Kit in Australia