OK. I need the DCV on all terminals of that IC. Copy and paste and fill in:
Pin 1:
Pin 2:
Pin 3:
Pin 4:
Pin 5:
Pin 6:
Pin 7:
Pin 8:
Pin 1:
Pin 2:
Pin 3:
Pin 4:
Pin 5:
Pin 6:
Pin 7:
Pin 8:
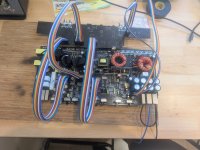
Remote voltage is a daisy chain from positive amp terminal. The power light of the amp doesn't come on while the top board of the amp is disconnected
Correct me if im doung my measurements wrong. One probe is on the ground terminal (12v input) of the amp, second probe on op amp pins
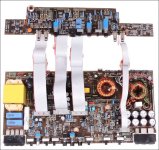
You're absolutely right, preamp board is disconnected and , unfortunately, i dont have any jumper wires to make the connection
Do you have some small wire (stranded ribbon cable [attached] would be ideal) to solder to a few of the pins of the op-amp (1/2 and 3 are most critical, at this point) and run them out to measure the voltage with the preamp board in place?
Attachments

The best i could find is cat 5 ethernet cable.do.i need to solder all of them, or, as you said only pins 1,2,3?
That's good enough. If you plan on working on more of these, the pluggable jumpers save a lot of time/headaches.
cang get the wires to stick to op amp, not sure whtas the issue. ive tinned the wires and the ic, solder sticks to the op ammp, but the wire to op amp not. can those jumper wires be readily bought?
Do you have any old computers? They all have the ribbon cable. If not, any computer store would have it, locally. This would be to do as you're trying now.
With ribbon cable (or even multiple runs of cat5, you could connect from one header to the other (main to preamp). All you need are the 10-pin connectors connected.
The connectors are like the following:
https://www.digikey.com/en/products/detail/3m/89110-0001/229679
They have to be purchased in male and female and need to be the type that cut into the ribbon cable when the cap is clamped down (hammered down).
The part numbers I have are out of stock but these are just generic connectors. If you don't plan on repairing more of these, there's no point in spending the money on the pluggable jumpers.
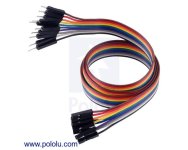
I had/have been recommending those but found a problem. If the ones you ordered didn't say 'copper' wire, order some that use copper wire. I think the ones I have used aluminum and they have gone open for about 50% of the jumpers. Confirm that whatever you get shows 0 ohms from end to end. Check every one.
Sorry, there was a misunderstanding.
Voltages with pins bridged:
Pin 1/2: 0v
Pin 3: 0V
Pin 4: -13.5V
Pin 5: 1.23V
Pin 6: 1.23V
Pin 7: 0.04V
Pin 8: 14.86V
Voltages with pins bridged:
Pin 1/2: 0v
Pin 3: 0V
Pin 4: -13.5V
Pin 5: 1.23V
Pin 6: 1.23V
Pin 7: 0.04V
Pin 8: 14.86V
- Home
- General Interest
- Car Audio
- JL Audio 500/1 V2 repair question