and you said "don't cut Quad 4 stack"? 🙂
I don't know what quad stack is.
Wait a second, you are the person who designed some of the horns for Lukasz Lewandowski?
I've been told by those that have have them that the highs slide down the long side (IIRC). Can't verify that as I no longer have access to the large horns.
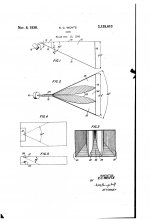
I guess maybe better to say along the outside. Regardless, W.E. painted a dashed line on the sides for aiming purposes: https://i.pinimg.com/originals/b4/21/8c/b4218cfcd07d2a4a18390e08fc6108d1.jpg
GM
Last edited:
Hi
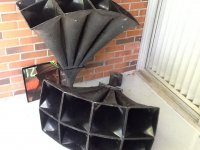
I used black mat camouflage paint. They disappear visually even when I have on the projector in the dark room. The original white was like sitting between two bathtubs. 🙂 annoying
Midbass is Emilar horn with floor/sidewall placed with B&C 8".
I also use the EV big 60 degree horns with JBL 2450SL.. both sound very good.
Crossover is 500 Hz - upper range driver is Radian 835 1.4" with BE
View attachment 794029
But EV9040 is 1,3" the 2450SL is 1,5", right?
Does this work?
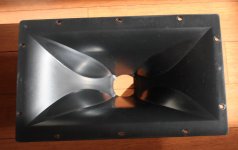
2005: Skew horn for loudspeaker, aka the "mumps" by Roy Delgado (Klipsch).
Delgado's patented Mumps are curved 1" ridges that round off the interior corners within the throat of the K-703-M midrange horn. The goal, according to Klipsch's website, is "to improve coverage and control of the key mid-frequency band."

Delgado's patented Mumps are curved 1" ridges that round off the interior corners within the throat of the K-703-M midrange horn. The goal, according to Klipsch's website, is "to improve coverage and control of the key mid-frequency band."
Klipsch also equips the K510 MkII horn with mumps:
Attachments

Last edited:
I don't know what quad stack is.
Wait a second, you are the person who designed some of the horns for Lukasz Lewandowski?
To many calls about Sato 🙂 Yes I was desiging for horns.pl between 2009-2013. Now they sell their own designes. Quad 4 stack is largest stack built by Wayne Picquet in US and imported by me to Poland.
What about mumps in 3 ft. long, oldskool horns (in order to avoid beaming)?
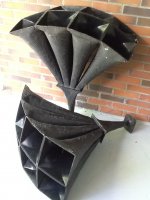
These Rauland multicells are from the 70s:
These Rauland multicells are from the 70s:
Attachments
Last edited:
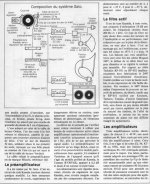
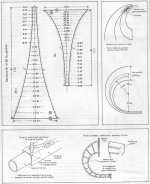
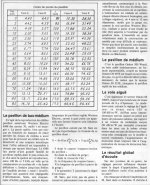
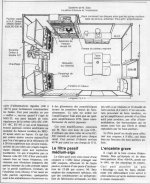
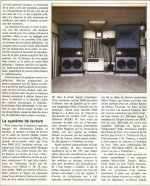
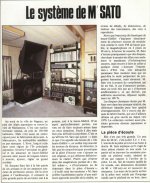
Jean Hiraga visits Susumu Sato:
Attachments
-
 516245SATO3 (1).jpg111.9 KB · Views: 161
 -
 429554SATO7 (2).jpg198 KB · Views: 96
 -
 528180SATO6 (1).jpg167.5 KB · Views: 122
 -
 611567SATO5 (1).jpg252 KB · Views: 152
 -
 140271SATO4 (1).jpg101.1 KB · Views: 144
 -
 461784SATO2 (1).jpg175 KB · Views: 183
 -
 699323SATO1 (1).jpg154.6 KB · Views: 193
 -
 557077SATO8 (1).jpg82.2 KB · Views: 107
Last edited:
To many calls about Sato 🙂 Yes I was desiging for horns.pl between 2009-2013. Now they sell their own designes. Quad 4 stack is largest stack built by Wayne Picquet in US and imported by me to Poland.
OK, well hello, and please feel to add to the quality of this thread as many have, so far.
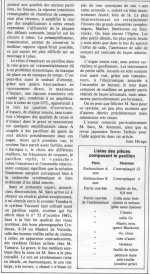
I've got the 3d printer narrowed down to 3 models. I'm in discussion with a person now to help figure it all out. Generally speaking, 3d printers have more resolution than one would need to print most horns. Its a matter of how much money I want to spend in order to get big enough printer to make print time not equate to something crazy. As with all things, there is some technique/skill/talent involved with how to use the printer. The neck of the horn is very simple and can be printed as one piece along with mount for the driver. I'm only concerned with the more dramatic angles nearing the mouth but it is already showing as completely possible and practical. Even at a fraction of a millimeter these plastics are very tough. Covering them with epoxy should add considerable amount of strength. If I create the parts with say 1/4" cavities thats enough room for enough sand to make for good dampening is it not? The surface is rendered with a minuet ribbed texture, a thin layer of epoxy and/or some sanding should take care of that.
Last edited:
What works best to properly bond/melt/glue 3D printed parts, depends on the filament.
- PLA: Methylethyl ketone/Ethyl acetate.
- ABS: Acetone.
2 part epoxy might work as well, but with the above solvents you more-or-less "chemically weld" the parts, instead of gluing them together.
- PLA: Methylethyl ketone/Ethyl acetate.
- ABS: Acetone.
2 part epoxy might work as well, but with the above solvents you more-or-less "chemically weld" the parts, instead of gluing them together.
Last edited:
Assuming you're still talking about 100-300 Hz horns, then easier to make them massive enough to push its mechanical Fs to < horn cutoff [Fp], i.e. like W.E. originally did with tar filled, otherwise you need a really rigid material to raise its resonance the ideal decade [5 octaves] and enough mass to damp it.
GM
GM
What works best to properly bond/melt/glue 3D printed parts, depends on the filament.
- PLA: Methylethyl ketone/Ethyl acetate.
- ABS: Acetone.
2 part epoxy might work as well, but with the above solvents you more-or-less "chemically weld" the parts, instead of gluing them together.
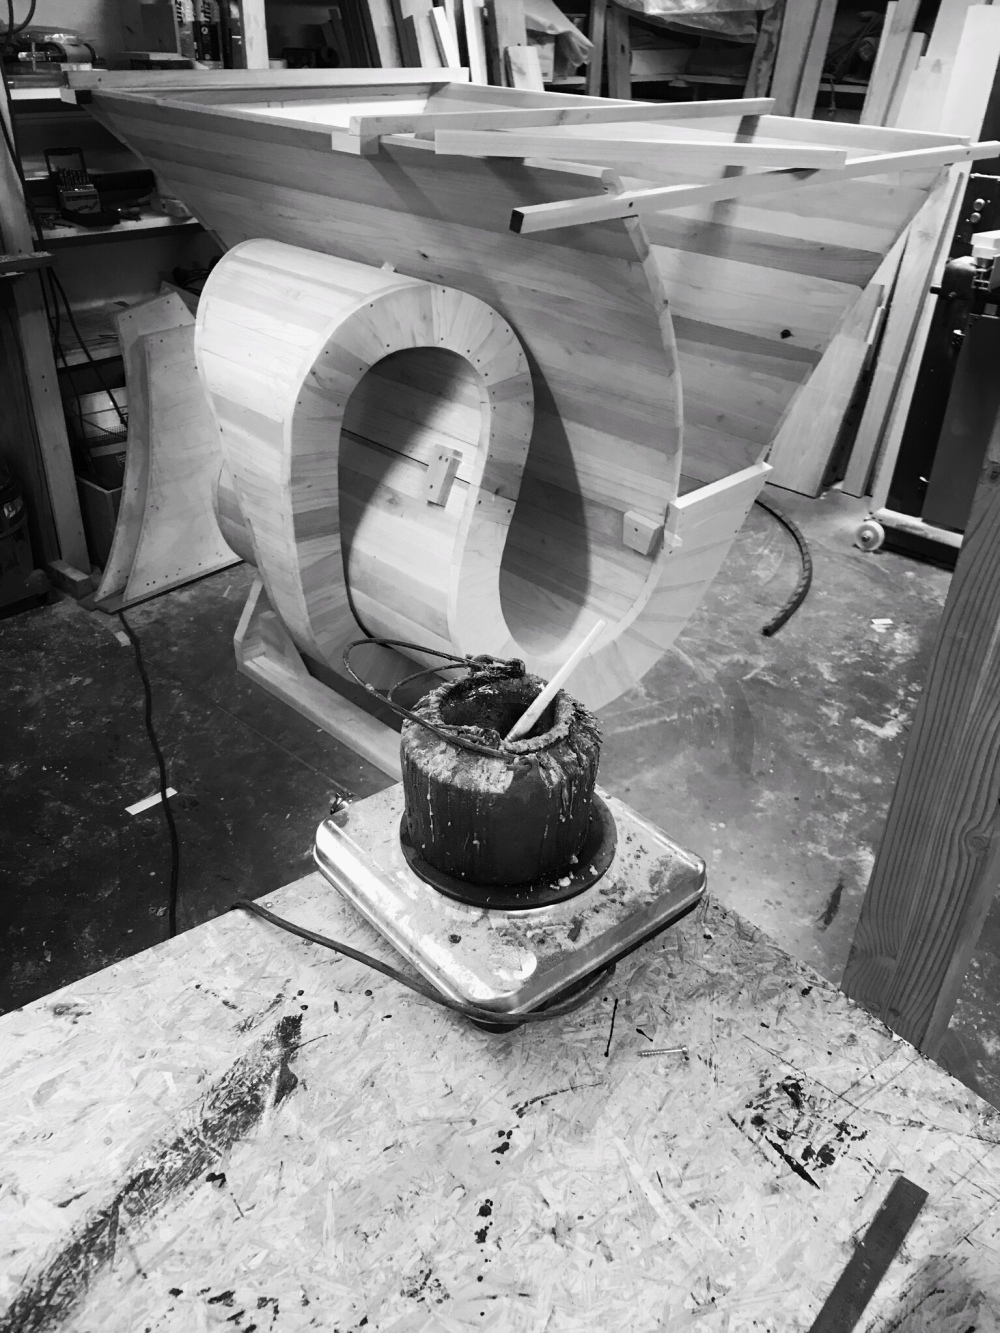
I like the idea of the chemical bond, I'm just saying, the whole thing is going to have a shell of epoxy resin, or some kind of finish coat anyway so. If filament material allows it. Horn oriented face down, I could print layers along the longitude but some bracing would likely be involved, otherwise 5 inch tall, layers starting at the mouth, I can just about print out 1/4th of the diameter. Once the horn dimensions where under 15" inches I can print whole pieces.
The one challenge I see from my perspective is, how easy is it going to be to apply finish material inside the whole printed neck and is the resulting surface going to be smooth as possible.
When I designed a radial waveguide for a cone driver I discovered that the best shape for a baffle style phase plug is a diamond, working back toward square with axial length. Is this the same thing/same reason for?Ro808 said:Mumps
Use in a well ventilated area to avoid unwanted psychedelic effects.Methylethyl-ketone
Annealing adds some strength to 3D printed plastics, but I am not sure about the effects on welded parts.
Last edited:
When I designed a radial waveguide for a cone driver I discovered that the best shape for a baffle style phase plug is a diamond, working back toward square with axial length. Is this the same thing/same reason for?
There might be some some similarities.
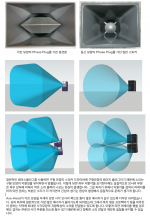
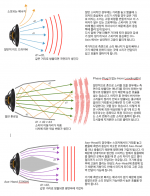
Your description reminds me of Funktion One's Axe-Head (I hope you understand Korean 😀)
The mumps not only reduce beaming and waistbanding, but also acoustically extend the horn's path length, thus lowering the cutoff frequency.
The small K510 loads the driver from about 500Hz, which is exceptionally low, considering its limited depth.
Attachments
Last edited:
I like the idea of the chemical bond, I'm just saying, the whole thing is going to have a shell of epoxy resin, or some kind of finish coat anyway so. If filament material allows it. Horn oriented face down, I could print layers along the longitude but some bracing would likely be involved, otherwise 5 inch tall, layers starting at the mouth, I can just about print out 1/4th of the diameter. Once the horn dimensions where under 15" inches I can print whole pieces.
The one challenge I see from my perspective is, how easy is it going to be to apply finish material inside the whole printed neck and is the resulting surface going to be smooth as possible.
The epoxy won't had this much strength. What make composite material strength is the woven fiberglass or carbonfiber used in combination with epoxy.
Surfboard shapers usually doesn't use fiberglass or carbonfiber on foam ( as the board needs some flex in use), just a finish with the epoxy ( in french we use this word for this step: 'glacage' which could be translated to icing in english).
It allow for a smooth shinny finnish ( if you spend enough time sanding it) but in no way it give this much strength: broken boards happen each session everywhere in the world even with not very punchy waves).
It is not difficult to have epoxy with a nice finish it just take time and patience and the good tools and space.
I don't know if you ever used this kind of thing but never touch epoxy with bare hands ( you could never have kids again...quick enough ( and your balls willdouble size) and use protective mask. Really when sanding those fine particle are nasty things and the product is really nocive for your health and environnement.
Last thing, before going into this make sure epoxy will bond to the material you plan to use as it won't with some materials. I've seen pieces 'delaminate' within some weeks because of incompatibility between materials ( i think it was polyprop, can't remember atm will investigate more with colleagues).
Last edited:
the mumps but also acoustically extend the horn's path length, thus lowering the cutoff frequency.
The small K510 loads the driver from about 500Hz, which is exceptionally low, considering its limited depth.
You could also say: the mumps increase the horn's throat resistance.
- Home
- Loudspeakers
- Multi-Way
- Is it possible to cover the whole spectrum, high SPL, low distortion with a 2-way?