Hi All -
First... Humble apologies. In my fervor to answer all questions and make a few jokes, I didn't check back to post #61. MY FAULT. The board layouts were not included. So, there was no way for even the most motivated among you to print the board layouts and measure. That darn Canadian was far too nice to just point out that I was being a doofus. 🙂 The board layouts were not posted for what I hope were/are obvious reasons.
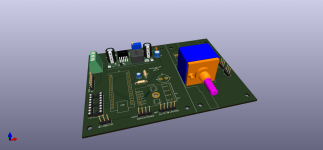
You do, however, have some pretty nice hi-res photos to check parts placement against for the time being until you get your boards and also just marvel in their mightiness.
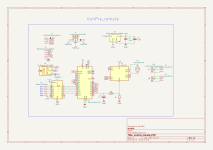
I dug through my files and found all my paper prints from ticking off schematics against board layouts against my beep machine measurements on the boards themselves.... Sheesh we've gone through a few iterations.
I then checked one more time to see that all of them matched the latest spreadsheet files, schematics, boards, parts etc, I have and the ones I sent to 6L6.
Then, I cleaned up the BoMs I used, tweaked them just a wee bit, and converted them to .pdf
Here ya go... Once again... These SHOULD be fine, but there's a reason for the final of the final of the final <crossing fingers> verification builds from randomly selected boards / kits. Use at your own risk.

Edited to add - Green highlight should be what you get in the kits.
First... Humble apologies. In my fervor to answer all questions and make a few jokes, I didn't check back to post #61. MY FAULT. The board layouts were not included. So, there was no way for even the most motivated among you to print the board layouts and measure. That darn Canadian was far too nice to just point out that I was being a doofus. 🙂 The board layouts were not posted for what I hope were/are obvious reasons.
You do, however, have some pretty nice hi-res photos to check parts placement against for the time being until you get your boards and also just marvel in their mightiness.
I dug through my files and found all my paper prints from ticking off schematics against board layouts against my beep machine measurements on the boards themselves.... Sheesh we've gone through a few iterations.
I then checked one more time to see that all of them matched the latest spreadsheet files, schematics, boards, parts etc, I have and the ones I sent to 6L6.
Then, I cleaned up the BoMs I used, tweaked them just a wee bit, and converted them to .pdf
Here ya go... Once again... These SHOULD be fine, but there's a reason for the final of the final of the final <crossing fingers> verification builds from randomly selected boards / kits. Use at your own risk.
Edited to add - Green highlight should be what you get in the kits.
Attachments

good work
edit that to add note about Lorlin (or knock-out) print rotary switch for selecting input relay, mandatory Make-before-break ("S" mark on back side of Lorlin switch)
note for Volume Pot - 10K to 25K (matter of upstream sources Rout Cojones)
note for multiturn pots - any pinout ( inline, zigzag), screw on top
note BC transistors - suffix B or C , irrelevant
note BD transistors - any suffix
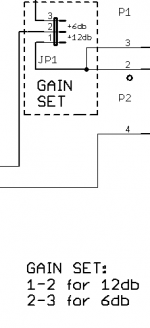
edit: note about gain: "need more gain? more gain is for Weaklingsessss "
"
edit that to add note about Lorlin (or knock-out) print rotary switch for selecting input relay, mandatory Make-before-break ("S" mark on back side of Lorlin switch)
note for Volume Pot - 10K to 25K (matter of upstream sources Rout Cojones)
note for multiturn pots - any pinout ( inline, zigzag), screw on top
note BC transistors - suffix B or C , irrelevant
note BD transistors - any suffix
edit: note about gain: "need more gain? more gain is for Weaklingsessss
"
Last edited:


Hi guys, could you tell me please how's the gain of this preamp compared to B1 Nutube? Could I obtain the same level of this one?
Thank you,
Gaetano.
Thank you,
Gaetano.

One of our fearless leaders, whom we have all grown to depend upon for our continuing expansion, is balancing a seasonal busy working schedule... with his other non-seasonal working schedule... 😎

^ I am completely biased, but it is my favorite both in terms of sonics and for versatility / build complexity / neat stuff.
It came along at the perfect time for me in my DIYing life. They're certainly not the easiest things I've ever built, but neither project should be too complex for a person that can follow a schematic. Plus, it's all still completely through-hole.
The other wonderful advantage is both the extremely quiet and rock-stable PSU section and the input switching are all on the same board. To me, that helped minimize the opportunity for ookups in assembly and wiring. It's a very satisfying project to build and to use day-in-day-out.
It's definitely worth the wait. Which... should... not... be... too... much... longer. 😉
For those that have an empty bench waiting... and want to get started immediately when they get their kit, I'll repeat one piece of advice. Get a Mega 328 or similar transistor tester. You'll receive a bunch of unsorted TO-92 package parts that will look the same to the naked eye. It's way easier (for me) to pop them in a tester than to try and discern the writing on the packages for proper sorting. Mixing up the transistors would be bad juju and impossible to troubleshoot by pictures alone if a board is mis-stuffed. They're well worth the investment, IMO.
Gentlemen,
For those that have an empty bench waiting...
and want to remote control the IronPre with any old IR control lying around...
Long time ago I have asked if there would be an option for remote control for input selection and volume control in this project? (s. #15)
ZM's answer has motivated me to do something in between, because I am too lazy to stand up every time when I want to set volume or input on device.😉
Of course it has to be a low-cost solution as I'm an old GB too...🙂
Here are the requirements:
1. Remote volume control + muting with motorized ALPS pot
2. Remote control for input selection
3. Digital display of current volume and input with tiny OLED on front plate
4. Volume and input control with one rotary switch directly on device
If anyone is interested, I would provide more details...
Attachments
Excellent idea. I'd love to see your remote control project in more detail.
I'm working on a similar project, but slightly different.
I'm working on a similar project, but slightly different.
Last edited:

@ACnotDC - That is SUPER neat-o! I would definitely try something like that. Personally, I'm OK with manually selecting inputs, since I typically only do it once per listening session. However, remote volume (and particularly mute) is almost a requirement for me.
FWIW, I also have a few of the 4-gang Alps motorized pots I had planned to try out in the Balanced version. 😉 To-date, I have only used the dual manual pot solution. Still futzing around with Muses-based solutions.

FWIW, I also have a few of the 4-gang Alps motorized pots I had planned to try out in the Balanced version. 😉 To-date, I have only used the dual manual pot solution. Still futzing around with Muses-based solutions.
What's a "Muses-based" solution? I don't know that terminology.Still futzing around with Muses-based solutions.
- Home
- Amplifiers
- Pass Labs
- Iron Pre Essentials Kits For The DIYA Store - Register Your Interest