
I guess MOTIP is international and just fine on Wood as well as metalI would love to do this, but I have been looking for wood paint for two days, but what Google shows me is depressing. This is usually the paint for painting fences. 🙂 I don't want my spheres to look like granny's fence. 🙂
Balls in English common language is яички
You made my day! This is very funny! 🙂 I did not know. I'll keep it on mind. 🙂 But I'm surprised you wrote in Russian?
I guess MOTIP is international and just fine on Wood as well as metal
Damn... I look like an idiot... Is that car paint? But the tree will then cease to be a tree... It will not be alive. I would like to keep the eco-friendliness element of wood.
I'm currently watching a YouTube video about Keda Red Liquid Wood Colorant. I was very impressed with this video. What do you think?
Looks nice. Kef rdm one and two uses same technique, but on mdf. The spray laquer is no different from MOTIP
Looks nice.
Yes, I'm impressed too. A very expensive dye in my country, but I think I'll take a chance, take it for experiments. While the spheres are being milled, I will be experimenting with wood. 🙂 I came up with an occupation.
I have a set of Keda dyes. Yes they are expensive, but it doesn't take a lot of powder. I mix mine with 70%-90% alcohol for fast drying and it doesn't raise the wood grain much. But different woods take the dye differently, you need to experiment. The reds and blues can be gorgeous! Of course you can easily mix the colors. I like the dye better than paint when you can use it, because you have the color and the wood grain. 
Guitar makers are very skilled at this.
Guitar makers are very skilled at this.
I'm already trying to buy a set of several colors of Keda, but it turns out that what I found is bought through ebay, but ebay won't let me buy anything anymore. 🙂 We again fell behind the iron curtain, as in 40 years ago in the USSR ... God, I was just born then, but I remember this terrible time ...
If you can find food dye, it can also work. It might not last long in the sun, but I have photographs that I colored with food dye 25 years ago that are still bright.
Okay, as they say: what "God does not do - everything is for the best." 🙂 I won't be in a hurry, I have a few pieces of wood, tomorrow I will buy the materials available to me, and try to experiment...I'm already trying to buy a set of several colors of Keda, but it turns out that what I found is bought through ebay, but ebay won't let me buy anything anymore. 🙂 We again fell behind the iron curtain, as in 40 years ago in the USSR ... God, I was just born then, but I remember this terrible time ...
There was such a wonderful poet in Russia, Mikhail Lermontov, he wrote such a poem, I will try to translate it now:
In the innocence of the ignorant
In short, I wanted to know you
But these sweet hopes
Now I'm completely lost.
Without you - I want to tell you a lot,
With you - I want to listen to you:
But silently you look strictly
And I, in embarrassment, keep silent!
What to do? - unsophisticated speech
I can't occupy your mind...
All this would be funny
When would not be so sad.
All this would be funny Whenever it was so sad... It’s impossible to translate exactly ... This is just the most important phrase.
Easy. Buy any old tweeter and put the word "super" in front of it.
Can you hear 18K? Very few men can, and even less of the last couple of generations with loud clubs and ear buds.
Can you hear 18K? Very few men can, and even less of the last couple of generations with loud clubs and ear buds.
Or leather stain, this will also work great on woodIf you can find food dye, it can also work. It might not last long in the sun, but I have photographs that I colored with food dye 25 years ago that are still bright.
thanks for the advice. I don't give up. 🙂 Everything will be fine! While I settled on the oil coating. Then this mess will end for us, the borders will open again and I will buy this Keda dye, and make the spheres red, as I originally wanted. But first experiments, experiments and more experiments. 🙂
Vetusto, the red color in that video looked very good, but keep in mind the wood he uses is very bright, your spheres are made of some darker wood, looks like Teak, and that red color will look quite different on it, probably quite dull and would need brighter lighting to show off, you can try to wet the wood with a bit of water and you will see how dark it gets and how the grains come forth to get some idea.
When you try out the new color you can start first painting a bit on the inside of the spheres to see how the color looks in case of you don't like the result before you paint the whole outside, the dye goes deep inside the wood and it will require a lot of work sanding off if you regret the result.
When you try out the new color you can start first painting a bit on the inside of the spheres to see how the color looks in case of you don't like the result before you paint the whole outside, the dye goes deep inside the wood and it will require a lot of work sanding off if you regret the result.
Last edited:
Yes you are right. But, unfortunately, I do not know what tree the spheres are made of. The master who undertook to mill the front edge said that it was very similar to oak. Now there is a feeling that the spheres are varnished. When I have the spheres again, I will sand them down with sandpaper. In this case, the texture of the tree will be visible and it will be clear what to do with it next.
There is one problem: spheres are made of parts. All these parts are glued together. I don't know the brand of glue. It can be anything from epoxy resin to PVA glue (I don't know how to translate this abbreviation correctly, the long name of this glue is polyvinyl acetate). In other words, I am very worried that with some kind of finish with oil or varnish, the gluing points will stand out strongly. That is why I will conduct experiments. I'll take a few pieces of wood, stick them together with different glues and try to treat them with oil, paint and other coatings that I'm looking for now, then I'll see what effect it will be.
There is one problem: spheres are made of parts. All these parts are glued together. I don't know the brand of glue. It can be anything from epoxy resin to PVA glue (I don't know how to translate this abbreviation correctly, the long name of this glue is polyvinyl acetate). In other words, I am very worried that with some kind of finish with oil or varnish, the gluing points will stand out strongly. That is why I will conduct experiments. I'll take a few pieces of wood, stick them together with different glues and try to treat them with oil, paint and other coatings that I'm looking for now, then I'll see what effect it will be.
Last edited:
Hmmmm, good point about the glue lines. I don't remember having trouble with any, but have not done much with complex glue-ups like you have.
PVA is the correct name for the glue.
PVA is the correct name for the glue.
I have used oil on many glued wood surfaces. It should not give any issues. But a piano fish might crackle if the glued item, crack just a little.
Good idea as the result can vary a lot between different combinations, looking forward to see the result!I'll take a few pieces of wood, stick them together with different glues and try to treat them with oil, paint and other coatings that I'm looking for now, then I'll see what effect it will be.
:)Hello! I'm getting closer and closer to the finish line!
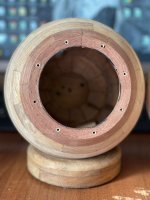
Last week my friends 3D printed a jig from my drawings so that I could drill holes for the terminals at an angle to each other. And this week I bought special glue, oak veneer and good oil. The bottom line is that on the side where the clamps should be located there are many holes that are not beautiful and are not needed. For two days I suffered, gluing the veneer. I spent 3 kilometers of nerves and about $100 on auxiliary materials such as glue, oil, veneer and a wood carving knife. 🙂
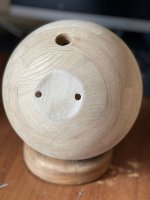
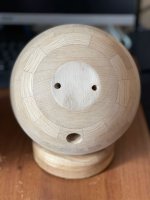
And I did it! Everything is very beautiful now! 🙂 How do you think?
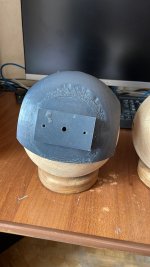
The first photo shows a helmet for a sphere. 🙂 This is my conductor.
I also bought a hefty oak board. I wanted to cut round chopsticks (I hope that's the right word?) that I wanted to glue into large holes, but I also dulled my favorite Japanese saw when sawing this oak and my hand jigsaw did not help me cut such chopsticks beautifully, and I decided that let those big holes stay like that....
As the saying goes, "the best" is the enemy of the "good"
Last week my friends 3D printed a jig from my drawings so that I could drill holes for the terminals at an angle to each other. And this week I bought special glue, oak veneer and good oil. The bottom line is that on the side where the clamps should be located there are many holes that are not beautiful and are not needed. For two days I suffered, gluing the veneer. I spent 3 kilometers of nerves and about $100 on auxiliary materials such as glue, oil, veneer and a wood carving knife. 🙂
And I did it! Everything is very beautiful now! 🙂 How do you think?
The first photo shows a helmet for a sphere. 🙂 This is my conductor.
I also bought a hefty oak board. I wanted to cut round chopsticks (I hope that's the right word?) that I wanted to glue into large holes, but I also dulled my favorite Japanese saw when sawing this oak and my hand jigsaw did not help me cut such chopsticks beautifully, and I decided that let those big holes stay like that....
As the saying goes, "the best" is the enemy of the "good"
Attachments
-
 WhatsApp Image 2022-04-08 at 11.30.23.jpeg165.5 KB · Views: 58
 -
 WhatsApp Image 2022-04-08 at 10.46.07.jpeg230.6 KB · Views: 63
 -
 WhatsApp Image 2022-04-08 at 10.46.08.jpeg200 KB · Views: 61
 -
 WhatsApp Image 2022-04-08 at 11.17.34.jpeg177.4 KB · Views: 62
 -
 WhatsApp Image 2022-04-08 at 11.17.36.jpeg166.8 KB · Views: 63
Tonight I'll cover these spheres with oil and glue the terminals. 🙂 I really hope that it will be a masterpiece. 🙂
Now I'm sitting, picking up an inductor and capacitors in order to make a filter at the weekend. I think I will try to make two filters. one first order filter, only a 1.99 capacitor (but I did not find 1.99 uF, only 1.5 and 2.2 uF), and a second second order filter. According to the calculation of the calculator, in order to cut the frequency by 10 kHz, you need a coil of 0.255 mH, and a capacitor of 1 uF. And again, I didn’t find the coil at 0.255, only at 0.22, but I found a 1 uF capacitor.
Here I sit and think, will I burn my tweeters?
- Home
- Loudspeakers
- Multi-Way
- how does one make a super tweeter