Sorry for a very long first post but I hope it gives all the relevant information needed without having to drip feed it.
TLDR; player won’t read CDs after being stored in attic for about 20 years; I changed all electrolytic capacitors, and resoldered most joints, on the power, decoder and servo boards. Player will now read TOC of a couple of discs sometimes but no others. It won’t play any tracks or discs.
A few months ago I decided to get my late 1980s B&O system from the attic where it had been stored for about 20 years and set it up in a spare room. Unfortunately the time spent in the attic has been detrimental to its health.
The CD player wouldn’t read disks properly giving a “?” on the display.
I’ve done a number of things to try to fix it based on the advice I’ve found on the internet.
I changed the electrolytic capacitors on the 5886 servo board with the recommended pack from BeoParts including the all-important blue axial one. After that it played for a couple of minutes but then powered down. I then resoldered the voltage regulator connections on the decoder board. Success I thought as it now played CDs. To check it out I left it on repeat play for a few hours just to make sure I’d fixed it and it worked fine. But, the next day it wouldn’t read disks at all again.
Since then I’ve;
changed the voltage regulators on the decoder board in case they were performing below spec
checked the caps on the power board. I did find a faulty one although that didn’t actually relate to CD playback. It’s one that’s controls the remote controlled standby system. But, I changed them all just in case.
changed all the caps on the decoder board. I first changed the ones relating to power despite none showing as faulty. I measured the DC voltage getting to the servo board from the decoder board and it is close to specification, but not perfect. The two feeds that should be + and - 10v are between 11v and 12v (taking into account if they’re + or -). The other power feeds should be -6v and +5v; I’m reading about + and - 6v on both. Do these numbers look OK?
Still no joy, so I checked and changed all the remaining capacitors, both radial and blue axial, on the decoder board. Am I right in thinking they relate to sound processing? All the Philips blue axial ones were out of spec, so not a wasted effort.
After all that, I now have a player that occasionally reads the TOC on a couple of CDs correctly as it shows number of tracks, CD total length, track length and lets me advance to individual tracks. But it won’t play an tracks. If it tries to play them it shuts down after a few seconds. Other CDs it just shuts down before it can read the TOC.
Finally, when I listen to it trying to play a CD I’m sure the speed the CD rotates at seems to change as though it’s hunting for the correct speed and then it shuts down. There is also a sound of something rubbing when the CD turns, but there is no evidence on a CD as to where it might be rubbing.
Apart from messing about with the laser power potentiometer, which I’m not keen to do as all I have is a standard multimeter, I’ve run out of ideas so am looking for any guidance you guys can give me. Do I need to test/replace the other components on the servo board; ceramic capacitors, diodes and transistors? Or, is it drive motor related? Or, maybe find a non B&O working player with a CDM 2/10 drive and try that in my B&O?
Usually the problem is caused to low power output of the laser. I have several old philips CD players and most of them are still working after adjusting the power output. Some of my players have this type of drive. I'm no expert but usually I get them to work after "fiddling" with the potentiometers. Just carefully adjust them bit by bit by turning left or right and see if the laser starts to read the TOC. Since yours already reads some CDs I think you should be able to get it working quite easily. If not then find a working donor player (any Philips-like player can be used for this as long as the same type of laser is used in it). I have swapped several laserunits around in order to get them working again.
To find a donor you could use this list: https://vasiltech.narod.ru/CD-Player-DAC-Transport.htm. (I check this list regularly to find the right CD players - I'm a huge fan of the old TDA1540/TDA1541 dac CD players) The CDM-2/10 is very common. But beware: Philips sometimes used different CDM-2 types in the same CD player. The other types should also work, but sometimes it might not.
To find a donor you could use this list: https://vasiltech.narod.ru/CD-Player-DAC-Transport.htm. (I check this list regularly to find the right CD players - I'm a huge fan of the old TDA1540/TDA1541 dac CD players) The CDM-2/10 is very common. But beware: Philips sometimes used different CDM-2 types in the same CD player. The other types should also work, but sometimes it might not.
Last edited:

sort of forgotten question: did you clean the lense? If not then just use a cotton swab with some alcohol and clean gently. Let it dry for a minute or so. Sometimes that may already solve reading errors.
First thing I did was clean the lens with IPA. What puzzles me is, after changing the capacitors on the servo board and then reflowing the voltage regulator joints it worked fine for about a day, then stopped working, Everything I've done since then hasn't really made any difference.
My original plan was to resurrect the record deck and amplifier, which I've done. The tape deck and CD player are more a hobby challenge to see I can get them working. Therefore, I'm not too keen on spending much more money on parts. There is a working one (at least that's what the buyer says) on eBay for about £150 which would allow me to swap parts and find out what's exactly wrong with mine. But, whether it's worth the cost is another question.
My original plan was to resurrect the record deck and amplifier, which I've done. The tape deck and CD player are more a hobby challenge to see I can get them working. Therefore, I'm not too keen on spending much more money on parts. There is a working one (at least that's what the buyer says) on eBay for about £150 which would allow me to swap parts and find out what's exactly wrong with mine. But, whether it's worth the cost is another question.
Some very good news 🙂 🙂 and not so good news 🙁🙁🙁.
I reassembled the player to adjust the laser power, and surprise, it read and played all the discs I tried. I can only think that previously I hadn't put the rubber suspension pieces, between the CDM and the chassis of the player, back correctly, thus making the laser angle to the CD lopsided. This time I made sure they were absolutely seated correctly.
But, not so good news as it stops playing after a short time. For example, put a CD on when it hasn't been used for several hours and it plays for about 5 minutes before stopping. Try it again straightaway and you get about 2 minutes, then 1 minute and finally just seconds. When it stops playing each time there is a second or so of sound through the speakers of crackling like something is shorting out.
This may be good news as it could be a dry joint; I'm thinking power supply related. In which case, easy fix, just resolder them all again. Or, bad news dodgy component which may be an issue to identify. The design of the player means all components are hidden when it's playing, especially the servo board components. Therefore, I'm not sure how to identify the component apart from touching the underside of the board and seeing if there is a hot spot.
If I could see the components I'd try brushing them with IPA to see what gets hotter than the others. Would this work on the underside of the board?
Glad you were able to solve your issue partially. Putting all parts back in the right way is quite crucial.
Not so nice that the playback stops after a while. Does is play again after switching off for a while? I.e. cooling down helps to start playing again?
As for further investigation I don't know how to proceed. For trying to pinpoint if you have a bad spot or a hotspot or a loose solder joint I would try to find it by spraying cold air from a compressed air can onto the back of the board.
What may help also is to resolder all components, especially the griplets.
I think I've taken it apart so often now I just got sloppy putting it back together the least couple of times. Doh!!!
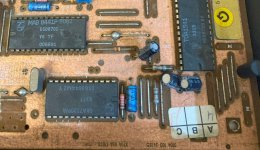
When you mention griplets, are these the blobs of solder through board connectors. For example on the decoder board I redid the joints that had pieces of wire with solder blobs, see attached. Or, are they also the through board connectors [square patch with copper ring in it] as in the bottom right of that picture?
When you mention griplets, are these the blobs of solder through board connectors. For example on the decoder board I redid the joints that had pieces of wire with solder blobs, see attached. Or, are they also the through board connectors [square patch with copper ring in it] as in the bottom right of that picture?
Attachments
All sorted. The overheating was a power supply voltage regulator not correctly seated against its heatsink.
It now plays OK with a number of different CDs. But, some it doesn't read initially but OK on the 2nd or 3rd try. Then, I remembered it was never that great at playing newer CDs and there was always a concern when buying one in the late 1990s and early 2000s to see if it would play. I'm sure I sent a number back to Amazon thinking the disc was faulty.
I think the failure to play is down to a mechanical rather than electronic issue. When they don't play there is a definite rubbing noise from the CD. I wonder it's the rubber bushings losing their damping/springiness properties over the years.
But, that's a job for another day.
Attachments
great to hear you solved it !! The issue with not playing directly and the rubbing may be caused by the fact that the CD is a bit too close to the lense. For this you might try to adjust the torx-screw on the motorspindle. Maybe a 1/4 turn would be enough (check out which way is up and which way is down). Best to mark the current location of the screw and then turn it a little bit.
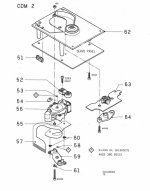
Are you referring to the motor that drives the CD? On my version of the CDM2 there seems to be no height adjuster. The drive motor is held in place by a plastic retainer, part 64 on the diagram, that itself is secured at each end by a torx nut and bolt. I think the only way to adjust the motor height is by slacking off the retaining bolts. But, I'm not sure that is correct as I can't see how you would get each bolt slackened in sync to ensure the retainer is level. The actual swing arm motor is again held in place by in a similar way, part 59.
Or, are you referring to the torx-screw holding part 52, the laser itself?
Or, are you referring to the torx-screw holding part 52, the laser itself?
Attachments
And now it's all gone wrong again and won't play any CDs. It'll read the TOC correctly on some but not play any. Just like a few months ago when I thought I'd fixed it but it only worked for a day.
I think it's mechanical as I can't believe the electronics have failed again. Therefore, it looks like I will now have to try the adjustment you suggested MSHAVS. Hopefully that will compensate for the possibly shrunken rubber suspension thingys. I can't see what else it can be.
Looks like yet another complete disassembly, unless I can carefully remove the servo board to access the adjustment screw without having to take out the whole CDM assembly.
Thanks for that @weissi.
Anyway, just tried it again and it now works fine on all the CDs I try expect for one where it doesn't like the middle tracks of an 8 track CD. Go figure.
I now realise it must actually be an Alfa Romeo cd player. It was built in Italy, looks good, performs pretty well but breaks down just when it feels like it for no particular reason!!!
To save starting a new thread; it plays most discs but not all the newer ones. Might this be caused by the laser needing more power?
Hello, I have also a Beogram CD3300 that does not play the CD’s.
It’s behavior is as follows for all CD’s. It spins for a while and does not read the TOC and displays the symbol ?
I have the service manual and test equipment available but it does not tell me how to get access to the component side of the PCB’s. I guess the problem is related to laser focus or power. Could you shed any light?.
I have replaced the gearwheel and belt on the glass plate drive and wonder what the correct sequence of events shall be.
When i push eject the plate is lifted about 15mm and then the drive starts slipping due to some light obstruction at the eject switch mechanism which is easily overcome by my finger assistance. The glass plate will raise to a near vertical position to allow me to insert the CD. Pressing “play” lowers the glass plate to close and bounces about 4mm up when touching the deck and settles in the normal closed position after which the CD starts to turn a very little bit in the wrong direction after a second it will turn correctly sometimes for a few seconds, sometimes for a lengthy period of time but no display of the TOC. When the disc spins I can step the tracknumbers as indicated on the display but no sound and finally it stops displaying the dreadly ?
@Brasto I've had pretty much all the problems you mention.
How to strip it down is shown here, the CDX2 is pretty much the same beast as the CD3300;
The lid bouncing back up is solved by replacing the blue 16v (I can't remember the uf) capacitor on the underside of the lid motor control PCB.
To open the player you should only need to press the button once and it then should fully open. If it doesn't, it sounds like the belt is loose. Where did you get your replacement from? The button only needs one push as that is all it takes to activate the open routine. When you get the bottom off you can see how the eject button rod pushes into a sensor to start the process.
To close the lid you can press the play as you say. But you can also give STOP a long press. This will close the lid and read the TOC but not play. Actually pressing any of the buttons will close the lid and do what the button says; advance, return, play, stop.
As it's not playing, the usual first step is to replace the blue capacitor, 16v 33uf, on the servo board. General advice is to use a specific capacitor, but there are some that have just used a good quality one. Search for "capacitor 2013".
Before you replace anything, it might be worth checking to see if the laser is working. Do this by removing the lid and press play without a CD in place. If you film through a phone you should be able to see the red light.
Finally, if you do get to to play, Congrats, but you might not get any sound out. I've found the solder connections in the 7 pin DIN plug fail after so long and need resoldering. Good luck in removing the plug without damaging it. I'm sure there's a correct technique but I've managed to destroy 2 trying to get them off.
Thanks a lot, there is good information in your post which I will try this weekend.
You mentioned: As it's not playing, the usual first step is to replace the blue capacitor, 16v 33uf, on the servo board. General advice is to use a specific capacitor, but there are some that have just used a good quality one. Search for "capacitor 2013".
I have not been able to locate this C2013 elco of 33uF on the Servo PCB schematic. Is there a TYPO error?
Part List does not address a C2013 either. Did you mean C2103 connected to the base of TR6108?
Last edited:
You're right, typo. Sorry, it should be 2103. It's the one in line with the variable resistor that controls the laser output. If you've got the same service manual as me, page 2-3 shows the servo board PCB 30 and its just above the resistor 3106. When you finally get to look at the board components you can't miss it.
- Home
- Source & Line
- Digital Source
- Help with CDM2/10 mechanism in a Bang & Olufsen Beogram CD3300