Nope, not possible.
250K is more than close enough. Check first though, a control is probably not needed.
250K is more than close enough. Check first though, a control is probably not needed.
First: I APPRECIATE ALL THE FEEDBACK & SUGGESTIONS, THANK YOU. And thanks for hanging in with me. I'm juggling a lot of heavy family stuff, so I'm not available to address these matters as often as I would like to. Please note: the right output is only a fraction of the left.
MY PARTS SEARCH ENDEAVOR THUS FAR
I've suspected it may be an Alps RK0971110D88, but didn't feel it's a confident match, mostly bc I don't know what I'm doing, but also bc the thick back pin (an extension of the back metal plate) isn't on the part. I haven't noticed any thick back pins on any balance pots, and suspect it may be for pot anchor/stability only. I've also looked for the part number Ixnay suggested to no avail.
DMM MEASUREMENTS & METHOD
I've taken measurements and photos. All side (L or R) references are taken facing the shaft's end (see photo showing "R fully R"). I'm including all measurement photos, but also documented here:
MEASURING PIN ON LEFT SIDE
balance pot fully left = 10.6 ohms
pot at center detent = 44.9k ohms
pot fully right = 44.9k ohms
MEASURING PIN ON RIGHT SIDE
balance pot fully left = 44.8k ohms
pot at center detent = 44.8k ohms
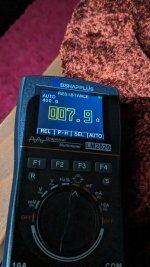
pot fully right = 7.9 ohms (see photos for method example)

MY PARTS SEARCH ENDEAVOR THUS FAR
I've suspected it may be an Alps RK0971110D88, but didn't feel it's a confident match, mostly bc I don't know what I'm doing, but also bc the thick back pin (an extension of the back metal plate) isn't on the part. I haven't noticed any thick back pins on any balance pots, and suspect it may be for pot anchor/stability only. I've also looked for the part number Ixnay suggested to no avail.
DMM MEASUREMENTS & METHOD
I've taken measurements and photos. All side (L or R) references are taken facing the shaft's end (see photo showing "R fully R"). I'm including all measurement photos, but also documented here:
MEASURING PIN ON LEFT SIDE
balance pot fully left = 10.6 ohms
pot at center detent = 44.9k ohms
pot fully right = 44.9k ohms
MEASURING PIN ON RIGHT SIDE
balance pot fully left = 44.8k ohms
pot at center detent = 44.8k ohms
pot fully right = 7.9 ohms (see photos for method example)
Attachments
Last edited:
Okay, the original pot is special. It is resistive up to the centre point, then a short to the other end. That is so the level of the channel not being reduced remains constant.
What you have not done is measured the DC voltage on the end pins or PCB pads. That meter isn't that good. I don't know if you will get meaningful readings on the mV scale. Try.
I have never had to replace one of these controls unless the shaft was snapped off.
What you have not done is measured the DC voltage on the end pins or PCB pads. That meter isn't that good. I don't know if you will get meaningful readings on the mV scale. Try.
I have never had to replace one of these controls unless the shaft was snapped off.
47K twin control, wire each channel separately.
6mm shaft.
You will find Alps, Bourns and others.

Got this as a sample off Digikey site, no ties to them, this is just for giving an example.
That can be made to control your unit.
That said, I agree with Anatech, failures are rare in Alps, very good quality.
Make sure the control is really at fault....and those sets are difficult to repair, be extremely careful.
If you cannot use the mV scale, this unit may be above your experience level, no offense intended.
Go step by step, telling us the original fault.
And clean all the mechanical pots, switches, and input connectors as above, then tell us if there is any change.
And clean off the boards, check for dry joints and old capacitors as well, those can cause weird issues.
I usually spray with iso alcohol (old syringe) to clean gunk off, let dry, spray with 2-26 spray, good results.
Also, I use the soft controls on the computer to control volume, the parts are difficult to find for old Japanese sets.
6mm shaft.
You will find Alps, Bourns and others.
Digikey part number, for Bourns unit:118-PRS14R-30025-103B1-ND |
That can be made to control your unit.
That said, I agree with Anatech, failures are rare in Alps, very good quality.
Make sure the control is really at fault....and those sets are difficult to repair, be extremely careful.
If you cannot use the mV scale, this unit may be above your experience level, no offense intended.
Go step by step, telling us the original fault.
And clean all the mechanical pots, switches, and input connectors as above, then tell us if there is any change.
And clean off the boards, check for dry joints and old capacitors as well, those can cause weird issues.
I usually spray with iso alcohol (old syringe) to clean gunk off, let dry, spray with 2-26 spray, good results.
Also, I use the soft controls on the computer to control volume, the parts are difficult to find for old Japanese sets.

Done. You're right (I suspect) - no readings at any position., tried with clips on right & left pins, all through the shaft rotation for each side pin. I'm also presuming this is an Autorange unit, so there's nothing I can do about making it more sensitive.What you have not done is measured the DC voltage on the end pins or PCB pads. That meter isn't that good. I don't know if you will get meaningful readings on the mV scale. Try.
Okay, so measuring on the pads with the control removed and the unit powered up, you read 0.0 mV DC on any pin or pad?
You're right, this meter sets itself up. Common and not a problem. Be aware that I've had to certify many meters new in box. I have had some better brands fail (Fluke), but the no name units often fail big time! That's new, imagine a year down the road. Yes, the calibration changes on the cheap meters, not so much on Keysight and Fluke. Keysight stuff is always bang on. Meters range from sort of okay to horrible when it isn't a name brand.
Never, ever assume anything. Always check and if you aren't positive - check again. Every time I see a technician stuck on something, that tech has made an assumption that turns out later is untrue. I have trained technicians for decades.
I measured from the pins (L & R) pot off the board (see below photo), with the center pin as the common/ground. By "pads" do you mean on the circuit board? Please forgive my lack of the lingo.measuring on the pads with the control removed and the unit powered up, you read 0.0 mV DC on any pin or pad?
Yes, you need to measure on the circuit board with the unit powered on. We need to see if there is any leakage voltage on the control. Of course, if the control is out in the air, there can't be any voltage across it.
As I said earlier, any DC voltage on these controls that flows will make a good control noisy.
As I said earlier, any DC voltage on these controls that flows will make a good control noisy.
Oy. Before committing to that next step, I should ask: is there a simple way to bypass the balance pot? I never use it anyway...
Okay, to be clear. Measure from chassis common (ground) to each pin separately. You should not measure any DC voltage on any pin. The unit must be on.
Yep, simply do not move it from centre. You can short the pins that measure short when centred.
Just measure the damn thing please.
Just measure the damn thing please.
Ok.. if I understood, unit powered on, negative to chassis common/ground (method in photo below), we are showing the following measurements, pot off the board, shaft at center detent:
L pin: -2.8mV
C pin: -5.9mV
R pin: -4.7mV

L pin: -2.8mV
C pin: -5.9mV
R pin: -4.7mV
0.3mV at each/all of the pads (L, C & R) on the board, pre powered up, pot not attached, ground clipped to chassis.
Okay, thanks.
So we know that DC voltage is not the culprit here.
Odd it is very noisy. As you can see, it is a sealed control. You can't get it apart and easily (reliably) put it back together again. I have cleaned these types of controls before and seen plenty ruined. You need the following:
Give a small shot of cleaner, don't pump the thing full. All cleaners (I don't care what they say) attack lubricants. Don't use audio cleaners, you are cleaning the metal slip ring - NOT THE CARBON! The carbon track is not where the noise comes from. Install the control and operate it. Fire it up and try the control, clean it a little more if still noisy, but the rotation of the control is what cleans it. The cleaner merely loosens the oxides, you need to operate the control mechanically.
The stuff I use comes from the aerospace industry, I had to be approved to buy it. Of course it is expensive. So look for a zero residue contact cleaner. You don't want anything else in there, and WD-40 is a bad idea. That control is too small to get fancy with. Just do the job and get out of it.
Good luck.
So we know that DC voltage is not the culprit here.
Odd it is very noisy. As you can see, it is a sealed control. You can't get it apart and easily (reliably) put it back together again. I have cleaned these types of controls before and seen plenty ruined. You need the following:
- Zero residue electronic contact cleaner (you should use this anyway).
- A "fine" PCB drill bit, sharp!!! 1/16" will work fine
- A "pin chuck" to hold that drill bit.
- Patience and skill
Give a small shot of cleaner, don't pump the thing full. All cleaners (I don't care what they say) attack lubricants. Don't use audio cleaners, you are cleaning the metal slip ring - NOT THE CARBON! The carbon track is not where the noise comes from. Install the control and operate it. Fire it up and try the control, clean it a little more if still noisy, but the rotation of the control is what cleans it. The cleaner merely loosens the oxides, you need to operate the control mechanically.
The stuff I use comes from the aerospace industry, I had to be approved to buy it. Of course it is expensive. So look for a zero residue contact cleaner. You don't want anything else in there, and WD-40 is a bad idea. That control is too small to get fancy with. Just do the job and get out of it.
Good luck.
I think I'm clear on everything; reiterating, hoping I do:
PCB drill bit, hole large enough to fit a cleaner guide. Drill (top down) in the green housing behind the wafer, carefully, just enough to penetrate the green housing. Spray a touch of no-residue cleaner, rotate shaft, pray to audio repair gods, reinstall, pray to audio repair gods x3, yes?
Would Deoxit Gold do the trick for a cheap, no residue spray? Or you have another suggestion?
lol!
Close. You don't need or want a large hole. 1/16" will do it. A large drill bit really risks a lot of damage. You just need to get the cleaner in, not the straw.
I have no idea. I've tried most cleaners out there so far. You need something advertised as a contact cleaner, zero residue. No protective coatings, no lubricants - nothin!
Most cleaners aimed at audiophiles are way overpriced. Use something for high reliability use. Like the aircraft industry, industrial maintenance. Those people don't play around. What they do must work and work reliably. You need something that doesn't eat other materials (safe on plastics is a good clue). It mustn't leave anything behind, and I mean nothing, 100 % evaporation. Pumping a control right full only means you destroy more lubricants, you do not want to do that. Use only as much as you need to do the job.
No problem.
If you're careful you should be successful. I'm sorry I don't know what cleaners are available in your area, and what I use isn't generally available to the public.
Good luck!!!
If you're careful you should be successful. I'm sorry I don't know what cleaners are available in your area, and what I use isn't generally available to the public.
Good luck!!!
Make two holes, the second as drain. 1 mm is enough, 0.6 will work.
I use a pin vice, basically a watch maker's chuck.
Use alcohol, then cleaner.
Just spray a whiff of cleaner into a small container, suck up with a syringe, use that to go inside the unit.
You can store the unused liquid in a sealed type container. Old film canister and similar, are good.
Work the pot, try and keep it vertical, shaft up and down, so the wiper is covered.
Bear in mind that most of these sprays are similar in composition, basically transformer oil and propellant, with about 5% special additives, which is the good stuff for you.
The different additive packages give different products, like WD-40, 2-26 and so on.
You can also put resistors in place of the pot, 22 k in series, with center tap, that will give you 44k, good enough.
Or not, it is a Carver set, so please take Anatech's opinion about that hack...he is far more experienced than I am!
- Home
- Design & Build
- Parts
- HELP - Seeking Replacement Balance Pot