Hi Peter & Brian,
Sorry to ask one more time.
Is the bridging board project for 4780 still under construction?
Haven't heard you guys talk about it for a while....
Not rushing, just wonder.
Thanks
Wing
Sorry to ask one more time.
Is the bridging board project for 4780 still under construction?
Haven't heard you guys talk about it for a while....
Not rushing, just wonder.
Thanks
Wing
The bridging board is definitely in the plans, but I didn't have much time recently to play with it. I received today a transformer that could be used for splitting single ended signal into balanced and will see how this works: http://www.edcorusa.com/transformers/audio/wsm/wsm10k-10k.htm
I will be not pursuing DVR134 option, as this has been already taken care of by digi01. His little boards are cute and present good value.
I will try to come up with some other solution, which is more of a challenge 😉
I will be not pursuing DVR134 option, as this has been already taken care of by digi01. His little boards are cute and present good value.
I will try to come up with some other solution, which is more of a challenge 😉
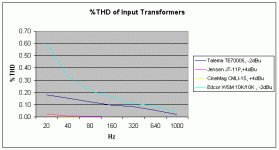
I am afraid that the Edcor transformers are, well, not very exciting. Note however that only the Talema and Edcor results are from my testing; the Cinemag and Jensen are from the datasheets. But I will probably buy some Cinemags in the near future.
As you can see I had significantly better LF performance from the Talema at roughly the same cost.
As you can see I had significantly better LF performance from the Talema at roughly the same cost.
Attachments
I'm sorry, I'm a bit slow. Is a balanced line driver related to the bridging board project? What would the transformers you guys are talking about be used for?
Me too
Maybe I'm also a bit slow, but I dont see a schematic for the boards? I see the layout, but is there a schematic showing the full circuit with labels corresponding to the layout and silk screen?
It would be really helpful if there were.
Also, I see the parts list on chipamp.com and some values don't match up to the National data sheet. Trying to figure out which parts to use where is a little tricky w/o a schematic. Maybe I missed the schematic after browsing page after page of this thread?
Brian is coming up with a manual. In the meantime I posted the National's schematic here : http://www.diyaudio.com/forums/showthread.php?postid=501639#post501639
and the description of parts we supply with a kit. I believe the only difference is 680ohm gain setting resistor (National recommends 1K). We decided on 680R, similarly as with a previous kit, to get more gain from the amp.
and the description of parts we supply with a kit. I believe the only difference is 680ohm gain setting resistor (National recommends 1K). We decided on 680R, similarly as with a previous kit, to get more gain from the amp.
LM4780 Mini guide
In order to save some time for others a road map follows.
PCB National schematic Value
R1 RF1 22k
R2 RF2 22k
R3 Ri1 680
R4 Rin 22K
R5 Ri2 680
R6 Rb1 1k supplied parts list indicates 2k.
R7 Rb2 1k see above
R8 Rout1 0.1
R9 Rout2 0.1
My kits only came with one 10k muting resistor which is through hole, I'm sure I have a few in the parts bin so should be OK. There seems to be only a provision on the board for an SMD muting resistor. I'm assuming that I'll attach the 10k directly to the pins of the LM 4780 or would one be able to tack it to the SMD pads?😕
For those of us who will use the Zobel, it appears as though we need to connect the capacitor to ground via a piece of hook up wire running on the bottom of the PCB. I'm assuming og.
I hope someone will confirm the correct road map above is correct, I'd hate to steer people wrong, and hope someone can confirm my assumptions as well.
Thanks
T
re zobel and mute resistor
the zobel circuit does not matter which is resistor or cap to ground
I found circiuit is fine no jumper needed, tho momentary confusion about extra hole for cap but extra hole must be for longer lead span on different size cap.
I applied 2 pads with solder, then bent the leads tight on muting resistor and then bent lead to make 2 "knees". One touch on the solder pad and it sucked lead on, almost like smd. They are barely off the board.
I also found it convenient to use the solder side for zobel resistor
the leads can be much shorter.

Anyone looking for larger heatsinks for the 4780, I found these and both chips mounted on it actually run cool!
Half of it may be enough.
http://cgi.ebay.com/ws/eBayISAPI.dll?ViewItem&category=1502&item=5737075855&rd=1&ssPageName=WDVW
Half of it may be enough.
http://cgi.ebay.com/ws/eBayISAPI.dll?ViewItem&category=1502&item=5737075855&rd=1&ssPageName=WDVW
I have the original Aleph-X circuit boards from "hi-fi Zen". I am looking to trade them for a set of the latest rev BrianGT LM3875 Gainclone boards so contact me if you have them and are interested in trading.
On the topic of Heatsinks
Speaking of heatsinks for the L4780... I like this little guy.
http://www.coolermaster.com/index.p...5-6J31C-01&other_title=CP5-6J31C-01CPU Cooler
Most local computer shops will stock this CPU heatsink and it is less then $10 US with the fan. If you run the fan at a slow enough speed you don't hear it. I power the fan from an old wall adapter from an external modem. Resister in series to slow it down.
Notice the copper at the bottom of the heat sink. It is actually pretty beefy. It is 50mm x 45mm and 4mm thick. It is screwed on with 4 screws. The spacing of the screws is 1mm short of the spacing between the two screws for a L4780 chip. To solve that you take a metal hacksaw blade and cut into the chip by 1mm. Put a little paint on the now exposed metal where you hacksawed. Two L4780 chips fit on the heatsink. There you have it, a nice little, inexpensive heatsink. No drilling or hole tapping required. To bad about the sawing, but that is minor.
If you want to insulate the chip from the heatsink then I suggest you put your insulating materal between the copper and the heatsink. If you use an old computer power supply case like I do in the picture below then all you have to do is drill 4 holes in the case and screw it on. The case is thin enough to transfer the heat through the case. The chunk of copper directly attached/touching the L4780 chips provides a nice heat buffer/transfer to the rest of the heatsink/case.
Most of my amps are not in cases, because I am still messing with them. Using this small heatsink makes it easy to handle them and use them without a case.
If you try it, let me know how you like it.
An externally hosted image should be here but it was not working when we last tested it.
Hi brentw-
That looks nice.
If you rotate the heat sink 90* so the fins are vertical, convection cooling will continue even if the fan fails.
That looks nice.
If you rotate the heat sink 90* so the fins are vertical, convection cooling will continue even if the fan fails.
Got my boards too...
After a long wait at last my boards arrived... thank you Brian!
Cheers
Andrea
PS Did you get the chips I sent you?
After a long wait at last my boards arrived... thank you Brian!
Cheers
Andrea
PS Did you get the chips I sent you?
4780 PCbs
Brian, Anyone, Will you be selling these PCBs any more. I need a few. 🙂 I will probably build Pavel's PA03 to get my fix. 😀
Thanks,
Russ
Brian, Anyone, Will you be selling these PCBs any more. I need a few. 🙂 I will probably build Pavel's PA03 to get my fix. 😀
Thanks,
Russ
I will begin selling boards again soon. I will post details soon, hopefully by the end of the week. I am also going to get some boards made for the LM3886 layout I did a while back.
--
Brian
--
Brian
BrianGT said:I am also going to get some boards made for the LM3886 layout I did a while back.
--
Brian
Please share some pictures or planned PCB with us!
rabstg said:
Please share some pictures or planned PCB with us!
Here is the LM3886 board I worked on:
http://www.diyaudio.com/forums/showthread.php?postid=554825#post554825
Here is the LM3875 board:
http://www.diyaudio.com/forums/showthread.php?postid=554829#post554829
Let me know what you think, try to keep the comments in those threads.
--
Brian
- Status
- Not open for further replies.
- Home
- Group Buys
- Group order of non-inverted LM4780 pc boards? Anyone interested?