G, I sent you some email with my address earlier today did you not get it?
I will send it again. 🙂
I will send it again. 🙂
Member
Joined 2002
Any one got some pictures of there project's.. ? I guess i should drill the boards i got and attempt to fill them..
jleaman said:Any one got some pictures of there project's.. ? I guess i should drill the boards i got and attempt to fill them..
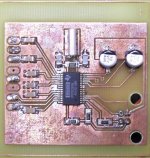
Pos 539 shows the boards Brian sent me. It is N00bers seperated ground design with added mounting holes. It sounds excellent.

Russ White said:G, I sent you some email with my address earlier today did you not get it?
I will send it again. 🙂
Sorry Russ, I hadn't checked my email when I sent that last post. I'll check tonight and send out the boards ASAP so we can get things moving for all the impatient folks around here 😉
I also wanted to post pics of my latest little project that will eventually become part of the entire preamp project. It's a PCM2906 USB DAC/ADC. This was my very first attempt at SMD and I must say it came out quite well IMHO. I am now thinking of converting one of the preamp designs to SMD to save space...but thats another project for another day. As for the little DAC, it worked on the first try, and sounds pretty good. I know there but this was a nice project to try SMD on. The circut is straight out of the datasheet, the board design is my own. By the way these boards were made with the method I posted earier...those are some very small spaces...that is a SSOP28 package!
😀
Attachments
G, that is very cool! I have been coveting a USB DAC like that for a while now. 😀 Any chance you could send one of those too? Did you do "flood and suck" to solder the DAC?
Did you do "flood and suck" to solder the DAC?Russ White said:G, that is very cool! I have been coveting a USB DAC like that for a while now. 😀 Any chance you could send one of those too?
Russ,
Since I am etching some boards anyway I suppose I could throw in a DAC too. For the PCM2906, I used the "flood and suck" method as you mentioned. Just loaded on the solder then used a desoldering brid to pick up the excess. For the caps and resistors, I put a little solder one pad, melted it and applied the part, then I soldered the other end in place, didn't need a desoldering braid for them. Turned out ok I think!
😀
Lt1010
Hey guys, for those of you who care, the price of the LT1010 from Linear Technologies is less than half (they can be had for less than $3.00) of the buf634($6-$7.00 at least), yet in my listening tests, it performs at least as good (in biased mode) as the buf634 for this application. It provides much more than enough current for a preamp. Also, the TO220 package looks like it would be easier to work with on single sided boards.
It has 20MHZ bandwidth and 150ma output capability. I did blind tests with two otherwise identical circuits and no one in our house could tell the 634 pre from the LT1010 pre.
Now changing the opamp and the other hand, most people knew right away.😎
I live in Nashville(A musical Mecca) , and I have quite a few musicians and studio engineers as family/friends. 🙂 Thus, I get to hear a lot of good music (including some great unreleased stuff), and my gear is always very well critiqued (especially now that I am into DIY).
The pricing thing will be especially important to some as TI is not sending out BB samples (at least not the good stuf like opa627/637 and buf634) anymore. 🙁 Not sure for how long.
Just a thought...😀
Russ, you are one lucky guy😀 😀I live in Nashville(A musical Mecca) , and I have quite a few musicians and studio engineers as family/friends. Thus, I get to hear a lot of good music (including some great unreleased stuff), and my gear is always very well critiqued (especially now that I am into DIY).
Do you really have to mention that Nashville is a mecca?? I mean, come on😉
BTW. Do all you guys realise that you don't even need a buffer-chip?? In something like 99% of all setups, it's not needed

Steen.
BTW. BTW.
Thats how abusing the samples policy works!The pricing thing will be especially important to some as TI is not sending out BB samples (at least not the good stuf like opa627/637 and buf634) anymore. Not sure for how long.
I know its really sad how people abuse the samples. I see what must be sample products on ebay all the time. I actually have almost whole rail of BUF634T(around 40 left of 50) that I bought a month ago, so I feel like I have paid TI back for the samples I order. 😀
Now, thats pretty good news. I never tried anything but the 634 buffer so have no ideaI did blind tests with two otherwise identical circuits and no one in our house could tell the 634 pre from the LT1010 pre.
That is what I mean when talking about abuse😉 If you only order a few samples for your own use, this would never have happened, would it?? Do not buy from those Ebay guys!!!!I see what must be sample products on ebay all the time.
Thats the ones, ruin'ing it for all of us.
Steen.😎
steenoe said:Now, thats pretty good news. I never tried anything but the 634 buffer so have no idea
That is what I mean when talking about abuse😉 If you only order a few samples for your own use, this would never have happened, would it?? Do not buy from those Ebay guys!!!!
Thats the ones, ruin'ing it for all of us.
Steen.😎
Couldn't agree more! 😀
If we abuse the samples policy...it will simply cease to exist...unless you have an email address me@sony.com. However it would be nice to see a "Hobbyist" type of sampling system, where parts are offered at discounted rates to hobbyists in small quantities. Also, why is it that everyone seems to order the maximum number of alllowable samples when in reality 2 would likely get the job done for prototying etc. Bottom line...if you like the product then pay for it!

George, You have inspired me to order some PCB laminate and a used laser printer (ebay) and try etching my own stuff. 🙂 I am going to try your method as soon as I can. I was thinking af making my own bubble tank out of polycarbonate from the hardware store and some tank sealer. 🙂
I hope I can make boards half as nice as yours.
Also, while I have/do order samples from TI and other places from time to time, it is for parts I otherwise would not buy without trying them first, and if I like them, I then buy some. 🙂 I think thats perfectly reasonable. Plus, technically I am an engineer (realtime software, and enterprise software, hehehe) . And I think exposure to the DIY community should help them sell more of their wares.
I feel sorry for the loosers who order all the samples they can and then turn around sell them on ebay or elsewhere. Really thats pitiful.
Cheers!
Russ
Russ White said:George, You have inspired me to order some PCB laminate and a used laser printer (ebay) and try etching my own stuff. 🙂 I am going to try your method as soon as I can. I was thinking af making my own bubble tank out of polycarbonate from the hardware store and some tank sealer. 🙂
I hope I can make boards half as nice as yours.
Also, while I have/do order samples from TI and other places from time to time, it is for parts I otherwise would not buy without trying them first, and if I like them, I then buy some. 🙂 I think thats perfectly reasonable. Plus, technically I am an engineer (realtime software, and enterprise software, hehehe) . And I think exposure to the DIY community should help them sell more of their wares.
I feel sorry for the loosers who order all the samples they can and then turn around sell them on ebay or elsewhere. Really thats pitiful.
Cheers!
Russ
Russ,
Glad to hear your going to try PCB etching, it's really easy. Not sure what you are going to use as an etchant, but lately I've been using hydrogen peroxide and hydrochloric acid. You can get peroxide from the drug store in a 3% solution easily, if you are lucky you can get 7%. HCL you can get as muriatic acid from the hardware store. I use 150ml of 3% peroxide to 50 ml HCL, then add your board. BE VERY CAREFUL if you do this, and do it outside. The reaction can generate a lot of heat and etches really fast. Also you should do this outside as the fumes are nasty, but honestly nothing I have tried gives a better etch 😀 I also bought my laminate on EBAY, I got more than I will ever use, two sided two ounce in 18"x21" sheets for next to nothing.
As for your thoughts on samples...I agree try before you buy, thats what I do to!
I was thinking of getting round to making my own boards also.
I have access to 33% Hydrogen Peroxide and 36% HCL, does anyone know a good ratio for these levels, so that I dont some my boards, as the exothermic reaction of theses chemicals can get pretty nasty, lol. Or should I water down both to a reasonable level and give that a go?
Thx for your helps's
n00b 😀
I have access to 33% Hydrogen Peroxide and 36% HCL, does anyone know a good ratio for these levels, so that I dont some my boards
, as the exothermic reaction of theses chemicals can get pretty nasty, lol. Or should I water down both to a reasonable level and give that a go?Thx for your helps's
n00b 😀
I would water them down first. If GC gets a fast etch at his concentrations, you probably don;t want it to go any faster. You want to be able to control the etch somewhat, so you don't lose small lines or get pitting in your copper.
I have always used Ferric Chloride for my etching, but I just got a bottle of Sodium Persulphate. It comes as a powder, and is much less toxic. I decided to try it, as my son is more and more wandering around in the basement (my work area) and I want to cut down on the super nasty chems. It's still not safe, but it probably won't burn as badly.
And, it less bad for the environment, I guess (??).
BrianDonegan said:I would water them down first. If GC gets a fast etch at his concentrations, you probably don;t want it to go any faster. You want to be able to control the etch somewhat, so you don't lose small lines or get pitting in your copper.
I have always used Ferric Chloride for my etching, but I just got a bottle of Sodium Persulphate. It comes as a powder, and is much less toxic. I decided to try it, as my son is more and more wandering around in the basement (my work area) and I want to cut down on the super nasty chems. It's still not safe, but it probably won't burn as badly.
And, it less bad for the environment, I guess (??).
I once etched a board using the concenterations Noober listed, I did it in the fume hood at my lab. WOW...5 seconds in a 1:1 ration....but you better not have any thin traces. Start with water, dilute the H2O2 down 3:1 then add 1/4 volume of concentrated HCL. I personally dont like it to go too fast. I think 5 minutes is a reasonable etching time, any faster and the etch is so aggressive that you loose any really thin traces.
G.
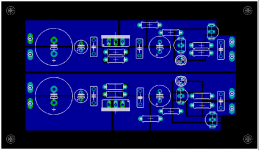
Since we are all looking for a PSU to go along with this preamp, I decided to design a board around the regulated supply on Nuuk's wesite. It seems to be getting posotive reviews, so I figured what the heck. I have arrached an image of it below. If you want to read about it you can see it here
http://www.decdun.fsnet.co.uk/gainclonepre.html#gcprebuffer
As you can likely see t is a simple LM317/337 based regulator for the first stage, then a discrete regulator for the second stage. I could have goined the grounds together, but decided to keep them seperate. I plan on using an Amveco PCB mount toroid that has split secondaries along with dual bridge rectifiers. I know this is total overkill but hey why not. I made sure that the regulators could be heatsinked, in case you have rather high voltage on your secondaries.
http://www.decdun.fsnet.co.uk/gainclonepre.html#gcprebuffer
As you can likely see t is a simple LM317/337 based regulator for the first stage, then a discrete regulator for the second stage. I could have goined the grounds together, but decided to keep them seperate. I plan on using an Amveco PCB mount toroid that has split secondaries along with dual bridge rectifiers. I know this is total overkill but hey why not.
I made sure that the regulators could be heatsinked, in case you have rather high voltage on your secondaries.Attachments
Gcollier said:Since we are all looking for a PSU to go along with this preamp, I decided to design a board around the regulated supply on Nuuk's wesite. It seems to be getting posotive reviews, so I figured what the heck. I have arrached an image of it below. If you want to read about it you can see it here
http://www.decdun.fsnet.co.uk/gainclonepre.html#gcprebuffer
As you can likely see t is a simple LM317/337 based regulator for the first stage, then a discrete regulator for the second stage. I could have goined the grounds together, but decided to keep them seperate. I plan on using an Amveco PCB mount toroid that has split secondaries along with dual bridge rectifiers. I know this is total overkill but hey why not.
Nice!!
I like it, I always like overkill, theres always a little extra if you need it, which you invariably will 😉
n00b
- Status
- Not open for further replies.
- Home
- Amplifiers
- Chip Amps
- GC Preamp Suggestions