Hi Dimitris,
I was reading through your blog and hifiduino, and stumbled upon a mentioning that in the first firmware the isolated serial is not yet supported - and indeed, I got the v1 and didn't do any update on it, so also not the FW. Time to do that update and resume testing afterwards!
Cheers, Erik
I was reading through your blog and hifiduino, and stumbled upon a mentioning that in the first firmware the isolated serial is not yet supported - and indeed, I got the v1 and didn't do any update on it, so also not the FW. Time to do that update and resume testing afterwards!
Cheers, Erik
Hi Dimitris,
As I bought one of the first v1 DAMs, I imagine it still has the 0.8 Firmware. I will look into upgrading that to the newer 0.9 FW,
Soekris R-2R: Firmware upgrade | Dimdim's Blog
Cheers, Erik
As I bought one of the first v1 DAMs, I imagine it still has the 0.8 Firmware. I will look into upgrading that to the newer 0.9 FW,
Soekris R-2R: Firmware upgrade | Dimdim's Blog
Cheers, Erik
Hi Dimitris,
Looking through your blog I saw dates going back to 2015, so I can unsterstand you forgot about it 🙂
Short version: it is working!
Long version: I updated the firmware, straigth to the newest one available at Soekris site (I dont know why there is also the 0.99 version?), reconnected the ArDam Lite controller and worked right away.
Now I have to ask a colleague if he wants to do the (official) vref mod, he is good with SMD - I am just baking 🙂
Many thanks for your efforts with the project and help!
@ Dimitri, please explain to me.😕
I was looking for the pin who is the in and out.
So pin 3 and pin 5, witch is that?
Is the pin 3 IN than !2S FSEL IN or ?
and the pin 5 is I2S WCLK OUT?
I do not have the knowledge/experience of this part of the job.
I see the display but the 44.1 or 352.8 kHz sample frequency is not showing.
Port and volume is showing.
I was looking for the pin who is the in and out.
So pin 3 and pin 5, witch is that?
Is the pin 3 IN than !2S FSEL IN or ?
and the pin 5 is I2S WCLK OUT?
An externally hosted image should be here but it was not working when we last tested it.
I do not have the knowledge/experience of this part of the job.
I see the display but the 44.1 or 352.8 kHz sample frequency is not showing.
Port and volume is showing.
Pins 3 & 5 are not used, they are there for future use. You only need to connect pins 1, 2, 4 and 6. I'm updating the documentation to reflect that.
Is the communication working atm? For example, when you're changing the volume from the arduino, does the volume of the dam actually change?
Is the communication working atm? For example, when you're changing the volume from the arduino, does the volume of the dam actually change?
Hi Dimitris
I have now my Soekris 1021 up running, and this sounds like the right way of controlling it. Do you have more boards, maybe even one with the IC soldered on 🙂
I have now my Soekris 1021 up running, and this sounds like the right way of controlling it. Do you have more boards, maybe even one with the IC soldered on 🙂
Regarding the soldered-on IC I can't promise anything but I do have a few boards. PM me for details.

Has it compiled for you in the past or is this your first attempt at compilation?
Which version of the IDE are you using?
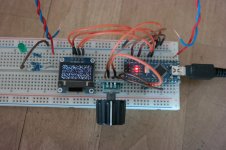
I also see a rotary encoder hooked up. Have you modified the code to support it?
Which version of the IDE are you using?
I also see a rotary encoder hooked up. Have you modified the code to support it?
It is my first attempt, I have only a few experience with arduino yet.
I am using the Arduino 1.8.5 (I think the newest) version.
I've installed all libraries, so it is not the problem.
The OLED display works fine with ug8lib, tested before...
I do not have an IR receiver yet, I'll buy it soon, so I did not want to modify the code. But it is not the problem, it comes only into play if I want to make some inputs...
It compiles just fine here but I haven't updated the relevant libraries in a while.
I'll update them and do some more testing..
I'll update them and do some more testing..
It compiles just fine here but I haven't updated the relevant libraries in a while.
I'll update them and do some more testing..
Being new to arduino I realised that updating the libraries was helpful. After that I could upload the program to the nano without any fault codes. Thank you so much for the board, Dimdim, and the code - I have now coded a remote, everything seems to work fine, with signals to the screen and to the serial port on the computer- I now just need to connect it to the dam - will do that tomorrow.
BTW - I am playing with the idea of adding a little code: I have included an Otto II from Twistedpear to allow for two I2S sources ( DIYINHK usbtoI2S and an RPI. I am now changing between these with a physical contact, but it would be nice to a: see the source on the screen and b: change via the program. I believe that it should be a relatively simple task to attach a pin to send the signal to the Otto, and to program buttons on the IR to give the signal to the pin - and then also to show this on the screen. But as said, I am new to arduino, so let us see.
Any comments to that?
I have now connected the thing to the DAM 1021. Works very well 🙂
Dimdim, would there be a way to program it so that it scrolsl through what it shows - as an example it shows the resolution briefly, and then goes back to volume.
Apart from that - my next little project will be to find a way to include the OTTO as mentioned in the post above. That should probably be one of the pins on EXP 1, right?
Well - When I give it power, it is turned off, and the screen looks like yours. Only the power led lights up. When I press the on/off button that I have coded on the remote the LDC shows what it is supposed to do, and the L LED also turns on. But I get no warnings when uploading the code.Hi, do you have some idea why are these error?
(I have at the moment no IR receiver, but it should be not the problem I think)
Dimdin, it would be nice if it starts on -but I cannot recognise where in your code that could be changed? Can you give me a hint?
Last edited:
Hi guys, sorry for the delay, I have very little free time these days..
I will answer every single question in detail later today.
For starters:
@zarandok: I just realized that you are getting warnings, not errors. Does the compilation finish or does it end with an error?
If it finishes, you should be OK in spite of the warnings. If you're getting the "static" that I see on your picture it just means that your code is running but your OLED is not properly "blanked" at power-on. That is a known bug, I have a fix for it.. I was planning to release it along with dsd compatibility and rotary encoder support but since that is taking longer than expected I'll just let you know of the necessary changes in the code later today.
@henrylarsen: All of the things that you'd like to have the code do are doable, most of them with little effort. Regarding a "power-on at boot" mode, I'll let you know what to change later today..
To properly blank the OLED at power-on, just replace this:
with this:
Now let's try to detect DSD.. this is not tested.. I'm waiting to hear from you guys if it will work.. change this:
to this:
Finally, to have the controller always powered on, change this:
into this:
That should do it..
Code:
void setup(void) {

  pinMode(POWERPIN, OUTPUT);
  digitalWrite(POWERPIN, LOW);

  x_dim = u8g.getWidth();
  y_dim = u8g.getHeight();

  Serial.begin(115200);

  irrecv.enableIRIn();                       // Start the IR receiver
  //Serial.println("IR on");
}
with this:
Code:
void setup(void) {

  pinMode(POWERPIN, OUTPUT);
  digitalWrite(POWERPIN, LOW);

  x_dim = u8g.getWidth();
  y_dim = u8g.getHeight();

  Serial.begin(115200);

  irrecv.enableIRIn();                       // Start the IR receiver
  //Serial.println("IR on");

  u8g.firstPage();                           // picture loop - clear screen
  do {
     }  while(u8g.nextPage());
}
Now let's try to detect DSD.. this is not tested.. I'm waiting to hear from you guys if it will work.. change this:
Code:
      if(serialin == "L384\r")
        SR = 384;
        else
          if(serialin == "L352\r")
            SR = 352.8;
            else
              if(serialin == "L192\r")
                SR = 192;
                else
                  if(serialin == "L176\r")
                    SR = 176.4;
                    else
                      if(serialin == "L096\r")
                        SR = 96;
                        else
                          if(serialin == "L088\r")
                            SR = 88.2;
                            else
                              if(serialin == "L048\r")
                                SR = 48;
                                else
                                  if(serialin == "L044\r")
                                    SR = 44.1;
                                    else
                                      if(serialin == "L32\r")
                                      SR = 32;
to this:
Code:
      if(serialin == "L384\r")
        {
          type = 0;
          SR = 384;
        }
      else if(serialin == "L352\r")
        {
          type = 0;
          SR = 352.8;
        }
      else if(serialin == "L192\r")
        {
          type = 0;
          SR = 192;
        }
      else if(serialin == "L176\r")
        {
          type = 0;
          SR = 176.4;
        }
      else if(serialin == "L096\r")
        {
          type = 0;
          SR = 96;
        }
      else if(serialin == "L088\r")
        {
          type = 0;
          SR = 88.2;
        }
      else if(serialin == "L048\r")
        {
          type = 0;
          SR = 48;
        }
      else if(serialin == "L044\r")
        {
          type = 0;
          SR = 44.1;
        }
      else if(serialin == "L32\r")
        {
          type = 0;
          SR = 32;
        }
      else if(serialin == "L02M\r")
        {
          type = 1;                               // Signal type is DSD
          SR = 64;                                // DSD64
        }
      else if(serialin == "L05M\r")
        {
          type = 1;                               // Signal type is DSD
          SR = 128;                               // DSD128
        }
Finally, to have the controller always powered on, change this:
Code:
  irrecv.enableIRIn();                       // Start the IR receiver
  //Serial.println("IR on");
into this:
Code:
  irrecv.enableIRIn();                       // Start the IR receiver
  //Serial.println("IR on");
  poweron = true;
That should do it..
Hi Dimitris
The code works almost as expected. It uploads fine, and it turns on the screen. Everything works, apart from showing DSD. When I put in a DSD file it goes directly to volume. If I then shifts to another source, like optic, it shows 384 when I turn back to the real source ( USB) with the remote. When I shift to another piece of music with the same resolution ( such as 44.1) it does not show up the resolution. Only if I shift to something else, like 96 or to another input and then shifts back. I don't remember how that worked put before, but I think I remember it as if it showed the resolution with every new, but I might remember that wrong.
Thank you - hope the feedback is helpful.
Another minor thing - it starts with 0 volume, even if it shows - 20, only when I touch the volume on the remote it shifts to what it shows. But that happened also before.
henry
Last edited:
- Home
- Group Buys
- GB for ArDAM Lite bare PCBs