So I got the plans from Dave and I'll be starting work on a template to make the cabinet side-panels. Any tips on how to best draw and then cut the large radius on the aft edge of the side panels?
Are the plans to scale? In other words. can I get them printed full size at a local print shop?
Thanks!
Are the plans to scale? In other words. can I get them printed full size at a local print shop?
Thanks!
The FH3 document has a page with suggestions of how to approach the back curve if you aren’t CNCing.
I can assist with DXF or DWG exposts of any of the pages.
I can assist with DXF or DWG exposts of any of the pages.
Last edited:

Hello Delnia19:
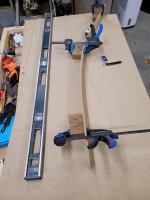
I used a piece of 1/8 inch aluminium about 2inches wide to make a "stick". Similar to a yardstick but a bit longer. I marked the edge points and the centre point of the curve with pin nails, two inside one outside, and adjusted the tension on the aluminium stick till the curve was balanced both sides of the centre nail, clamped down the stick, traced out the curve, cut it with a band saw yet a jig saw would work just as well. Be sure to compensate for the thickness if materials. (off set by 1/8 plus pin nail thickness).
I hope this helps
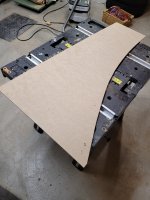
I should have read the print, not just look at the images! So I went as instructed on the plans. Worked very well. Not perfect but almost! I guess what's important is that all 4 side panels end up the same. Picture attached for any newbies like me! Now the next challenge will be to cut that curve...
Attachments
Hello Dlenia19:
Looks good, I might have screwed the clamp blocks to the waste side to eliminate filling the holes later.
Leave a 1/8" amount on the line, to the waste side, to be dressed off with the sander.
Once you cut the 4 sides, I suggest you then clamp all 4 pieces together and do your sanding work on the edges as a single clamped up packages. This will give a larger surface to work with and reduce the risk of rolling the edges on individual pieces.
Good stuff
I hope this helps
SCD,
You are so right about the blocks, but since it is only the template, I never even gave it a second thought. I will definitely use your recommendation when it comes to sanding the 4 side panels. The wood should come in sometime next week. Can't wait to get started on the real stuff!
Thanks!
You are so right about the blocks, but since it is only the template, I never even gave it a second thought. I will definitely use your recommendation when it comes to sanding the 4 side panels. The wood should come in sometime next week. Can't wait to get started on the real stuff!
Thanks!
Attachments
Hello again Delnia19:
Glad you are making a template. I did the same thing. I made my cabinets from Maple hardwood as I prefer to work with real wood where ever possible. A little tricky but worth the effort.
Somewhere in this long thread are a few pictures I posted of them. Still the main speakers in the living room. I added a pair of small commercial "subwoofers" to help fill out the bottom octaves.
Mine look quite pretty and sound great. A very good design. Good for you Dave and Chris.
Chris a man needs to keep his hands busy. I do miss seeing the many beautiful cabinets you were making.
Playing for the first time.
Crazy low.As if two subs are added .
Entire house is shaking.
More stuffing needed?
I don't know, is it? 😉
If there's too much LF gain, then yes, it will damp out whatever is unwanted. If there isn't an excess, then no: no need.
If there's too much LF gain, then yes, it will damp out whatever is unwanted. If there isn't an excess, then no: no need.
Great, if you put them close to wall you will get event more from them. And rest, mids, high?
- Home
- Loudspeakers
- Full Range
- Frugel-Horn XL for Alpair 10.3/10p, Fostex FF165wk, more