You are like a gift from heaven above Leon. I've just bought pair of FE166En and was sad to find that MJK ML TQWT is not proper for them. But your project looks very promising. Could you show sound absorbent placement inside enclosure? Or any words about it ?
Pawel
Pawel
After burn-in most people don't use any absorbent at all!!
Wich means that the design is okee!!
During burn-in time only the Cc is slightly damped with 3 or 4 mm wool felt on 3 sides.
If you have a very reflective room you can ad small amount of poly fill in the first 5cm in the centre of the throath.
Very easy to reach and experiment with by removing the full range speaker.
BTW Zilla ; nice to CU on one of my subjects for a change , mostly I'm watching yours!!
You'r advice is very welcome!!
You'r advice is very welcome!!
My advice is to keep building and continue trying to maximize your musical enjoyment by trying different designs. I think you will find there is more than one truth and the journey is worthwhile. Consider yourself lucky to have friends to help you build, listen and critique the projects you choose.
So true Zilla, a never ending journey!!
I do build and try a lot and don't publish everything I discover but sometimes.............
this design is really amazing.
Heard it in very different rooms, sizes , reflective etc.
THEY DOMINATE THE ROOM and sound always impressive!!
Once heard depth in the soundstage sitting right of the right speaker!!
Listened to Pink Floyd, Norah Jones , Miles Davis , Kari Bremnes , Foo Fighters etc.
So this was one design I wanted to share with everybody else!!
We used some soft filling in and arround the whizzer for the first 200hrs.
Why?
To make them more listenable during the burn-in stage ; but some people leave them on and go away for the weekend= another possibility!
Do you have a picture right before do you close the enclosure? The bottom of the enclosure intentionally is with 1 mm shorter? The thickness of the stuff is 18mm?
the tweeter is in series with a C ; 0,82 -2,2 uF and then parallel to the Fr.
add an R ; 1 - 2.2 ohms in series to the C to adjust the level of highs ; is room dependent.
At this moment , after burn-in , everyone uses only 2,2 uF.
Does anyone use the resister after burn-in?
What was the thickness of the material you used? Did anyone try with plywood?
Answers:
After burn-in ; nobody uses resitor!! Only first 40/50 hours till bass starts happening!!
Bottom minus 2 mm : people glue lead-sheet on yhe underside ; gives more controlled bass and a more firm stand (they are tall!!)
Everything is 18mm thickness ; when you look at the drawing you see 250mm - 2x18 = 216 ; this seems uncorrect but 216 is after sanding the last side . gives 215/214mm !! (hope this is clear?)
I always use MDF but you are free to use other materials as long as the thickness is the same.
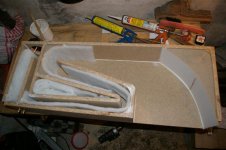
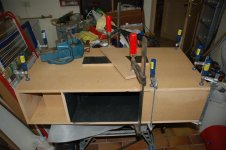
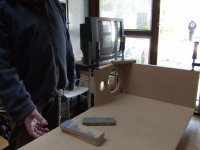
Some more pics ; just before glueing.
You see the glue as a continueish line.
Put the last side on it and DON'T PRESS IT!!
make small circular movements with the last side ; don't press!!
Wait for about 10/15 min.
Then start clamping the side on the outside and put a lot of maass on the centre (BOOKS!!)
Sand the sides after drying!!
If you are not to experienced : Take the last side 2 mm wider and longer then the other side ; easier sanding flat!! ( suppose your angles are a bitt beside 90dgrs!!)
After burn-in ; nobody uses resitor!! Only first 40/50 hours till bass starts happening!!
Bottom minus 2 mm : people glue lead-sheet on yhe underside ; gives more controlled bass and a more firm stand (they are tall!!)
Everything is 18mm thickness ; when you look at the drawing you see 250mm - 2x18 = 216 ; this seems uncorrect but 216 is after sanding the last side . gives 215/214mm !! (hope this is clear?)
I always use MDF but you are free to use other materials as long as the thickness is the same.
Some more pics ; just before glueing.
You see the glue as a continueish line.
Put the last side on it and DON'T PRESS IT!!
make small circular movements with the last side ; don't press!!
Wait for about 10/15 min.
Then start clamping the side on the outside and put a lot of maass on the centre (BOOKS!!)
Sand the sides after drying!!
If you are not to experienced : Take the last side 2 mm wider and longer then the other side ; easier sanding flat!! ( suppose your angles are a bitt beside 90dgrs!!)
Attachments
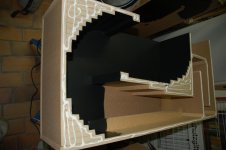
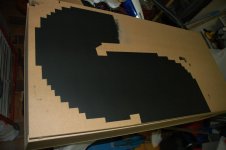
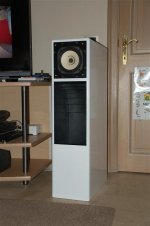
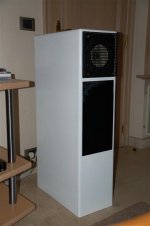
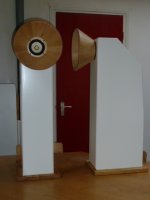
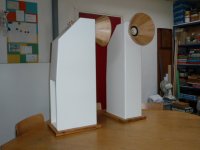
The last pics are Xander's product
These are the end-results!!
MDF is nice painting ; he did it by hand wih a roller!!
This was all before he added the tweeter boxes on top.
These are the end-results!!
MDF is nice painting ; he did it by hand wih a roller!!
This was all before he added the tweeter boxes on top.
Attachments

On page 6moons audio reviews: Gemme Audio Concerti 108 one can find review of original "Concerti 108" which is out of production now. Enclosure is not damped inside but polished and lacquered. The only sound abosorbent inside is a wool felt padding at the wall opposite to the speaker[FONT=Arial,Helvetica,Geneva,Swiss,SunSans-Regular].
[/FONT]
[/FONT]
That was my first clone ; THE CONCERTI 108 CLONE. (PDF drawing).
There are about 22 sets build , according to my design.
They definetly need a subwoofer added!
The concerti166 : no urgent need for sub!!
I later designed the ibR 108 (search forum!!) this one is a lot beter then the concerti108clone but needs room corners for placement!!
There are about 22 sets build , according to my design.
They definetly need a subwoofer added!
The concerti166 : no urgent need for sub!!
I later designed the ibR 108 (search forum!!) this one is a lot beter then the concerti108clone but needs room corners for placement!!
Attachments
I don't understand that 2 mm in the front piece and 1 mm in the bottom. The pieces are trapezoid or what? The top is 482+18=500, the bottom is 463+18+18=499. The front and the back is not parallel, also the left and the right side is not parallel?
To My Dear Friend Gemil :
I'll try to explain as good as I can ; English is not my native language!!
This project is meant to be foe everyone , including children and house-wives ; they must have the possibility to build there own loudspeakers!
That was one of my mayor design points.
So I started reducing aiding materials.
The only thing you need for this project can be found in everyones shed!!(or in their uncle's)
House wives never will make 100% perfect 90 defrees glue joints so I had to figure out some solution.
First priority was to get an airtight , good sounding speaker.
Second : they should be optically good looking.
Third : everything must be do-able with little means by children as well.
Everything has to do with the "building-sequense "!!
I'll try to explain with pics, so there are going to be several posts!!
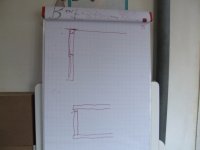
Basic building lines :
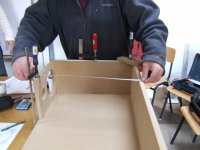
pic 1 the sketch for explaining.
Every panel of MDF has a flst side = Hard(H)
and a top side = Soft(S).
Every time you join 2 pieces the S is a bit over the H ; because of sanding after glueing ; when the H is more outside you will never get it flat later on.
In the drawing I exagerate very much.
pic 2 is the real life situation ; when you look carrefully you see the S a bit over the H !! about 0,5 mm!!
In pic 3 from the inside , you can see the glue so it will be airtight.
Now wait till drying is don , be patient!!
I'll try to explain as good as I can ; English is not my native language!!
This project is meant to be foe everyone , including children and house-wives ; they must have the possibility to build there own loudspeakers!
That was one of my mayor design points.
So I started reducing aiding materials.
The only thing you need for this project can be found in everyones shed!!(or in their uncle's)
House wives never will make 100% perfect 90 defrees glue joints so I had to figure out some solution.
First priority was to get an airtight , good sounding speaker.
Second : they should be optically good looking.
Third : everything must be do-able with little means by children as well.
Everything has to do with the "building-sequense "!!
I'll try to explain with pics, so there are going to be several posts!!
Basic building lines :
pic 1 the sketch for explaining.
Every panel of MDF has a flst side = Hard(H)
and a top side = Soft(S).
Every time you join 2 pieces the S is a bit over the H ; because of sanding after glueing ; when the H is more outside you will never get it flat later on.
In the drawing I exagerate very much.
pic 2 is the real life situation ; when you look carrefully you see the S a bit over the H !! about 0,5 mm!!
In pic 3 from the inside , you can see the glue so it will be airtight.
Now wait till drying is don , be patient!!
Attachments
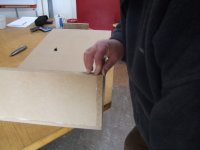
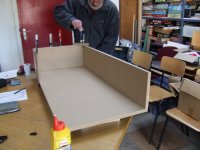
In the next pic 1 you see me adjusting ( by hand ) the back panel and in
pic 2 : I check by measuring 499 mm if everything is okee
pic 3 : close up of the bottom.
On the left you see a small gap ; adjust to 499 mm.
After final sanding the loudspeaker will become 499x1049 mm
instead of 500x1050 mm !!
But everything wil be as flat as possible!! (optically)
And your last side panel wil be over H as wel , so you can sand flat!!
Hope everything is more clear now.
This is not about the perfect drawing but the functional buildable loudspeaker for everyone!!
Attachments

Dear Leonidas, king of Sparta!
I'm a 42 years old man, and I'm carpenter, but I never made a box with this method! We have a proverb: " The good priest learn till death!"
Thank you!
PS: Is good ( for the best sound) if I make the enclosure 500x1050?
I'm a 42 years old man, and I'm carpenter, but I never made a box with this method! We have a proverb: " The good priest learn till death!"
Thank you!
PS: Is good ( for the best sound) if I make the enclosure 500x1050?
My dear friend Gemil,
Glad you gave some personal info!!
Now I'm sure you have the competence of building a set!
Build them as good and accurate as you can ; you want be dissappointed.
The drawing was made by one of the builders, so check every measurement.
It was made after the buildingproces by measuring each panel as good as he could. I cannot garantie everything , but if you have questions I'm going to help as good as I can.
For me ; I do have the equipment ( table saw , lamello's etc.) to build them tu the mm.
In this case the problem was to make the building proces for EVERYONE!!
So I did some "out of the box thinking " to come to these results posted in here.
If you can do the proces accurate you are more then welcome to do so!!
Please keep me informed and have fun.
If you call me KING ; be my Prince and build them in birch-ply!!
I'm very curieus if you are going to claim "a warmer" sound in the future.
- Status
- Not open for further replies.
- Home
- Loudspeakers
- Full Range
- FE166En+FT17H "Concerti clone" (lots of pics!!)