I have been thinking about this too, for a long time.Anyone ever tried any bitumen based products? they would surely work out cheaper.
Anyone knows the answer?
What about the fumes, if there are any?
Can liquid bitumen be used, might be easier to apply, maybe with sand or lead in it. Or use it to 'glue' the bitumen in place.
Another thought: What about 'sticking' a magnetic shield in place, for a center speaker for example. The shield wouldn't ring and is glued at the same effort. Just fill the shield partly and let the driver sink in it. 🙂
... Or is a magnetic shield unnecessary with LCD/LED😕
A lot of questions, I know...
Thanks for reading.
Hi
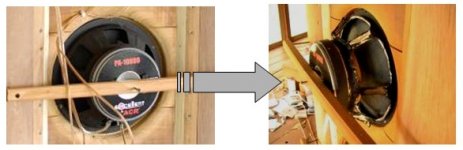
this is a CHR70 (first series) treated with duct seal und felt:
all you need for this procedure (sissers missing on the pic):
Step 1:
Step 2:
Step 3: felt installing
Next step (somewhere in the future):
felt on the magnet system.
Time for this procedure: about 1 hour, easy to do.
What happend:
Highs are much clearer, not so "hard" anymore, more detailed, soundstage imaging clearer.
Easier to listen to the driver / music.
this is a CHR70 (first series) treated with duct seal und felt:
all you need for this procedure (sissers missing on the pic):
An externally hosted image should be here but it was not working when we last tested it.
Step 1:
An externally hosted image should be here but it was not working when we last tested it.
Step 2:
An externally hosted image should be here but it was not working when we last tested it.
Step 3: felt installing
An externally hosted image should be here but it was not working when we last tested it.
Next step (somewhere in the future):
felt on the magnet system.
Time for this procedure: about 1 hour, easy to do.
What happend:
Highs are much clearer, not so "hard" anymore, more detailed, soundstage imaging clearer.
Easier to listen to the driver / music.
Last edited:
Anyone here want to split a gallon of SR500 ? By the way they also have a SR1000
but it's almost twice the cost.
but it's almost twice the cost.
The last time i went in to buy a gallon my supplier was switching to another brand and since out of SR500 (coast guard approved), i got SR1000 for the same price. I prefer SR500 for application, performance seems the same. SR1000 is white vrs SR500 grey.
dave
dave
Here in the U.S.A. I saw the RS500 offered for $60 a gallon plus $15 shipping.
I was hopeing there were 3 others here who wanted to split a gallon. Let me
know if this sounds interesting.
I was hopeing there were 3 others here who wanted to split a gallon. Let me
know if this sounds interesting.
So would the Mark Audio drivers benefit from all this? I don't seem to see any other mention of this mod as far as they're concerned
In a Mark Audio drivers, the 1st candidate would be the back of the bezel (the 2nd batch of A7 & the A10.2 excluded as Mark went one step better with his supergasket). The other would be basket/magnet juncture. Not a lot of room on some of them.
dave
dave
Hello
For the stamped baskets, I use a rude but very efficient method.
With strong pliers, I put up the edge of the holes at 90° on 5mm (hard to find words when not a native English speaker). The increase of rigidity is enormous and secondary effect, the holes get bigger (or the branches smaller 😉).
In the extreme cases, I even create triangular section branches that I fill with epoxy and bitume. Have to take care of not weakening or cutting the basket. On OB, this has audible effects that compensate the absolutely hand made look and the effort (more than one hour of hard work per driver, funny when it's a MTM)
A useful test is hitting the basket. Before the mod, it's like hitting a bell, after it's still less ringing than a cast aluminium basket.
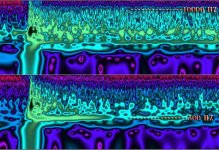
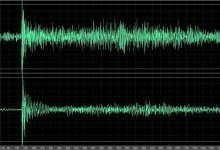
It's possible to make measurements. The two spectrograms below show that the resonance of the unmodded basket is very long to extinct and reaches the 10.000 Hz. The modded one is much more quiet.
Can be seen this on the picture below.
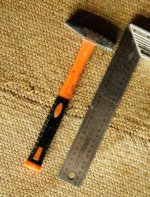
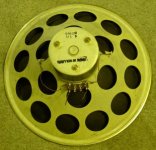
I can't resist to show you a view of the exciter used in this demonstration 😀.
For the stamped baskets, I use a rude but very efficient method.
With strong pliers, I put up the edge of the holes at 90° on 5mm (hard to find words when not a native English speaker). The increase of rigidity is enormous and secondary effect, the holes get bigger (or the branches smaller 😉).
In the extreme cases, I even create triangular section branches that I fill with epoxy and bitume. Have to take care of not weakening or cutting the basket. On OB, this has audible effects that compensate the absolutely hand made look and the effort (more than one hour of hard work per driver, funny when it's a MTM)
A useful test is hitting the basket. Before the mod, it's like hitting a bell, after it's still less ringing than a cast aluminium basket.
It's possible to make measurements. The two spectrograms below show that the resonance of the unmodded basket is very long to extinct and reaches the 10.000 Hz. The modded one is much more quiet.
Can be seen this on the picture below.
I can't resist to show you a view of the exciter used in this demonstration 😀.
Attachments
hahah if in doubt, grab a persuader!
ive used bostik putty on baskets with good affect, and felt around the back of the magnet seems to help too. i had to stop myself from over felting near the frame air resistance etc etc.
i am experimenting with hardening epoxy putty too, though i havent comapred the results yet. hopefully itll work!
Radugazon,
What do you mean with: "I put up the edge of the holes at 90° on 5mm"?
You can tell it in French, thank you.
Can you explain the spectrogram a bit too?
Thanks.
What do you mean with: "I put up the edge of the holes at 90° on 5mm"?
You can tell it in French, thank you.
Can you explain the spectrogram a bit too?
Thanks.
Sorry, I knew it was wrong, but impossible to found the right words this day 😱
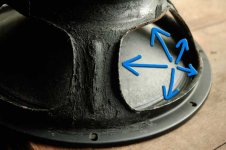
Must be "roll up", in french it's "retourner 5 mm des bords pour créer une cornière qui rigidifiera le saladier".
but to be definitively clear just see the picture below, it's international.
The black putty is a bitume with fibers used for water proofing roofs.
Now for the spectrogram...
It's a joke of couse, except maybe for the Hard Metal fans, I suppose that nobody will push a basket to this level of stress. It just shows that under a strong hammer hit (or even with a finger), the dampening is efficient. This is obtained with the cheap driver of the picture.
But this removes nothing to the spectrogram utility. It's nothing else that a different grafic representation of the impulse obtained with a Fourier transformation, as in any PC based measurement software that is not a RTA.
Comparatively to the raw impulse that only indicates level vs time, here the spectro represents also the frequency. This third dimension is represented by the color.
On this example, on the first plot the impulse reaches 10000, the main energy is concentrated at 500 Hz, rings for a while : the model of a bell.
And of course, the instant when the hammer hits is the big vertical peak with a black eye 😉.
As a comparison I join too the corresponding impulses : it's possible to identificate the ringing, but nothing says that this is mainly a 500 Hz resonance.
about the time scale, this one is expressed in samples. As it was a 48000 Hz, you divide the value by 48 and you have the time in ms.
here: the impulse starts at 1300, stops at 3000 samples.
(3000-1300)/48 = 35.41 ms...rocket science.
But the real interest of this kind of chart is just having a fast overview of any big big problem, or to see very well the decay by frequency.
For time aligning drivers, it's better to go back to the impulse and apply some FFT filters that will isolate each driver.
My 2 cents : REW 05 has a nice spectro now, but wavelets are much more revealing
If you speak french, you can have much more details here and the complete alignment method . IIRC, must have the hammer joke at the end 😀
OMG, I forgot : the doc to download is in the fifth post "Mes bien chers frères.docx"
Attachments
Last edited:
I have a pair of these 12" vintage Phillips drivers and am wondering what might be a easy but good basket treatment. The SR 500 seems like the best place to start but if I can't get any of it any other ideas how to damp all that sheet metal. And don't you just love $5 yard sale finds?
Attachments
The SR 500 seems like the best place to start
I haven't forgotten woody. It will actually be SR1000 (coast guard approved) since they were out last time i went and they sold the more expensive stuff for the SR500 price.
dave
Hello
For the stamped baskets, I use a rude but very efficient method.
With strong pliers, I put up the edge of the holes at 90° on 5mm (hard to find words when not a native English speaker). The increase of rigidity is enormous and secondary effect, the holes get bigger (or the branches smaller 😉).
In the extreme cases, I even create triangular section branches that I fill with epoxy and bitume. Have to take care of not weakening or cutting the basket. On OB, this has audible effects that compensate the absolutely hand made look and the effort (more than one hour of hard work per driver, funny when it's a MTM)
A useful test is hitting the basket. Before the mod, it's like hitting a bell, after it's still less ringing than a cast aluminium basket.
It's possible to make measurements. The two spectrograms below show that the resonance of the unmodded basket is very long to extinct and reaches the 10.000 Hz. The modded one is much more quiet.
Can be seen this on the picture below.
I can't resist to show you a view of the exciter used in this demonstration 😀.
Howdy son. How ya'll are? Where I come from we call that "exciter" a LFH.
An externally hosted image should be here but it was not working when we last tested it.
We call this a BFH.
Sorry, I knew it was wrong, but impossible to found the right words this day 😱
Must be "roll up", in french it's "retourner 5 mm des bords pour créer une cornière qui rigidifiera le saladier".
but to be definitively clear just see the picture below, it's international.
The black putty is a bitume with fibers used for water proofing roofs.
Now for the spectrogram...
It's a joke of couse, except maybe for the Hard Metal fans, I suppose that nobody will push a basket to this level of stress. It just shows that under a strong hammer hit (or even with a finger), the dampening is efficient. This is obtained with the cheap driver of the picture.
But this removes nothing to the spectrogram utility. It's nothing else that a different grafic representation of the impulse obtained with a Fourier transformation, as in any PC based measurement software that is not a RTA.
Comparatively to the raw impulse that only indicates level vs time, here the spectro represents also the frequency. This third dimension is represented by the color.
On this example, on the first plot the impulse reaches 10000, the main energy is concentrated at 500 Hz, rings for a while : the model of a bell.
And of course, the instant when the hammer hits is the big vertical peak with a black eye 😉.
As a comparison I join too the corresponding impulses : it's possible to identificate the ringing, but nothing says that this is mainly a 500 Hz resonance.
about the time scale, this one is expressed in samples. As it was a 48000 Hz, you divide the value by 48 and you have the time in ms.
here: the impulse starts at 1300, stops at 3000 samples.
(3000-1300)/48 = 35.41 ms...rocket science.
But the real interest of this kind of chart is just having a fast overview of any big big problem, or to see very well the decay by frequency.
For time aligning drivers, it's better to go back to the impulse and apply some FFT filters that will isolate each driver.
My 2 cents : REW 05 has a nice spectro now, but wavelets are much more revealing
If you speak french, you can have much more details here and the complete alignment method . IIRC, must have the hammer joke at the end 😀
OMG, I forgot : the doc to download is in the fifth post "Mes bien chers frères.docx"
Hi Radugazon,
Very good work, well done!
Mark.
There was a design using an Audax Bextrene driver that used composite glue to reinforce the area between the magnet and the legs of the basket, claiming that this reduced some ringing in the frame. This was claimed to remove som nasalaty of the drivers but not measurements was shown.
Well I'm just a carpenter but: if I frame a roof with an ungusseted jog in it like a stamped basket has, either the inspector or the first big snow would say no, that's not how you do it. Look at an old Wolverine chassis. Now that's more like it. Of course the latter day high end drivers agree. We call it load path in the construction realm. No hinges.
There was a design using an Audax Bextrene driver that used composite glue to reinforce the area between the magnet and the legs of the basket, claiming that this reduced some ringing in the frame. This was claimed to remove som nasalaty of the drivers but not measurements was shown.
I usually apply a thin coat of epoxy to the joint between the magnet and basket and when it partially cures, mix up a batch of pulverized limestone and epoxy to a fairly stiff consistancy and fill the joint completely to form a nice fillet. The raw epoxy is applied just as base coat or "primer" for the metal. The rest of the basket is damped with a layer of Duct Seal. For small drivers it may be overkill, but it seems to work and besides, it's fun to do.
However, money is no object in "my" quest for sonic perfection, even if it amounts to as much as a dollar!
(YMMV 😀)
Best Regards,
TerryO
- Status
- Not open for further replies.
- Home
- Loudspeakers
- Full Range
- Extreme basket tricks