I've stopped repairing 63 panels cause they are so poorly made with wrong glues and flimsy construction.
And, your picture shows a typical untouched Huntington panel in all its glory, with amateurishly sprayed membrane...
Yes, the quality control was never their strong suit. The new ones still have a dreadful reliability record. I have a 5 year old set of 2912's with 5 of the 12 panels replaced so far.
My rebuilds replace the crappy thermoset stator glue with something much better, and I use a wipe-on coating which flows out and forms a uniform conductive layer.
Sheldon
quadesl.com
thermo set glue. hmm it feels more like contact adhesive. that has dried out or a PU glue of some sort.
WrineX you are talking about the ESL-63 model where as Sheldon is talking about the 29xx model. You are both completely right. According to New Transtec, the Dutch Quad importer, IAG has switched to 2 component glue recently. Don't know if this is correct.thermo set glue. hmm it feels more like contact adhesive. that has dried out or a PU glue of some sort.
A little off-topic: Does anyone know where I can get a single dead or blown ESL57 tweeter panel? I want to measure the stator parts to try to make a 3D-printed version.
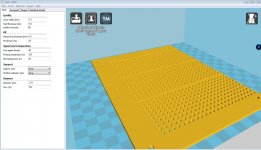
Nice idea, but be prepared for long printing time: I made a model of a 57 panel from memory, cut down to 1/4 in length and got a result of 6 hours. The many holes is the culprit here..
If You have a speedy printer with large building area, and go ahead with printing, I have an idea for the conducting layer: Glue 3 very thin copper strips over the hole areas, on the outside. Place the stator on a flat surface and fill the 0.7 mm deep "bassins" with ferric chloride and etch away copper that covers the holes...
Attachments
Bwaslo, I don't understand you want to print this, as the stator of the ESL 57 is a flat plastic sheet with round holes all of the same size.
I can give you the outside size, the hole size, the thickness and the hole pattern. The spacers for the diaphragm are glued on plastic strips, I can give you width and thickness of those too.
Ah, I didn't know that. From the pics, I assumed that it was all one molded piece. Not that it couldn't be, though, right?
Most important: what a bout the resistive coating on the stator, how are you going to solve that? Or are you going to use in a different way?
I was planning to use conductive paint (which, according to a rebuilding website, is what QUAD used?). Isn't the high-resistive (nylon) coating on the diaphragm, while the stators are low resistance (except where the pieces contact the diaphragm)?
I can give you the outside size, the hole size, the thickness and the hole pattern. The spacers for the diaphragm are glued on plastic strips, I can give you width and thickness of those too.
If you could post a dimensioned sketch, that would be very helpful.
Nice idea, but be prepared for long printing time: I made a model of a 57 panel from memory, cut down to 1/4 in length and got a result of 6 hours. The many holes is the culprit here..
If You have a speedy printer with large building area, and go ahead with printing,...
6 hours is nothing for a 3D print! That's why they aren't used for manufacturing. More than 24 hours isn't uncommon. After all, it's the printer's time, not mine!
My printers bed is 300mm x 300mm, so, yeah, I was thinking of doing it in sections. Not an exact copy, but similar. I'd also use a wider nozzle, which can dramatically speed up print time compared to the usual 0.4mm nozzle.
My model is one quarter in length, gives 24 hours.....
You need two panels, gives 48 hours......
My experience with 3d printers tells me that a nice 3 mm hole is very hard to
achieve with larger nozzles than 0.2 mm.
But, I have Anet A8:s and A2:s, not what you can call super good printers.
I hope You give it a try, should be very interesting to follow!
On the Idea of a 3D Printed Stators.....
They do make a Conductive Filament material that could be used for the Stator Elements.
Conductive Graphene 3D Printing PLA Filament
conductive 3d print filament - Google Search
I had got my printer for Xmas this last year and as soon as I found about this stuff a light came on and I too had thought about giving it a try myself.
I haven't gotten a reel of the stuff yet, But I have even seen examples in pages of completely 3D printed working transformers as well using some Nickel or Iron filled material !!
LaserHacker 3D Prints a Working Power Transformer with Proto-pasta’s Magnetic Iron Filament | 3DPrint.com | The Voice of 3D Printing / Additive Manufacturing
3d printed transformer core - Google Search
The thought of this may even make it possible to print the resistors for electrically segmented designs right in to the panel as well, as they need not be super precise but enough of a tolerance to be in the proper range of resistance.
I have only worked with PLA so far and it is a bit too flexible (IMHO) in the long run and I plan on getting some ABS for the added strength and rigidity for something of this nature.
Graphite filled may be the ticket for that.
This is a very interesting subject and would like to see more ideas and results of your findings on this.
I have also fancied the idea of encapsulating some Wire Warp Wire as well or even some plain ole' magnet wire could work for the elements for them.
Sorry I still have other pressing issues at the moment before I can get back to my Re-building of the Desktop ESL project ( I know that it has been a long time now) but I did finally get the proper solvent to build the frames with and funds are not an issue anymore.
The original frames did fall apart as expected as I used Super Glue to assemble them with.
3D printing some frames is next on my list of something to try so I need to get some ABS for that.
Also I got a box of some .045 TIG rod for the new Stators as I was not happy with using .062 after coating them in the First place the rods were to big in diameter for my liking.
The thinner rods will give me a finer segmentation (more of it) for a more better even dispersion and aesthetically will look much better as well for such a narrow panel
Maybe it would also be suitable for mounting the diaphragm as well instead of having to worry about making precision cut plastic pieces for them and special solvents to assemble them, except for epoxy. 😉
A locking shape on the Diaphragm frame to the Stator frame could be used to keep it from losing its tension as well, as I was able to adjust the tension using the Sandwich Bolt technique on my original design after it had been heat treated.
Now my only concern that I need to test for is, how porous are the prints to keep the corona from leaking out and causing Breakdown failure.
As you all know that was my main subject of research on the Desktop ESL Project and making a more efficient unit ... IE Sensitivity. 🙂
Cheers !!!!

Jer 😀
They do make a Conductive Filament material that could be used for the Stator Elements.
Conductive Graphene 3D Printing PLA Filament
conductive 3d print filament - Google Search
I had got my printer for Xmas this last year and as soon as I found about this stuff a light came on and I too had thought about giving it a try myself.
I haven't gotten a reel of the stuff yet, But I have even seen examples in pages of completely 3D printed working transformers as well using some Nickel or Iron filled material !!
LaserHacker 3D Prints a Working Power Transformer with Proto-pasta’s Magnetic Iron Filament | 3DPrint.com | The Voice of 3D Printing / Additive Manufacturing
3d printed transformer core - Google Search
The thought of this may even make it possible to print the resistors for electrically segmented designs right in to the panel as well, as they need not be super precise but enough of a tolerance to be in the proper range of resistance.
I have only worked with PLA so far and it is a bit too flexible (IMHO) in the long run and I plan on getting some ABS for the added strength and rigidity for something of this nature.
Graphite filled may be the ticket for that.
This is a very interesting subject and would like to see more ideas and results of your findings on this.
I have also fancied the idea of encapsulating some Wire Warp Wire as well or even some plain ole' magnet wire could work for the elements for them.
Sorry I still have other pressing issues at the moment before I can get back to my Re-building of the Desktop ESL project ( I know that it has been a long time now) but I did finally get the proper solvent to build the frames with and funds are not an issue anymore.
The original frames did fall apart as expected as I used Super Glue to assemble them with.
3D printing some frames is next on my list of something to try so I need to get some ABS for that.
Also I got a box of some .045 TIG rod for the new Stators as I was not happy with using .062 after coating them in the First place the rods were to big in diameter for my liking.
The thinner rods will give me a finer segmentation (more of it) for a more better even dispersion and aesthetically will look much better as well for such a narrow panel
Maybe it would also be suitable for mounting the diaphragm as well instead of having to worry about making precision cut plastic pieces for them and special solvents to assemble them, except for epoxy. 😉
A locking shape on the Diaphragm frame to the Stator frame could be used to keep it from losing its tension as well, as I was able to adjust the tension using the Sandwich Bolt technique on my original design after it had been heat treated.
Now my only concern that I need to test for is, how porous are the prints to keep the corona from leaking out and causing Breakdown failure.
As you all know that was my main subject of research on the Desktop ESL Project and making a more efficient unit ... IE Sensitivity. 🙂
Cheers !!!!
Jer 😀
WrineX you are talking about the ESL-63 model where as Sheldon is talking about the 29xx model. You are both completely right. According to New Transtec, the Dutch Quad importer, IAG has switched to 2 component glue recently. Don't know if this is correct.
I was thinking of the 63's. That dried flaky crap that they held the stators onto the frames with will melt and re-form with a little heat. That's one easy way to clean off the diaphragm adhesive as well.
The newer (my 2912) panels do use a different glue for the stators and the diaphragms. The problem is that the diaphragms develop a lot of little splits and cuts and fail. I call this diaphragm rot. I'm not sure what they are doing that is causing this, because I never saw it on any of the british panels. in my 2912's 5 of 12 panels had it.
If they can fix this "diaphragm rot" issue, then they may finally have panels that are reliable.
Sheldon
quadesl.com
Ah, I didn't know that. From the pics, I assumed that it was all one molded piece. Not that it couldn't be, though, right?
There were two different ESL treble panels. The early ones are indeed one molded piece. You can see that from the outside between the three columns of perforations is a dip where the plastic has been molded to form the support. These panels are my favorites to rebuild. The forming process strengthens the stators and they tend to keep their shape the best.
The newer ones are indeed like described where the outer stator area is a flat sheet with spacers inside the panel. In my experience these can suffer from deformation from cold setting or creeping over time and are no longer really flat messing up the D/S spacing.
Regardless of style, the tolerances on an Original ESL treble panel is not nearly as tight as a 63 panel, and it shows. I can rebuild a pair of 63's and get impulse responses that lie on top of each other, at times it's hard to see that there are two lines on one graph. the original ESL's can be off by a dB or more with the same precision rebuilding methods. That lack of precision makes me sad, because it's so easy to now make precisely spaced mechanical structures cheaply (the 63's are a good example of it from 40 years ago), and the original ESL's can be much more precise with more careful manufacturing processes.
Good luck with the 3D printing, I'm anxiously waiting to hear how it goes.
I'm not sure if this is true of the 3D printing filaments, but some plastics use carbon to make them black. That carbon may be slightly conductive, and mess up your project. You might want to make them out of a light color to avoid that.
Sheldon
quadesl.com
I was thinking of the 63's. That dried flaky crap that they held the stators onto the frames with will melt and re-form with a little heat. That's one easy way to clean off the diaphragm adhesive as well.
The newer (my 2912) panels do use a different glue for the stators and the diaphragms. The problem is that the diaphragms develop a lot of little splits and cuts and fail. I call this diaphragm rot. I'm not sure what they are doing that is causing this, because I never saw it on any of the british panels. in my 2912's 5 of 12 panels had it.
If they can fix this "diaphragm rot" issue, then they may finally have panels that are reliable.
Sheldon
quadesl.com
A way of maybe avoiding rotting membranes:
According to my measurements, You can use 6 uM film.
The high freq response difference to the original is undetectable, at least with my equipment, due to the limited bandwidth if the transformers.
This goes for older british (brittle!) Esl 63:s.
The delay line attenuates more than the transformer itself. If you not listening exactly on axis.
Regarding the rotting, when there is small debris collected that attracts charges and attracts to the membrane, microscopic small arcs goes between stator and membranes. Those small arcs are creating Ozone.
And the ozone is the key to the broken bonds inside the polymeric chains within the polyester film. With no Ozone, the membranes has maybe eternal life.
By cleaning the membrane surface with a sharp razorblade, all debris can be wiped away, and arcing stops.
Last edited:
Ah, I didn't know that. From the pics, I assumed that it was all one molded piece. Not that it couldn't be, though, right?
I was planning to use conductive paint (which, according to a rebuilding website, is what QUAD used?). Isn't the high-resistive (nylon) coating on the diaphragm, while the stators are low resistance (except where the pieces contact the diaphragm)?
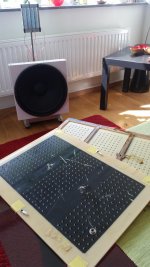
Like these KLH(?) panels? (Found them on a street sale in Copenhagen!)
Nice push-on contacts.
Actually, these would be no problem for a 3D printer, very few holes!
I would estimate 6-7 hours on a Creality 10.
Attachments
By cleaning the membrane surface with a sharp razor blade, all debris can be wiped away, and arcing stops.
You'll need a steady hand for this, I presume?
And being free from diagnoses like Parkinson and such!

Yes a steady hand... And also when your coating has dried after refurbish you can use the razorblade to smooth the surface.
The delay line attenuates more than the transformer itself. If you not listening exactly on axis.
Regarding the rotting, when there is small debris collected that attracts charges and attracts to the membrane, microscopic small arcs goes between stator and membranes. Those small arcs are creating Ozone.
And the ozone is the key to the broken bonds inside the polymeric chains within the polyester film. With no Ozone, the membranes has maybe eternal life.
By cleaning the membrane surface with a sharp razorblade, all debris can be wiped away, and arcing stops.
This is an interesting topic. I guess this has also to do with stator insulation as I never have seen this happening with audiostatics (which have thick PVC insulated wires). A coating with higher resistance may also help.
I knew a guy who, in his efforts to get higher sensitivity, built a new bias supply with higher voltage for his Martin Logans.
After a few days, the sensitivity went to zero!
We took the panels apart, and found that the sputtered conductive layer had left the building, leaving only an oily residue on the membrane.
After a few days, the sensitivity went to zero!
We took the panels apart, and found that the sputtered conductive layer had left the building, leaving only an oily residue on the membrane.

I'm testing with anti corona dope
maybe plastic spray (contact chemie) is also worth trying.
I assume you put it on stators, dont know about the added weight when sprayed on the mylar....
- Home
- Loudspeakers
- Planars & Exotics
- ESL Diaphragm coating