I suck!
I look at everyone else's stuff and realize what a hack I am.
dlneubec, your project looks spectacular.
Bud did we ever finish the conversation/discussion regarding transformers?
dave, still haven't decided what I might need from you, please hang onto the stuff until further notice. Sketchup is really cool, can even import Autocad files into it....
Hi Dave,
Thanks!
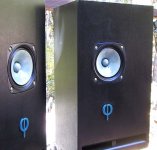
I'm extremely happy with the sound. The soundstage is astounding, yet the transition from omni to direct firing in the tweeter makes for excellent imaging as well, IMO, that is.
There has been a lot of hours testing, building, finishing, etc., so I'm always looking for any way, especailly something relatively simple, to improve them. I'm not afriad of the time it would take to do the enable. I will probably want to try something temporary on the woodworking parts, because I don't want to mess with that until I'm certain if will be a worthwhile improvment.
Thanks!
I'm extremely happy with the sound. The soundstage is astounding, yet the transition from omni to direct firing in the tweeter makes for excellent imaging as well, IMO, that is.
There has been a lot of hours testing, building, finishing, etc., so I'm always looking for any way, especailly something relatively simple, to improve them. I'm not afriad of the time it would take to do the enable. I will probably want to try something temporary on the woodworking parts, because I don't want to mess with that until I'm certain if will be a worthwhile improvment.
Bud,
Thanks for the kind words. There is the front firing sub/woofer with a rear firing TL terminus. There is an up and down firing mid from the two boxes that sit on the top and a single front firing tweeter that is suspended between them. Essentially it is a WMTM with up and down firing M's. The speaker trasnsitions for omni in the low to mids to direct firing with the tweeter. I do get some diffraction artifacts from the tweeter off the front edge of the top and bottom mid boxes that show up as narrow 1-2db dips between 3-4khz. I have addressed these with a little F13 felt.
subwoofer (or woofer if you please) to mid crossover is in the 180hz range and mid to tweeter at about 1560hz.
I actually posted the project in this thread in case anyone wants more info, pics, measurments, etc.:
HOSS project
I've searched and I don't find a post regarding this idea. What about using liguid paper or "white out" for the patterns. It comes in a spill proof small bottle with a small brush that looks like it would be very easy to apply with. It dries very quickly as well.
Of course, liguid paper is generally white, but it could possibly be colored or covered over with something like a sharpie permanent marker, which come in a variety of colors. I did find some at an art supply place that comes in avariety of colors.
Colored Liquid Paper
Any thoughts?
Of course, liguid paper is generally white, but it could possibly be colored or covered over with something like a sharpie permanent marker, which come in a variety of colors. I did find some at an art supply place that comes in avariety of colors.
Colored Liquid Paper
Any thoughts?
dlneubec said:I've searched and I don't find a post regarding this idea. What about using liguid paper or "white out" for the patterns. It comes in a spill proof small bottle with a small brush that looks like it would be very easy to apply with. It dries very quickly as well.
Covered already in the middle of this thread. Sounds like it works just fine.
dlneubec,
I personally would not use white out, nor would I use a brush to apply the pattern with.
Issues of control of material flow, visibility of errant brush strokes and the likelihood of making errant brush strokes, would worry me. I realize other folks have steadier hands than I do, but the calligraphy pens are so easy to use, so inexpensive and solve so many issues with the application process, that I really have to recommend them.
The Poly S clear flat paint is very suitable for pen application, with high surface tension and excellent flow rate. This material will also stick to just about anything, even polypropylene woofer cones from DynaVox.
In addition, the clear flat material dries almost invisible, with just the flat non reflective surface showing and under the Gloss coat even that disappears.
The boundary layer that you are controlling with this process, is easily deranged and I have no idea how your plans will sound when dry. Plus, the rest of what you have done shows such skill, thought and attention to surfaces, that I would be surprised to find you satisfied with the white out and magic marker look.
And then, there are the issues of inner pattern rings, which are necessary, and the phase plug. These are going to need tiny dots of paint and very steady hands to apply. Treatment of the phase plug will help control phase coherence from the mid drivers and with the level of detail you are going to gain, this will be quite audible.
You really are going to have to treat the tweeter too and while the damping material you have added to the body of the tweeter mount will help with diffraction, the EnABL patterns will make the diffraction disappear.
All of this is just a suggestion, but it is from 30 years and more than 300 drivers worth of experience.
Bud
I'm prepping to EnABL my 1st box... i want to start with the GR Fonkens (image attached) as they are already a show-piece. Instead of just doing constant size blocks i decided to try my hand at something a little more artsy-fartsy. I've already discussed pros & cons with Bud about average length vrs "official" length blocks & the opinion is that it doesn't matter... before i go ahead i want to pass the patterm past Bud and thot everyone else might get something out of it. more next post
dave
dave
Attachments
Here are the guides i used to generate the pattern. You can see the radial pattern generating shape underneath as well as guides for the block height. I used the avaerage of the longest & the shortest block divide by 2 to get the block height. I figyred that the blocks needed to be above the ports, but for cosmetic completness (with sides & back) they also needed to be under. The arc patterns on the top corners, and above the port are intended to reflect the underlying radial pattern generator.
Attachments

Hi Dave!
I have been wondering about working up an OB (think MJK) with EnABL on the baffle and your thoughts are inspiring! I really like the extra thought you put into doing a radius with reference to the speaker - great idea!
Now with yours I would be tempted to use some blacklights and play a little Jefferson Airplane!
(Ah - that brings back some memories!.)
Getting closer
I think one of the things I'll equip myself with to EnABL cones is a lazy susan. With the driver centered over the bearing and "clamped" in place, I'll tip the lazy susan up at an angle that corresponds to that of the cone. This positioning allows the marks to be made relatively flat and level. I'll also have an arm rest so that only my wrist is unsupported while making the marks. Rotating the driver will bring successive mark locations into position.
Dave, I like what you are planning with the cabinet and look forward to results.
Hi Bud,
I will take your suggestions. The flat black paint is very appopriate for my use and will pretty much dissappear, which I would prefer anyway. I may run out and get the stuff tomorrow. I have a Hobby Lobby close by. Maybe they would have the pens, paint, etc.
Please tell me if I'm overstepping here, but I've spent so much time on these speakers that I want to be certain I'm doing it right! If I email you some dimensions of my speakers, maybe in a pdf file or whatever format you might want, would you consider making some suggestions as to where to place the patterns (besides on the drivers). I could probably do the flat black on some of the critical gloss black baffles if you think it would be helpful. It would be much less noticeable than two 1/4" thick x 1" x 4" pieces of gray-brown felt, that's for sure. I would rather not mark up the veneer part of the cabinets. I could also post a pdf, tiff, gif, etc. here on the forum if that is more acceptable.
Hi Ed!
I like your idea about the "Lazy Susan" and the arm rest - Think I'll add one of those swing arm lights with the magnifier on it too.
When my wife ask me what I'm up to I will need to be very careful about the words I choose - her name is ------ Susan!

I like your idea about the "Lazy Susan" and the arm rest - Think I'll add one of those swing arm lights with the magnifier on it too.
When my wife ask me what I'm up to I will need to be very careful about the words I choose - her name is ------ Susan!
C2C,
You are slipping buddy...it's called a lazy Ed.... and I recommend scale model maker, magnification lenses. Slip on visor style with flip down lens set, Cheap.
Sounds like Dave needs Ed's set up too, with the mass treatment practices he has been doing. Thanks Ed, nice ideas, as usual.
Dave,
Looks fine to me, You may find that a ring on the basket of the driver, just before the gap to the baffle, will also help get the pressure wave to expand uniformly. Not usually critical but that is a very definite boundary layer interruption and it is really easy to get anal about this procedure.
dlneubec,
I will be more than happy to provide templates. I use rings with the block pattern printed on the edge, to guide my pen stroke length. Makes it easier and by marking a start point I can apply the flat CLEAR Poly S paint and not worry about it becoming invisible as it begins to cure. Back a few pages is a series of pictures Dave posted showing Fostex FR drivers that have a phase plug shaped center dome. I modified them to show where the pattern rings need to be applied for best results.
Look for the Poly S flat clear paint first, then flat black if there is no clear. The pigmented paints don't flow quite as well as the clear and tend to clog a bit. Also ask for Micro Scale Gloss coating material when you go to the hobby shop. That and a 3/8" wide, inexpensive flat sable paint brush to apply it with.
Perfection in application IS NOT NECESSARY!!!!!!!!!!
Good workmanship and a steady hand will do the job. There are some pics posted here and one set in particular covers the materials. Pen tips are A series and A-0 through A-5 are good to have, along with a tip holder.
http://picasaweb.google.com/home?tab=mq
As for the templates, if you have Corel Draw or Adobe Illustrator I can send you vector files you can scale. If you have a set of divider calipers from a mechanical drawing set and a vernier dial caliper, you can provide measurements good enough for me to use the EnABL cone pattern generator for Auto Cad 14. I would be happy to make that available to you too, if Auto Cad is your brand of poison.
Also, littered throughout the thread are PDF format paper doll cut outs for a growing variety of cones, that you can download, print out and lay on your cones. We will get you a useful tool regardless.
Look around a bit to get a feel for what is needed.
Bud
Hi Thomas,
No intentions of disparaging our better halves. I'm motivated by my own laziness. An expansion on the "bearing" idea would be to have an indexing mechanism and a laser pointer.
It'd be so cool I'd have to wear shades...
I like the magnifier.
No intentions of disparaging our better halves. I'm motivated by my own laziness. An expansion on the "bearing" idea would be to have an indexing mechanism and a laser pointer.
It'd be so cool I'd have to wear shades...
I like the magnifier.
it's called a lazy Ed....
I resemble that remark...
Also found on post 139: graph paper printer
http://pharm.kuleuven.be/pharbio/gpaper.htm
edit: add link
Ed,
How about a stepper motor powered turntable? With appropriate # of degrees per foot operated switch twitch... 4 deg, 2 deg, 4 deg, 4 deg, 2 deg, 4 deg. Then if you added a flow tube to the applicator and a sip tube to the mouth, you would only have to remember when to pick the pen tip up and put it down, pick it up and move it over. But colored lights could help with that... though the sippy tube Jack Daniels water might eventually overcome this plan....
Bud
Hi Ed!
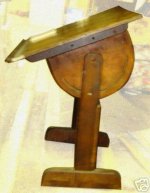
I'm thinking of something along the lines of the drafting table in the attached photo should work. Mount a rotating platter on to it and mark off 2 degree increments on the platter. Getting the speaker centered and held in place could be a little tricky tho -
Hi BudP!
Used the triple loop flip down magnifiers when I would repair blown etches on PWB's back in the day. Yep - They work fine! Plus I get to pretend I'm a 'Borg doing a little transmutation when I put 'em on!
Attachments
I dream of something like this...
http://www.ijfisnar.com/robots_rt404flex.htm
dave
http://www.ijfisnar.com/robots_rt404flex.htm
An externally hosted image should be here but it was not working when we last tested it.
dave
Are these expensive?planet10 said:I dream of something like this...
http://www.ijfisnar.com/robots_rt404flex.htm
An externally hosted image should be here but it was not working when we last tested it.
dave
- Status
- Not open for further replies.
- Home
- Loudspeakers
- Multi-Way
- EnABL Processes