I would research applying any finish over linseed oil.
About the only suitable things, in my experience, are paste wax or more linseed oil.
I would not expect lacquer to adhere very well, if at all.
About the only suitable things, in my experience, are paste wax or more linseed oil.
I would not expect lacquer to adhere very well, if at all.
Well,
I was hoping that the shellac would serve as a sealer between the laquer and the linseed oil. I guess I can just try it on a piece and see what happens.
I was hoping that the shellac would serve as a sealer between the laquer and the linseed oil. I guess I can just try it on a piece and see what happens.
Yes, shellac between by all means.
Oil Lightly and let the oil dry for a day or two. Longer if humid/cool.
It's a gamble.
You could end up with the same visual effect with just the shellac and lacquer. I would try that first.
Oil Lightly and let the oil dry for a day or two. Longer if humid/cool.
It's a gamble.
You could end up with the same visual effect with just the shellac and lacquer. I would try that first.
Thanks for your advice Bob,
I've tried the shellac and laquer w/o oil, but the grain didn't stand out nearly as much and the black was more of a grey blue color.
Overall, the oil really provides contrast and richness. I will try the shellac over oil, then laquer combo sometime soon and see what happens.
-Wes
I've tried the shellac and laquer w/o oil, but the grain didn't stand out nearly as much and the black was more of a grey blue color.
Overall, the oil really provides contrast and richness. I will try the shellac over oil, then laquer combo sometime soon and see what happens.
-Wes
Bob Bartko is right on the money here.
Laquer over oil is bad ju ju. If the linseed oil had months to dry (polymerize - heat, oxygen, time) it might be OK... but otherwise, you have come too far. I would think the same of shellac... toluene (laquer) is meaner than alcohol (shellac). Never put mean paint over weanie paint. The reverse is OK though.
Your choice of analine dye is excellent. Consumer oil stains are just B.S. for subsequent clear coating. I have too many stories and reasons to list here. In short, in ALL painting systems you are told to REMOVE oil before applying paint... it is no different with clear-coated wood.
The effect you are noticing from the linseed oil, is coming in part from the yellow cast it lends. Laquers, once built up will also throw a yellow cast.
Oh and build up more than three coats before your first sanding. Everybody's definition of a coat is different. An experienced painter can lay on 4 times as much paint without hanging a run. Don't try to sand it dead smooth on the first pass. Just bust the tops off the mountains and flatten down the dust noogies. If you cut through you will get water in your veneer, glue, etc... You can recover from all this, but it will always show.
Also allow plenty of time between coats... it will reward you in the end. Solvents get trapped in the build up and literally take weeks or months to escape. In either event, don't do the final sand and poilsh for at least 4 weeks... more if cold or humid. Otherwise, the imperfections you filled will telegraph right back.
BTW... DAMN BEAUTIFUL WORK.
😉
Thanks Poobah,
I agree with you about the drying time. I was thinking about putting on 1 coat in the morning and 1 coat in the evening and repeating this procedure for about a week or so.
Then sand down and repeat for a few more coats.
Unfortunately, I can't afford to wait too long for final drying time or for oil to cure because I have approximately 1.5 months to finish before I have to move to small apt in the city = no garage or tools. So hopefully I can push it without ruining it.
Unfortunately, its pretty much always hot and humid here in St. Louis... kind of like living in the nation's armpit during the summer. I wonder if I can dehumidify the garage or if this would be a lost cause...
Oh well, time is short and work is far too much. Thanks for the compliment btw. I guess it was a bit of a stretch for my first speaker/veneer project but perhaps thats why its taken me 3 stupid years 🙄
(well I supposed I did manage to get a degree during that time as well...)
-WRL
A couple of hours between coats will be fine... just not 10 minutes.
Be advised that with high humidity your laquer my "blush". This will appear as foggy and non translucent... ignore this. It is caused as follows: As the solvents evaporate they carry away heat and cool the surface. This cooling in turn causes leetle water droplets to condense on the surface. The droplets cause leetle wrinkles in the surface. The leetle wrinkes kill the gloss and add a weird sort of irridescence. Reds will look pink... clears will be gray... don't sweat it. Another reason to allow good drying time is so the water can eveporate.
If it blushes on your final coat, and you can't stand looking at it that way for 4 weeks, just polish them lighly with some fine compound. Save the sanding and real rub down for later.
And... you really don't need that much sanding between coats. It really just matters how much dust you're trapping. Wipe the surface dry often while sanding and look carefully... you get a feel for it as you go.
😉
Poobah Speaks the truth Wes!
Yep laquer over oil is a big time no no!
Time for the compliments.
Nice box!
Got the colour you wanted!
Oil will give you a nice finish.
You might try sanding a sample with wet oil and 400 grit paper to see what type of a reaction you get. You may like the finish a bit more. May fill in the grain and also strip off some of the dye to give you more of the original effect of dyed and raw wood grain swirling around.
Wish I could see it in person!
Mark
http://www.sawdustmaking.com/Finishing/finishing.html
http://www.woodworkersjournal.com/ezine/archive/54/qapop2.html
Since you oiled it already, maybe a sanding and wipe down with alchohol will prep it for another dye. They seem to recommend two colors of dye to get the cat's eye finish. Then you can go straight to the lacquer or shallac to get the final tint and depth. I would skip the oil just because it is not a very durable finish.
Once you've got that done I would go for a many about 7 coats of clear, of a variety that will not add any further yellowing.
Frog juice is such a clear, I'm sure there are others, water based or polyurethane ones are said to be such a clear. I've worked with frog juice before and it requires thinning, it also dries insanely fast, a little practise with it will go a long way. It's good stuff though.
By the time you're done wetsanding that it should have a glass like finish, be very careful while wetsanding near edges, it's easy to go too far with it.
At this point I'd figure out your game plan though, decide on products that can work together towards your final finish, and experiment on scrap until you find the right combination.
If you rush it any further you may ruin it.
The only problem I've experienced is that the plaster doesn't penetrate very deeply into the wood, so if I sand after plaster, I get a very grainy appearance in the previously dark areas.
I think that treating with a yellow or amber dye after I fill with the dark plaster might work and be a good alternative to oil. I'll order some and give it a shot.
I just wish I had more time to get a good result. I really only have a month left to finish so I can't spend too much more time messing around trying to decide a finish...
-Wes
I just wish I had more time to get a good result. I really only have a month left to finish so I can't spend too much more time messing around trying to decide a finish...
Yeah the two dye scheme seems to make sense 🙂
The shallac will darken things further but you may also be able to go straight to a pure clear.
I'd just make sure all your products will be compatible from this point on.
One idea to speed things up might be to use a heat gun on your test pieces. It might buble or whatever but who cares, it's just to let you see how the coating/layering will look without having to wait.
Hope it works out for ya.
I've done a bit of woodworking with shelac and urathanes over top.
My best recommendation is to get Zinser "seal-coat" which is a 99% wax free shelac. Some of the "waxy" stuff prevents the urathane from bonding 100% to the surface. This is more important with tables and countertops but if I had a choice I would always use the de-waxed stuff.
John
My best recommendation is to get Zinser "seal-coat" which is a 99% wax free shelac. Some of the "waxy" stuff prevents the urathane from bonding 100% to the surface. This is more important with tables and countertops but if I had a choice I would always use the de-waxed stuff.
John
ya,
I've been using the sealcoat (when I've been saying shellac).
Do you have any idea of the shelf life of this stuff? Mine is about a year old now and it doesn't seem to look as good as I remember once applied.
I ordered a new quart just in case.
-Wes
I've been using the sealcoat (when I've been saying shellac).
Do you have any idea of the shelf life of this stuff? Mine is about a year old now and it doesn't seem to look as good as I remember once applied.
I ordered a new quart just in case.
-Wes
I think an unopened can is only good for about a year. If its been opened and exposed to the air/moisture its probably no good.
John
John
Good enough for now...
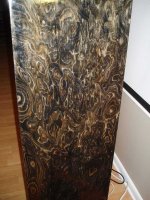
Well this is the closest I can get (after several years of on and off working). Thanks for everyone's help as I couldn't have done it without this forum.
First was a plaster of paris and black analyne dye pore filling followed by boiled lynseed oil. Then several coats of shellac followed by numerous coats of laquer. For the pore filling I actually wiped it off with a damp cloth before it dried rather than sanding after drying.
I wanted to get the glossy "piano" finish, but it was just too hard with a brush and I got too frustrated. Its actually a bit more uniform than it appears, but its hard to capture with the camera.
By the way... the rest of the system is posted here:
http://www.diyaudio.com/forums/showthread.php?s=&threadid=23208&perpage=25&pagenumber=55
Attachments
Nice work, BUT...
This could have been done much cheaper, easier, faster and more consistently with three paint colours and spray equipment.
On a SMOOTH base, spray consecutive layers of each colour over and over again. Let dry, then sand through the layers with a random orbit sander to get the desired "grain" pattern.
Clear coat and you're done.
- Status
- Not open for further replies.
- Home
- Loudspeakers
- Multi-Way
- Does anybody know how to get this finish?