Hi Patrick (itsAllInYourHead)? - I tried to send this in a PM but the address I used was wrong apparently. I consider that I know next to nothing about electronics. The replies I get may as well be in French because I have to look up Google for an explanation to every second word or term! And that takes hours! I have a little experience. I did the Overnight Sensations speakers and soldered up the crossovers. Ditto the Sunflower Redux tower open baffle speakers and I helped a mate who built 4 x Modulus-86 mono blocks and I built the Amp Camp Amp on my own which worked first time! BUT nothing has prepared me for doing the Universal Power Supply!!! So basic and simple suggestions are welcome. Nothing anyone says will be taken as an affront! I have spent the morning reading up on toroidal transformers and how to wire them up and I am making progress but some way to go of course. On the Universal Power Supply PCBs I assume from the replies I have that I snap off the bottom 1/4 ie the diode section and instead use 2 x Monolithic Rectifiers? I cannot find a high res photo of a F6 fully built up so I am using one of the F5. Which is attached. Cheers Geoff Lee, Melbourne Australia.
Yes - just snap off the boards and toss them. Then get 2 bridge rectifiers like the ones I just referenced.
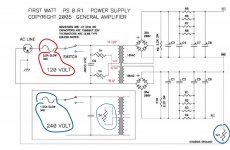
Questions regarding Thermistors TH and TH1. The schematic for the DiyAudo Store/First Watt Universal Power Supply includes components TH and TH1. Attached. The 120V build specifies 2 x TH and 1 x TH1 whilst the 240V build specifies 1 x TH and 1 x TH1. Strangely these Thermisters are not included in the UPS Bill of Materials so far as I can see. BUT both TH and TH1 ARE included in the Bill of Materials for MOUSER prepared by ‘flohmann’ who has documented a very helpful Build Guide for the Adelph J in his Google BLOGGER (Mouser Electronics, Inc. Australia) website. My questions are: Q1: Why aren’t the Thermistors included in the DiyAudio Store Bill of Materials for the UPS? Q2: Where are TH and TH1 mounted? On the base of the chassis or on a heat sink or on a Printed Circuit Board or where? Q3: Are both TH and TH1 the same part number (specified by ‘flohmann’ as Mouser 527-CL60. Unfortunately it is impossible to read 90% of the writing on the UPS printed circuit boards because the images are very low resolution so the numbers are blurry and pixelated. These PCBs are out of stock and I do not have any but I am trying to do what I can before they come back into stock. With thanks Geoff
Attachments
Last edited:
Good morning!
0) flohmann‘s amp is called »Aleph« 🙂
1) the thermistors aren’t in the official bom because they aren _on_ the board. And because these solutions are the easiest well working possibilities to achieve what they have to...
2) You use them for a) limit the inrush current on power-on (the ones connected to the main hot) and b) to „elevate ground“ (the one going from the boards 0V to the chassis.
Hth
David
Attachments
Last edited:
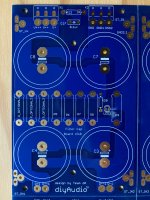
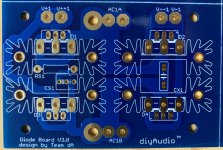
Thanks very much for your prompt reply. Alpeh J it is! I hope ‘flohmann’ is not offended! Thanks for the really high resolution photos of the Filter Cap Board V3.0 (left side) and the Diode Board V3.0 (I assume left side). This is extremely useful! Could you repeat for the right side please just for completeness. Are you saying that TH and TH1 are actually imbedded in the Filter Cap Board V3.0 or imbedded in the Diode Board V3.0. I cant see TH or TH1 marked on either board in your photos. If they are imbedded in the pcbs why has ‘flohmann’ included them in his Bill of Materials for Mouser? Could ‘flohmann’ have seen TH and TH1 on the schematic and therefor assumed as I did that they are a required purchase? Thanks Geoff.
Hi, Melbourne! Good morning, or should I say evening? Worldwide forum, pretty cool.
I understand this can get confusing, I have been there too, and readily get confused each and every time I try to do or learn something new within DIY audio.
Thermistors were confusing too. David and Patrick have given you good answers and guidance. The referral to the F6 build guide is very good for visualizing the thermistors at work. Click on this link:
F6 Illustrated Build Guide
In pic 17 from the top, you can see a terminal block/connector block with two circular black things, and one blue. Disregard the blue for now. The two black ones, are Amphenol CL60 5 amps 10 ohm thermistors. These do what myleftear said: they work as a softstart, meaning they ensure your mains fuse does not blow at power on. They also spare your PSU parts, lengthening component life. And the also filter out some of the mains high frequency noise. A nice package, yes?
What you are seeing on that pic, is the wires from the mains inlet entering the terminal block. There they are connected to the thermistor, forcing the current through the thermistor. The job of the thermistor, or one of it’s jobs and most important in this application, is to slow down the current from the mains. Once the thermistor heats up, it’s resistance drops in parralell with thr PSU caps reaching full charge. Think of it as a controlled acceleration.
Note that two thermistors is for 110-120Vac. For 220-250 volts, in Europe etc, only one is used.
On pic 18, you see the thermistor used as sort of a ground lift. It is connected between the PSU PCB 0v/ground, and the chassis. There it provides resistance/impedance between the two, so that if there are small loop currents they will in effect be stopped/impeded by the thermistor, reducing chances of ground loops between the chassis/safety ground and signal ground/PSU 0v.
Using thermistors is cheap and simple. There are other ways of doing this, but few as cheap and simple as thermistors. Nelson uses them, so they will be good enough.
He also uses monolithic bridge rectifiers in the First Watt amps, but no longer in Pass Labs amps. They are good enough. For clarity: he does not snap off the rectifier PCBs, his PSU does not have a diode/rectifier section. Nelsons PSU boards are different from the stores universal PSU in several respects. One of them is that Nelsons PSU has traces for AC. This means the AC wires go into the PSU board, and therefore the inrush current limiting thermistor(s) (CL-60) is on the PSU. This can not be done with the stores PSU boards.
I wish you well and good luck! I bet the F6 will sound lovely, I want to build one myself.
Cheers,
Andy
Last edited:
Hi Geoff. I think what you refer as TH1 is a slow blow fuse that is put on the power inlet.
For Aleph J on 230V you need 2A fuse like this:
https://eu.mouser.com/ProductDetail/530-5ST2-R/
The fuse goes into the power input module like this:
https://eu.mouser.com/ProductDetail/693-4304.6058/
(this one fits the hole on the back pannel of the diyAudio Deluxe chassis from Modushop).
For TH, this is the thermistor that is used to surpress the high inrush current on the moment of the turn on of the amp. It's resistance is higher when cold and therefore it restricts the inrush current. Then it is heated up by the current flowing throuth it (to 80-100C) and it's resistance goes down to 1ohm or below and therefore it kind of "dissapears" from the circuit. You put this thermistor on the "hot" power wire just before the transformer. The power supply schematics specify the CL-60 for TH, but there were some discussusions in the forums that 11 ohm cold resistance of CL-60 is a bit too low for 230V and there were recomendations to use something of up to 60 ohms cold resistance. You could still blow some fuses with CL-60. My personal choise was this, with 47 ohms cold resistance:
SL15 47003 Ametherm | Mouser Europe
You will still need one CL-60 for another purpose, to "lift the ground" between the power board and the star ground of the chassis to eliminate the ground loops. So, order one of these too:
https://eu.mouser.com/ProductDetail/527-CL60/
See the picture of the mains wiring for 230V (this is my Aleph J). TH is in the bigger red circle. You also see the mains capacitor there which has to be wired between the hot and neutral wires of the mains:
DE2E3KY332MN2AM01F Murata Electronics | Mouser Europe
The CL-60 is in the small red circle but hardly visible here.
Hope this helps.
-Alvis
Attachments

Last edited:
Avitkauskas - TH1 is not a fuse. It's a thermistor used for the ground lift.
Geoff - great questions.
What chassis did you pick? If posted previously, apologies. If you got one from the DIYAudio Store (ModuShop), did you get the back panel parts kit? If not, what power inlet module will you be using? I ask b/c of the fusing mentioned above. The inlet module from the DIYAudio store has neutral and hot fuse blocks. If you only install one fuse, it won't work. Don't worry about that yet, but when you're ready to use it, you'll need to ensure that it's done properly and you choose the correct fuse value(s). Yes, it's easy, but it's important.
tl;dr - I hate to pay shipping when I forget a part or order an incorrect part. My guess is that you'd like to get it all tidied up and done for one complete parts order. Post your choices so far, and we can comment and/or fill in the blanks. Depending on your choices, you perhaps won't need a few of the parts in the Mouser BoM you linked, or maybe you will. I personally like the "trimmer adjustment tool" 😀
Have fun! 🙂
Last edited:
Hi Mr Minnesooota! I currently intend to buy the 'Deluxe 4U Aluminium' chassis at USD$339 which after freight to Australia and conversion from USD$ to AUD$ is a fortune! And tonight I just bought the back panel kit (though I will not be actually be using the DiyAudio Store IEC switch and fuse chassis mount because I want the ON/OFF switch at the front (this is how I have my Amp Camp Amp and it works well). So I will have a fused IEC chassis mount at the back and a ON/OFF switch at the front. I have received excellent response to my questions about the Thermisters especially the photos of other people builds - both 120V and 240V builds - a picture is worth a thousand words of course. I also got some excellent high res photos of the PSU PCB's at last. I am digesting all the replies I have received which takes quite a while to digest then document. I wont be using the Diode Board V3.0 so it seems as though I can dleted many parts Iie. rows) from the BoM that Jason posted for the PSU. I am leaning heavily to the Mouser oder set up by 'flohmann' Cheers Geoff
Oh, yes. I did not notice the small circle at the bottom right in the Geoff's picture. Sorry.
And yes, Geoff will need 1.25A fuse(s) for F6 on 230V.
And I seccond about the "trimmer adjustment tool" - it's the best 2$ investment to make.
Here it is, just in case 🙂
H-90 Bourns | Mouser Europe
And yes, Geoff will need 1.25A fuse(s) for F6 on 230V.
And I seccond about the "trimmer adjustment tool" - it's the best 2$ investment to make.
Here it is, just in case 🙂
H-90 Bourns | Mouser Europe
No worries. 🙂 I still look at schematics cross-eyed. Well, that's just my eyes 😀
Geoff -
Congrats! While relatively expensive compared to the rest of the build, the PSU and chassis can be used for all sorts of wonderful amps if that's your idea of fun. If its the permanent home for your F6 forever, awesome. If you decide you want to use the PSU and chassis for another FW amp down the road... awesome.
Just to ensure there is no confusion, for an inlet with dual fuses (hot and common/neutral), you would not use 2x 1A25 fuses. Perhaps I simply misunderstood the previous post, but if I'm not the only one... just in case. Generally, a fuse that blows at a higher current (10A) fuse on the neutral and the appropriately adjusted (1A25) fuse for the hot is what's done. Lot's of excellent posts re: why, but in essence you don't want neutral blowing before hot. Consult an electrician for real advice and do what makes you feel safest. I don't give advice for mains wiring. So, I'm offering things to consider and observations of what I can say with reasonable confidence have worked for myself and/or others. My actual advice is get someone you trust locally to tell you definitively what's proper for your mains and the expected current draw of the amp. I don't think it gets mentioned often enough that mains voltages can kill you at worst and damage lots of stuff at best if not wired and handled properly/safely. We don't want to lose DIYers. It's a rare breed. Serious mode <off>
As you go through flohmann's Mouser list, yes, you'll immediately notice that things like the XLRs and a few other things can be removed. It's also includes BoM for the Aleph J boards, so you can remove those parts. The nice thing is that he includes things that may often be forgotten like terminal blocks and wire terminations etc. He's even got a ceramic mount for the ground lift thermistor, which is a nice touch.
Re: front panel switch. When you get to that point, unless you're completely comfortable, be sure to post / ask about what you're planning. Lots of options, but I have seen people get thrown by the choices. Also, with the deluxe kit... that 10mm thick front panel limits some choices unless you want to machine it. Again, I never want to presume someone's skills, so if that's all easy-peasy for you, just ignore. There are definitely options out there that will work, some easier than others. 🙂
Hi Minnesoooota - My attitude is the same as Sergeant Hans Schults's ie. "I know Nutting!" ie. Nothing when it comes to the danger of working with AC (230-240V here). Part of this is my natural caution but this was reinforced when I read Nelson Pass explaining why the Amp Camp Amp uses a switch mode power supply ie. to keep people like me away from AC! Luckily I do have 2 friends who know far more than I do about circuits, amplifiers and electricity so if I cant get advice from them when I don't understand the advice from forums. Re an ON/OFF switch for the front panel. I have ordered one of these from eBay but I would welcome any suggestions you have for an ON/OFF switch that I can include in my Mouser order. Cheers Geoff Push Button Switch 19mm Metal Annular Ring LED Momentary Latching SPECIALLISTING | eBay
Hi Geoff -
Cool looking switch. You got the 220V latching version, I assume. From what I can see, I think that's a good choice. I admit my ignorance, so hopefully at least one other person with more knowledge than I will chime in. If one of your local friends has already checked it over, then even better. The depth looks like it'll work on the front panel too w/o any milling. 🙂
Cool looking switch. You got the 220V latching version, I assume. From what I can see, I think that's a good choice. I admit my ignorance, so hopefully at least one other person with more knowledge than I will chime in. If one of your local friends has already checked it over, then even better. The depth looks like it'll work on the front panel too w/o any milling. 🙂
ON/OFF SWITCH FOR F6 and Universal Power Supply
Hi
A friend of mine who does know heaps more than me about electronics and who has built 4 x Modulus-86 monoblocks with toroidal transformers in each and which incorporates a IEC chassis socket/fuse and ON/OFF switch in each OK'd the ON/OFF switch on eBay and purchased two himself (he is building 2 x Amp Camp Amp monoblocks). Anyway when they arrive we will test them. And I will learn allot from that. By the way, did you receive my PM regarding the difficulty I am having finalising the the order for the PSU components? I can share my Mouser order with you if you would agree to that which would be very much appreciated. Thanks Geoff
Are there any advantages to using monolithic diode bridges vs. the ones on the circuit board?
I assumed the discrete components would be better ?
Faster rise times and softer falls ?
I assumed the discrete components would be better ?
Faster rise times and softer falls ?
Yes there are advantages. From certain points of view there are also disadvantages. It's less unsophisticated than you might think.
_
_
Last edited:
Thanks Mark, but now I'm really confused...
Which would you personally use in an amplifier like say an Aleph J ?
and why ?
Which would you personally use in an amplifier like say an Aleph J ?
and why ?
Hi
A friend of mine who does know heaps more than me about electronics and who has built 4 x Modulus-86 monoblocks with toroidal transformers in each and which incorporates a IEC chassis socket/fuse and ON/OFF switch in each OK'd the ON/OFF switch on eBay and purchased two himself (he is building 2 x Amp Camp Amp monoblocks). Anyway when they arrive we will test them. And I will learn allot from that. By the way, did you receive my PM regarding the difficulty I am having finalising the the order for the PSU components? I can share my Mouser order with you if you would agree to that which would be very much appreciated. Thanks Geoff
Excellent that your friend has checked it over. I really need to get around to building one of Tom's Modulus amps. 🙂
I got your PM and replied yesterday (my time). Check your inbox and let me know. I sent again just now. Note - if you change the file extension to something that the forum software will accept and let us know, we can change it back before opening. You can also zip it or save it to .pdf. to post.
Thanks Mark, but now I'm really confused...
Which would you personally use in an amplifier like say an Aleph J ?
and why ?
Which one does Nelson use in his Aleph J?
Why can have many answers. One way of finding the answer is looking through a scope connected to the rectifiers. Another and probably the best way, is to test through listening.
As Mark says there are advantages and disadvantages to both. Fast recovery had advantages and disadvantages, but so do monolithics. It is therefore a question of personal taste in many cases, but rooted in physical differences. I plan to test by listening, and by use of scope. And through the scope, try to identify which one has the smoothest ripple, and listen to see if that in fact makes an audible difference or not. Reverse voltage behavior and harmonics might also be important. So what better to do than try and listen and test if one had the equipment!
Ultra fast soft recovery ones seem to be the go-to of some of the experts, but they cost quite a penny. Would like to check some out though.
Mark: I assume the store boards accept soft recovery diodes too? Have you tested?
Regards,
Andy
Last edited:
More here:
Power Supply Freds, Hexfreds, Ultrasofts, Ultrafasts and Fast Recovery
And here:
fast vs. slow rectifiers
And here:
From passdiy.com, unknown date but old:
« Yeah, sure, rectifiers are important, after all, the AC has to get converted to DC, but I don't like the fast recovery types that some audiophiles have raved about. Fast recovery means that they withstand many amps and volts in a tenth of a few nano-seconds, something we don't see very often on the old 60 Hz AC line. They are essential element in switching power supplies, but for regular "linear" power supplies, I much prefer SLOW diodes, and we create them by placing small capacitor circuits across the diodes, which greatly reduces radiated noise.»
Since then, Nelson uses 35/200 monoliths in FW and DIY projects, as far as I can see, and in PL, fast+soft seems to be what is done, choices mostly made in a cost effective manner.
This comment by Nelson should be seen in comparison with his statements in the first two linked threads, as well as choices bow made by PL.
Cheers,
Andy
Cheers,
Andy
- Home
- Amplifiers
- Power Supplies
- diyAudio Power Supply Circuit Board v3 illustrated build guide