Thanks Dave - that's great.
I think that I'll either build that or try and figure out a way to to a bi-pole of Tim's little gem:
http://www.pi.alegriaaudio.com/FQ127.htm
Again, great site - this thread is a real service and speaks volumes about this community.
I think that I'll either build that or try and figure out a way to to a bi-pole of Tim's little gem:
http://www.pi.alegriaaudio.com/FQ127.htm
Again, great site - this thread is a real service and speaks volumes about this community.
jrosenth said:figure out a way to to a bi-pole of Tim's little gem FQ127.htm
Double the cross-section area & the number of ports (or figure a single one of equivalent effect)
The only way of doing that and keeping the same aspect is to double the width (below is the above distance analysis for the FQ127 -- an on-axis listening distance of just over 6 ft, quite a bit more latitude if you are happy with +/- 10 degrees.
It should also be noted that the original FQ127 cabinet was the now famous RS 40-1197 bipole, so you might well consider trying to find some 1197s or even just install a pair of FE103 in the FQ127.
dave
Attachments
That almost seems to easy so I'm certain that I'm misunderstanding 🙂
Do I simply take that design and:
1) double the internal width
2) add a second port of the same size next to the original port
3) add a second 127FE on the back of the cabinet at the same height as the driver on the front
4) connect the backs of the two drivers with a dowel (admittedly may take a little playing around to get the angle)
Also, where could I find the plans for the "original FQ 127" if I did just go with the 103?
Thanks.
Thanks Tim - I think I follow now.
Also, red is a great color for these. I was toying with the idea of doing red or blue, maybe even green stain but wasn't certain how it would look (think WAF). After seeing those, I think that I'll go for it.
Also, red is a great color for these. I was toying with the idea of doing red or blue, maybe even green stain but wasn't certain how it would look (think WAF). After seeing those, I think that I'll go for it.
Fe127 TWQP
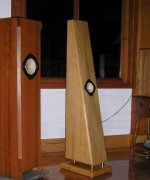
Well did someone ask about my favourite creation.
Attached is a photo of this little gem. I do not have my detailed construction notes handy so I will have to just use the rough data to start.
This is the design I was suposed to use:So=6.5, Sl=65 L=42, 1" port out the bottom. 1.5 inch legs. Line the inside with wool felt. Vertical brace just off centre.(needs side bracing as well). Couple drivers.
I use real wood if that is not available I highly recommend Baltic Birch plywood rather than MDF.
use three legs.
I have not tried it yet but I think Daves latest mod to the driver will be very good in this design.
Good luck keep us in the loop
Attachments

questions
Appologies if these have been discussed but I've not found the answers skimming the thread
1. What is the best method for bracing between the back end of the drivers in a bipole configuration? Is it simply a matter of a press fit brace between the two or is the bracing somehow attached to the rear of the drivers?
2. Are the drivers wired in series or parallel?
Thanks very much
Ryan
Fonken
Sorry if this has been asked. However, I want to know if the Fonken design will lend itself well to the fostex fe126e as well? Anyone have any thoughts on this? I am currently building modified Buschhorn Mark II's and want to try these drivers in other types of boxes. What I assume is that this driver works best in BLH designs, but, I am extremely curious about the Fonke design. Any thoughts would be appreciated.
Sorry if this has been asked. However, I want to know if the Fonken design will lend itself well to the fostex fe126e as well? Anyone have any thoughts on this? I am currently building modified Buschhorn Mark II's and want to try these drivers in other types of boxes. What I assume is that this driver works best in BLH designs, but, I am extremely curious about the Fonke design. Any thoughts would be appreciated.
Hello Ryan:
Planet10 did drawings for the WR125 bipole on his in the box plan library. This shows a very good example of bracing for both the driver and the cabinet. I have used this process with great success. If you want to get real fussy you can increase the internal crosssection by approx the amount of the bracing. I like to use either 1/2 or 3/8 inch plywood for this.
I cut a stopped dato in the back of the baffles to locate the brace. You could also use a biscuit joiner to do the same thing.
Temporarily mount the driver on the baffle to get the correct sizing for the cut out. Use duct seal to bind the driver to the brace once cabinet is complete. Makes a fantastic difference.
Hope this helps
Good luck
Re: Fonken
Tried that. No it doesn't work. To get real bass out of the 126 really requires a horn. I'd suggest the RonHorn A126 or the Frugel-Horn (it is a moving target thou).
dave
Harderror said:I want to know if the Fonken design will lend itself well to the fostex fe126e as well?
Tried that. No it doesn't work. To get real bass out of the 126 really requires a horn. I'd suggest the RonHorn A126 or the Frugel-Horn (it is a moving target thou).
dave
SCD said:Planet10 did drawings for the WR125 bipole on his in the box plan library.
http://www.planet10-hifi.com/boxes.html
Most of the bipoles in the box-pan library show this technique. A step further along is to use ready rod instead of screws to hold the driver in. MaxRo did one where he floated the driver on the baffle (ie the driver not coupled to the baffles, only to the brace & each other), integrating the baffle into the mix means having access to the inside of the box to tighten the nuts on the inside of the box... an idea of that can be seen here

dave
Re: questions
your first question has been answered, but as to #2 - that probably depends on the synergy with your amp.
one of the project P/P tube amps we're using has 4/8&16 ohm taps, so it's not an issue, but in the case of amps with single tap only (or SS), I usually use a biwire terminal plate to allow for easy switch from S to P.
RKH said:Appologies if these have been discussed but I've not found the answers skimming the thread
1. What is the best method for bracing between the back end of the drivers in a bipole configuration? Is it simply a matter of a press fit brace between the two or is the bracing somehow attached to the rear of the drivers?
2. Are the drivers wired in series or parallel?
Thanks very much
Ryan
your first question has been answered, but as to #2 - that probably depends on the synergy with your amp.
one of the project P/P tube amps we're using has 4/8&16 ohm taps, so it's not an issue, but in the case of amps with single tap only (or SS), I usually use a biwire terminal plate to allow for easy switch from S to P.
FOnken
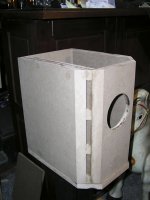
Thanks Dave! Before I read your reply I threw together a set today. The picture doesn's do them justice. I still need to clean excess glue off and trim the bottoms and tops before I damp and seal them. I am going to try throwing the 126's in there tomorrow just for giggles. I suppose I will order a set of 127's in the next couple of weeks. That is of course unless someone would suggest a better driver for these enclosures? I like Fostex though.
Just to cover how I built these. No screws, all glue. I made all the outside panels 19mm instead of the 1/2 inch that was called for. All interior dimesions are the same as what the planet 10 plans called for. I used MDF of course, as these are more of an experiment than anything. I also, I believe that I altered the plan a bit in that I mad the top and bottom panels the last thing to be attached. I like this way of working and it allows easy access if I need to go in to tweek anything. Now that I know that I will need different drivers, I am dying with anticipation as to what these beautiful boxes will sound like. Has anyone else built these? Any comments on how they sound? I became interested in the Onken design some time ago and was pleased to find this plan on the Planet 10 web site. Any feedback on these would be appreciated!
Attachments
Re: FOnken
These 4.5" drivers don't have much room behind them, so champfer out behind the driver to give them some room to breath.
Cheers,
Gio.
Harderror said:Any feedback on these would be appreciated!
These 4.5" drivers don't have much room behind them, so champfer out behind the driver to give them some room to breath.
Cheers,
Gio.
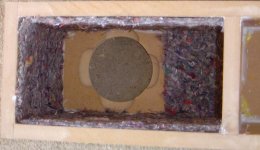
The picture below shows a champfer for an FE127E bi-pole I am working on. The router work was done by my friend Mark.
Since you already have the baffle on, you may have to do something along the lines of what I had to do with my BD-Pipes.
http://www.diyaudio.com/forums/showthread.php?postid=808967#post808967
Good luck,
Gio.
Since you already have the baffle on, you may have to do something along the lines of what I had to do with my BD-Pipes.
http://www.diyaudio.com/forums/showthread.php?postid=808967#post808967
Good luck,
Gio.
Attachments
I don't think you can see it in the photo but I did a pretty heavy roundover on the edge. Anymore and I am worried that I won't be able to screw in the screws for the driver. I suppose though that I need to get as much room as possible right? maybe I can take somemore off. I didn't think of doing it liike you show in your photo there though. Hmm, nice work.
- Home
- Loudspeakers
- Full Range
- diyAudio Full Range Reference Project