Hi all. First time amplifier builder here and I am having some trouble with my Honey Badger amplifier boards. R54 and R53 keep burning up on my boards.
I have been reading through some of the previous posts in this build thread and found the resistors are supposed to catch fire to protect the output transistors. I have checked all my transistor leads to ground and the rails (no shorts) and checked their orientation (they are correct). Currently I am following the build guide and have 10ohm resistors in place of the fuses and the pots are set correctly. Additionally I am using the diyaudio universal power supply with the recommended AnTek AN-8445. At this point I am following the powering the amplifier for the first time steps and repeatedly blow the resistors.
Does anyone have suggestions for troubleshooting this issue? Should I just remove R53 an R54 and let the fuse blow, I do not have a bulb limiter? Thanks for the help! Pictures attached.
Honey Badger Amplifier Board - Album on Imgur
Check the leads of your transistors, looks to me like you have them flipped. You turned them over to fit the heatsink.
be sure and tell us everything you have tried.
1) Are you sure the power supply is working and proving the expected +/-63Vdc?
2) Are R53 and R54 1/2watt resistors as spec'd in the BOM?
3) If #1 adn 2 are both yes, then have you checked your outputs leads to the heatsink, not just ground? making sure no leads or back of transistor is touching your heatsink?
4) If all else is correct - you will need to test each transistor with the diode function of you DMM and tell us the findings. Any shorts, especially Emitter to Base would be a sign of damage.
Try these and let us know what you come up with and we can tell you more things to try to help you find the issue.
I updated the image album to include the power rails on the oscope and the amplifier without the thermal bus bar. I feel like I am missing something obvious.
1) The power supply is providing 64.5Vdc and -64.5Vdc per rail. There is a jumper between the power supply ground rails, so each board has a common reference.
2) R53 and R54 are 22ohm 1/2W, I purchased these
Access to this page has been denied.
3) None of the transistor leads or the backs are shorted to the heatsink or the ground spade.
4) Q19-Q21, using the diode setting, no shorts, diodes ready ~0.5, positive on C/E, negative lead on Base.
Q16-Q18 no shorts, diodes read ~0.5 positive lead on Base, black on C/E
The only shorts I see are Q16-Q18, collector to V+ and Q19-Q21 collector to V-, but this matches the schematic.
Honey Badger Amplifier Board - Album on Imgur
first off, use a dim bulb tester.....What is a Dim Bulb Tester? - YouTube
if your biasing or base spreader is wired wrong, that bulb glows steady fully bright...
what we are looking for is for the bulb to glow bright at turn on and then full dim after a few seconds...
if it stays bright, then you have mistakes on the boards that need correcting..
if the bulb glow very dim, then you are on track...
so your first objective is to get that dim build to glow very dark....
correct your mistakes, take it slow and deliberate, and when you are stomped take a breaker and refresh your mind...
the dim bulb ( 60 to 100w) in series with the AC input works great. Splice an extension cord hot wire ( keep the return wire intact) and connect a ceiling bulb socket to the cut wire, srcew in bulb and plug in Amplifier.
the schematic of #4737 is a little different from #2,
the location of the two resistors are different,
#2 schematic, (R53, R54 22R) should placed from the collectors of the output transistors to the drivers, not parallel with the fuses.
#4737 schematic, (R112, R113, 10R ) is placed at the right spot.
please check your amp, if it follow #4737 or.....
the location of the two resistors are different,
#2 schematic, (R53, R54 22R) should placed from the collectors of the output transistors to the drivers, not parallel with the fuses.
#4737 schematic, (R112, R113, 10R ) is placed at the right spot.
please check your amp, if it follow #4737 or.....
Schematic in post 4737 is NOT the original honey badger. But the 2021 EF3 version that is comming soon.
And R53,R54 IS in paralell with the fuses in the schematic in post 2.
R112, R113 in post 4737 has nothing to do with R53, R54 in post 2. They do not have the same task.
And R53,R54 IS in paralell with the fuses in the schematic in post 2.
R112, R113 in post 4737 has nothing to do with R53, R54 in post 2. They do not have the same task.
Last edited:
So R53, R54 serve a different purpose,
its in parallel with a fuse, so when the fuse is off, we can check the current flow by measuring the voltage on the R53,R54 resistors. convenient.
is there any other task for the R53, R54....
if, just if, when the fuse is off and if large current flow through, the R53, R54 won't be able to handle. will be heating up, burnt....may be..
so the fuses must be inserted,
I want to learn what is the purpose to parallel a resistor with a fuse.
Well. i don't like R53/R54, so i don't use them. I can't find a good reason for them to be there.
cptjack6
would you mind uploading pictures of the inside of you amp and boards,
so we have more clue,
your have the R53, R54 22R parallel with the fuses in your amp, don't you.
would you mind uploading pictures of the inside of you amp and boards,
so we have more clue,
your have the R53, R54 22R parallel with the fuses in your amp, don't you.
@ cptjack6
As a fellow FNG, here's what I have to offer. All that was said before in this thread for you is good stuff.
Most of them are way ahead of me, so let me try and give you a few things they may not consider as they are more advanced than either of us.
You need to use the KISS principle here. Pull the power from one board straight away. This serves two fold. It cuts the possible problems in half and it also keeps you from smoking two boards when you made the same mistake on both. This is something you should always do to start with... esp for us FNGs.
As mentioned earlier, I would safetly pull the supply from both boards nad make sure it's doing what it should do. Only after I knew that would I plug it into one board and I would also have the "dim bulb," in the circuit. You were told it should light up and go back dim if all is well. that's true, but not so when there is something causing something to pull current. That could be a short, but it could also be a properly biased amp. From what you said, that isn't the case, but if something else (reversed, cooked or shorted)will cause the light to star bright.
Now, since you are cooking those two resistors, and we have established that they are correct.... something is shorted or reveresed. There should be very little on 54-53. When you get it right, that voltage will drop.
Have a look here if you haven't already....
Okay, so how do I check for a chip installed worng? Well, we don't know what you used, so you need to look up the pinou of every chip used and then compare it to the schematic, to make sure the orientation is correct, and aslo that it worked right as it should diode wise.
Good luck... I just went through these things with a microscope, if you close to Rockford, or you are going to give up.... bhit me with a PM.
JT
EDIT: One sanity check is that both boards are doing the same thing... therefore you have the same issue on both boards, or so brother Occam would dictate. 😉
Attachments
Last edited:
After looking through the other pictures, looks like the outputs are correct if you didn't switch NPN and PNP.
I did notice that the small heatsink is fairly thick, make sure no leads are contacting the heatsink.
I did notice that the small heatsink is fairly thick, make sure no leads are contacting the heatsink.
Oh. I did not notice the pics link before. I agree with RickRay. Those vas heatsinks are very thick. If my memory serves me right, i concluded with a maximum thicknes of 2mm here. More then that and there is a posibility of shorting some transistor legs.
After looking through the other pictures, looks like the outputs are correct if you didn't switch NPN and PNP.
I did notice that the small heatsink is fairly thick, make sure no leads are contacting the heatsink.
this happened to me, and the dim bulb tester saved the output trannies from frying....
so now, in order to avoid mistakes, i put red nail polish on the leads closest to the body for all npn's and white nail polish on all pnp's, and test them before soldering in...
taking extra steps helps in the long run, specially since the laser marking can be difficult to read with my 67 year old eyes...
Last edited:
Most of the power amplifiers with circuits similar to this can be operated with 5 volt rails. This is low enough to be unlikely to cause damage but the amplifier can still pass a signal. This can be observed with a scope. DC measurements can be made and major errors found and corrected. If all is ok, then increase the voltage in increments checking at each stage.
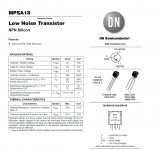
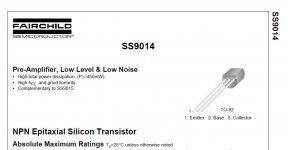
Could someone please confirm if the MPSA 18 has the same EBC configuration as the SS9014. Google search says yes, but the data sheet seems to be 180 deg out.
- Home
- Amplifiers
- Solid State
- diyAB Amp The "Honey Badger" build thread