If you would like me to make comment. Please make a test with the same parameters as I'm using.Thanks brother!
What do you think of those numbers so far?
See images 2 & 3
Look at the top for the numbers.
Output level should be -0.5dBv this will give you an output of about 80watts RMS. Also you need to long click on the THD button and set the range to 20hz to 96khz
Then post me your results.
Something else to note. I know that you using the quantasylum load resistor. I was using an ebay load resistors that turned out to be inductive. It completely messed up my readings. Spent nearly a year trying to work out why my 16khz numbers were so bad. It was the load resistor. So to be honest unless you can verify your load resistors is not causing distortion its difficult to give comment on your plots.
Please read my posts and keantokens posts between post 2378 to post 2445 to get a better understanding.


You need to enter 95999.9999999I can't do the numbers you have as it will clip the input before I get there. I pulled the 451 out and am using 8ohm from same as you were using in the picture below.
Also, can not do 96k on the THD it shows invalid.
Or something similar. Do you have the latest QA401 software?
Those are the problem resistors. Do bother using them.
You need these ones.
Even a 3x3 array is better for a quick test than that ebay one.
All the notes are in my past posts


I can go back to using the QA451, but I also have some other load resistors which should work too. I will look into that and the others from the thread.
Yes latest 1.924 for the 401.
I appreciate you help and will let you move on... thanks
Yes latest 1.924 for the 401.
I appreciate you help and will let you move on... thanks
No worries glad I could help.I can go back to using the QA451, but I also have some other load resistors which should work too. I will look into that and the others from the thread.
Yes latest 1.924 for the 401.
I appreciate you help and will let you move on... thanks
If you have trouble with getting the attenuator PCB's I could mail you some as I have spares.
Getting this measurement setup right is a pain and does take time but your getting there and now have the foundation knowledge of what's involved
Thanks for that,but it would the cost would be better spent sending to those who read in the future and are closer to you. I used your Gerbers and have 5 on the way sometime... lol
To check whether the resistor is the problem, measure THD at the feedback resistors rather than the output point.
Good point. I forgot to add that.To check whether the resistor is the problem, measure THD at the feedback resistors rather than the output point.
Thanks Keantoken. [emoji846]
Just a note, those post numbers are from the other HB thread.I can go back to using the QA451, but I also have some other load resistors which should work too. I will look into that and the others from the thread.
Yes latest 1.924 for the 401.
I appreciate you help and will let you move on... thanks
diyAB Amp - The "Honey Badger"
diyAB Amp - The "Honey Badger"
THD
I can do that.
To check whether the resistor is the problem, measure THD at the feedback resistors rather than the output point.
I can do that.

Big grin... have the B18 driving the Badger and got downright nasty with AC/DC. The Tektons were seriously making the windows breath. I don't do it often, but for short periods I still like to light the fuse. 🙂
Sounds fine thanks guys... that's perhaps the best big ball ever. lmao.
Sounds fine thanks guys... that's perhaps the best big ball ever. lmao.
It looks like I pushed it a little to hard! hehe. Dire Straights killed it.... "Money for Nothing," almost appropriate.
Popped the mains fuse, haven't looked yet, that's for tomorrow. I just flipped a switch and brought the SIT-3 online; and no to abusing that one. 🙂
Popped the mains fuse, haven't looked yet, that's for tomorrow. I just flipped a switch and brought the SIT-3 online; and no to abusing that one. 🙂
Reaching out for tomorrow.... Pulled the rails off the amp boards and still had over-current. Amps, at a glance seem okay, no fuses blown there and no shorts.
The build has a Toe soft start and Dc protect boards. It's also a true dual mono. The caps get charged enough to light the lights and stay charged fo several minutes.
Trannies look to be okay...
That's what I know so far... direction always sought and welcome.
I don't think I exceeded the limits of the design, I think there was an execution erro on my part, or something like.
JT
In case anyone was reading or cares. 😛 Broke out the dim bulb and did some testing.
Testing one thing at a time, Unplugged the amps and just worked with the supply. With the dim bulb the supply came up and functioned with proper output voltages, but took a long time for the current to be reduced. Okay, that's weird. So something is causing a huge pull when powered up even with the soft start it was popping a 5A fuse.
I noticed that the caps held the charge fine after the power was removed. Okay, rule out the main caps and resistors on the PCB. I'm using package rectifiers for this build and have them snubed. As I inspected the caps closely on the left channel, I see what looks like a little heat... slight brown tinge. Hmmm. Grabbed a pair of side-cutters and removed the snubber from the left channel. Closer inspection showed it had indeed been very warm and even slightly distorted. Didn't bother checking it, just hooked the trans back in and hit the switch again. Bang! No, I still had the bulb, but it powered up faster and didn't look to be pulling the current it was. I compared the good side time to power with the problematic one and the times were both about 3.5 secs to bulb going out with negligible current draw.
Decided it was time to see if it would power without the training wheel, amp boards still unplugged. Powered up no issues.
Note: Sunbber parts were properly rated, or at least what I thought was proper. 🙂 I'll hack the other snubber out and just run the thing and see if I can blow it up again tonight! 😛
Have to go get the puppy some food, when I get back i will hook everything back in and do a test... will update, or not. 🙂
In case anyone was reading or cares. 😛 Broke out the dim bulb and did some testing.
I'm reading and following 🙂.
What did you use for the LTP transistors? I ordered the premium choice(SS9014 D class) which ended up having oscillation issues, so I never finished assembly. I plan on nhaivng them up and running as soon as I get a few odds and ends.
hello tim, I used MPSA18 bought 100pc off ebay and matched them up. I still have a boatload if you need some.
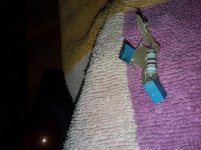
Here's the bad cap:
Here's the bad cap:
Attachments
Last edited:
The Badger is singing once again! Nice to figure it out with no help too. can I get an ATTABOY? 🙂
- Home
- Amplifiers
- Solid State
- diyAB Amp The "Honey Badger" build thread