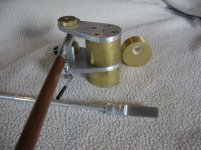
Could not stop with just one. 😀. This one is on a just finished diy plinth with a modded b55 lenco turntable.
Alfredo
An externally hosted image should be here but it was not working when we last tested it.
An externally hosted image should be here but it was not working when we last tested it.
Alfredo
Last edited:
Alfredo,
I really like the industrial look of your tower design and implementation. Very nice work.
I really like the industrial look of your tower design and implementation. Very nice work.
Alfredo,
Is that a wheel bearing used as a record weight/clamp?
Cool.........😀
2 Years and counting, still working on my clone......so slow am I.
Ron
Is that a wheel bearing used as a record weight/clamp?
Cool.........😀
2 Years and counting, still working on my clone......so slow am I.
Ron
Is that a wheel bearing used as a record weight/clamp?
Not sure what it is from. Looks like a pulley that accepts a toothed belt
Alfredo
Thanks, very cool looking indeed. Nice job on the tonearm BTW.
How's she sound? What Cartridge are you using?
Ron
How's she sound? What Cartridge are you using?
Ron
Thanks Ron,
I like the sound a lot. This arm has a sure v15 type III. I like the sound of the Lenco with this arm and cartdridge better than my other clone in the SLQ2 with Dl103. The Dl103 is not modded though. Still sounds very good. I think the Lenco idler TT may have something to do with it. I am planning to mount the DL103 on the Lenco TT to see if there are differences.
Alfredo
Thanks Ron,
I am planning to mount the DL103 on the Lenco TT to see if there are differences.
Alfredo
Please keep us informed.
Ron
yep, it's been a while. Surprised with the lack of activity on this thread.
Binspaul has been lost also it seems....
JD
Binspaul has been lost also it seems....
JD
Well, in my case it is still in the planning phase. I will keep you guys informed when I have something to share, ask or whatever B-)
I'm past the planning and drafting finally. ..............seems like 2 years now. Finally have some Brass and Aluminum shaving on my garage floor. I'll post some pics this weekend. Without a lathe it is difficult at best. I'll make 3 parts, throw 2 away. Takes much longer with only a drill press and belt sander............😱 Never give up! Never surrender!
Ron
Ron
Your opinion about this Kevlar thread
Hi guys,
I am looking for the thread for the Shroeder tonearm that is still in planning (slowly getting parts as well) phase. Can you tell me is this Kevlar thread good enough. I got magnets (3/8 x 1/4 N40) so I am wandering is this thread strong, durable, flexible,... enough for such magnets.
Hi guys,
I am looking for the thread for the Shroeder tonearm that is still in planning (slowly getting parts as well) phase. Can you tell me is this Kevlar thread good enough. I got magnets (3/8 x 1/4 N40) so I am wandering is this thread strong, durable, flexible,... enough for such magnets.
Trzalica,
interesting name.....
But back to business so to speak, I'm sure that thread will be more than adequate for our purposes. The main thing is non-stretch and flexible. Both of those criteria are met with Kevlar. Plenty there to perfect your knot tying skills too! 😉
Let us know if we can help with anything else.
Show us some pictures of your progress too, we like pictures...
You may want to rethink the strength of your magnets thou. Maybe a little weak. I don't know for sure but most of us are using stronger / bigger ones. Mr Schroeder has suggested this too. It's all in this long thread. Long reading but well worth the effort of understanding.
Ron
In a different light / state of mind I have re-read the topic of pole pieces and now understand why they are important. Cool stuff here. I may have to pry out my lower magnet and rework the holder with some Iron in the base.
Anyone try with and with out the added pole pieces?
Any noticeable difference?
Opinions on using only one pole piece? Which one?
Conjecture welcome.
Ron
Anyone try with and with out the added pole pieces?
Any noticeable difference?
Opinions on using only one pole piece? Which one?
Conjecture welcome.
Ron
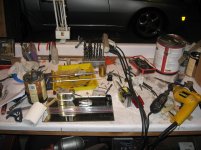
As promised, 'cause we all like pictures. Here's some of my modest attempt at this wonderful design by Mr. Schroeder.
Does anybody else's workbench end up looking like this when they are working on a project.....? Be honest now.
It does get cleaned up from time to time. 😉
Ron
Does anybody else's workbench end up looking like this when they are working on a project.....? Be honest now.
It does get cleaned up from time to time. 😉
Ron
Attachments
Headshell question
Mr. Davidson,
What is the width of the tonearm head which allows the cartridge carrier to swivel to an appropriate angle? ie 22*
I'm unsure just how wide to make it so I can reach my desired 22* offset. My cartridge bolts are the standard 1/2" apart.
Thanks,
Ron
Mr. Davidson,
What is the width of the tonearm head which allows the cartridge carrier to swivel to an appropriate angle? ie 22*
I'm unsure just how wide to make it so I can reach my desired 22* offset. My cartridge bolts are the standard 1/2" apart.
Thanks,
Ron
Attachments
Mr. Davidson,
What is the width of the tonearm head which allows the cartridge carrier to swivel to an appropriate angle? ie 22*
I'm unsure just how wide to make it so I can reach my desired 22* offset. My cartridge bolts are the standard 1/2" apart.
Thanks,
Ron
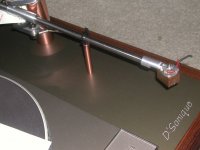
Hi Renron,
From the photograph, it seems that you are using 2mm Hex Socket Head Cap Screws. Assuming a maximum head diameter of .1567", The width of your head shell should be a maximum of .3069". Depending upon the actual diameter of the heads of the screws in your possession, and the minus tolerance of your head shell, you could put shims between the screw heads and the head shell while tightening the central screw. The shims could be made from ordinary writing paper which is .004" thick.
Sincerely,
Ralf
Ralf,
Hey, that's my Dad's name!
The photo was of Mr. Davidson's tonearm, I'm still building mine....🙂
Thanks for your answer, but I'm not sure I asked the question correctly. The cartridge MUST be twisted 22* for MY tonearm design to function properly. I was inquiring what the width of the tonearm stub (center screw) is, because I need to have some space to twist the cartridge. Not so easy to describe. I may just file it down 'til it fits my needs.
Ron
damn, I darn near hogged this entire page! Oink!
Hello Renron,
With an "F" ?
I think you asked the question quite correctly.
I would call that part the "head shell"
I am attaching two drawings to show what I am talking about.
As I understand your question, you want to rotate the cartridge mounting platform until the heads of the two cartridge mounting screws touch the Head shell and thus achieve a 22 degree offset at that location of the cartridge mounting platform.
My drawings show a head shell width of .3026" when the diameters of the screw heads are .1610". If the screw heads have a different diameter, then the width of the head shell would change. Knowing the diameters of the heads of the particular screws you are going to use, you can use trigonometry to figure out the width of the head shell. The center to center distance between the cartridge mounting screws remains constant at .500".
I cheated, I used my CAD program.
Sincerely,
Ralf
Renron;2537870]Ralf,
Hey, that's my Dad's name!
With an "F" ?
Thanks for your answer, but I'm not sure I asked the question correctly.
I think you asked the question quite correctly.
I was inquiring what the width of the tonearm stub (center screw) is.
I would call that part the "head shell"
I am attaching two drawings to show what I am talking about.
As I understand your question, you want to rotate the cartridge mounting platform until the heads of the two cartridge mounting screws touch the Head shell and thus achieve a 22 degree offset at that location of the cartridge mounting platform.
My drawings show a head shell width of .3026" when the diameters of the screw heads are .1610". If the screw heads have a different diameter, then the width of the head shell would change. Knowing the diameters of the heads of the particular screws you are going to use, you can use trigonometry to figure out the width of the head shell. The center to center distance between the cartridge mounting screws remains constant at .500".
I cheated, I used my CAD program.
Sincerely,
Ralf
Attachments
Last edited:
Ralf,
With an "F"? Sadly, No.
I was wrong...........;( , after looking at the Tonearm Alignment Calculator again I see that using the Baerwald alignment I get a lower distortion with an offset angle of 23..016 (almost a whole number), which could be set pretty closely with an angle finder I have.
You are correct with your measurements, Mr. Mitutoyo says that the heads of my screws are .1610 in. diameter (standard size?) and the cartridge spacing is .500 in. .
Because I lack the proper (advanced engineering) tools, (save for Mr. Mitutoyo) I am forced into "making" things work with a file and sandpaper, which leaves much to be desired. I will make the "headshell" just under .300 in. which will give me a little fudge room if I need it. Shouldn't, but it can't hurt to have a little extra space. 23* is my desired offset angle for the 239mm effective length of my tonearm.
Thank you very much for those fantastic drawings. Just beautiful. Which CAD program is that? Just curious, I wouldn't know how to use it, but it sure looks awesome.
Thank you,
Ron
- Home
- Source & Line
- Analogue Source
- DIY Schroeder Tonearm?