Useful addition IMHO
As said, with patience and a lot of care you can achieve the required precision with the pots from the BOM - I just did it, so it works.
But it would probably be more precise / quicker (depending on level of the builder) with multi turns.
Good that thanks to you people have now the choice.
If I build a third one for a friend I might well give those multi turns a try and then report here so I can share my experience between the options.
The least I could do for such a great community...
Enjoy music
Claude
Multi turns can be a pita because it takes so long to get anywhere. They definitely aren't as touchy though!
Read the specs... 25 turns... argh, for sure precise but indeed probably pita.
Up to 5 or max 10 turns would be better I guess...
Up to 5 or max 10 turns would be better I guess...
I can't verify the pin layout against everything, but I can report success with Bourns 3339 series trimmers (4-turn) in a few things. Example linked below.
https://www.mouser.com/ProductDetail/Bourns/3339P-1-502LF?qs=pSi0RBzb0orX5sCUZr39lQ==
They're more expensive that most of the 25-turn trimmers, and they may not work for every board, but there are lots of things between single-turn and 25-turn available.
So, I have no idea if they have the 'hysteresis' / spring 'issues' sometimes associated with 25-turn trimmers or if they offer all the benefits of single-turns, but to me... they were a nice compromise.
May be worth a look.

For those who built an ACA Mini based on the store kit with no chassis, which just using M4 hex standoffs as feet, I've posted a quick 3D print for feet that slide on over the hex standoffs. With the feet, the ACA Mini has a little more grip (less likely to slide around) and the 3D printed TPU adds protection from scratches of whatever it is sitting on. Very easy to print and cheap to make. For those without a 3D printer, I'm happy to send some your way on the cheap (shipping is the primary cost as the parts are about a buck in material at most).
https://www.diyaudio.com/community/...-feet-slide-over-the-m4-hex-standoffs.414813/

https://www.diyaudio.com/community/...-feet-slide-over-the-m4-hex-standoffs.414813/
Attachments
My solution was not quite as snazzy -- I used the red caps from a package of assorted vacuum caps I had lying around. (Auto parts for capping vacuum lines, not capacitors!)
 )
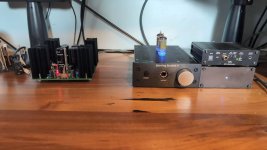
)Hi all ! I'm following silently this thread for few months. Now that an other ACA Mini is alive, I guess it's time to post some feedback.
First of all, what a wonderful little amp! Big thanks to Papa for this amazing addition!
Big thanks also to Claude who hooked my ears to this amp and helped with the build, and who is also lending me his own Mini for bi-amping tests. Will more be better? Let’s see…
Regarding the tweaks Claude suggested, I feel a short feedback is deserved.
Initially I tried his Mini exactly as designed by Papa, with or without Mark’s / Claude’s additional coil filter for the (uprated and quality) SMPS. It made quite a difference and it sounds clearly better with coil than without - only positive and no drawback regarding dynamic or else. Mark’s PO89ZB (I have a few of these) was also beaten in this function by the simple Murata coil. Daisy chaining both added nothing among the coil alone.
I had a long listening to the Mini with this coil filter and I could live with it. However, in direct comparison with other amps I have I found that in a perfect fairy world the Mini could benefit from having more slam, being faster on attacks (regardless the frequency) and also probably display a cleaner note decay in the bass region. In a way, I'm a bit responsible for Claude's attempts around his tweaks 😛
After a long run-in and listening period, I tried then Claude’s additional caps, both tweaks in one go, and it has made immediately quite a difference... exactly in these departments. It met perfectly my wishes! On top, it has also IMHO added more clarity, more precision and a better soundstage (better defined and greater). Only positive again. The icing on the cake is that none of the original and so addictive sound signature of the Mini is altered, neither has its stressless listening changed.
These are definitely recommended tweaks and for a few bucks really no brainer. They are very easily reversible anyway, so if ever these don't match one's ears…
Listening system is Eversolo DAC and Klipsch RP-8000F LS. The Mini PS is an uprated Meanwell 5A low ripple unit. Jumpers out is my preferred option in this set up. The Mini, or Minis (TBD) are from now on my power (!) amp in my main system... that does say a thing.
Have fun guys and many thanks to everyone which made it possible,
Gilles
Attached pic: starting bi-amp listening test sessions… The night is likely to be long 😉
Attachments
So glad you are happy!
Can't wait to read your report re horizontal, vertical and Vertical 2 bi-amping with these Minis.
Your cabling and switches to enable switching "on the" fly across various configuartions is indeed impressive and priceless when it comes to comparisons!
Enjoy music and thanks for your kind post
Claude
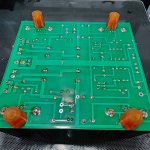
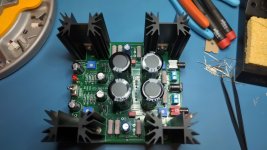
I got around to building mine over the weekend. I used the v1.1 BOM when ordering my parts, yet somehow didn't get 200k or 22.1k resistors so I used the original 221k and 6.8k values for R2 & R4. I'll be picking those up with my next parts order.
The biggest issue I ran into were the 1 turn pots. It felt like blowing on them was enough to turn them too far. I should have listened to prior comments and gone with multi-turn like I have in my other projects. It took somewhere around 8 hours to dial it in because of how touchy the pots were, but I eventually got it to 11.5V and 305-310mV on both channels.
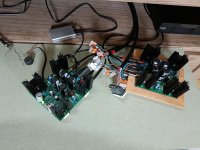
Until today I only had headphones so the first test was with a pair of Beyerdynamic Tesla T1 2nd gen fed straight from an AMB Gamma 3 DAC. That sounded good but isn't why I built it, so next up was a pair of Energy ESM-4 bookshelf speakers fed from a Starving Student II and AMB Gamma 2 DAC. Now starts the fun of trying it with all my other gear to see what the best combo is.
An ACA or ACA MinMax seemed like a good next project, but for the price I might do a second ACA Mini then my F5m. You really can't beat the price & performance of the mini. After a day of use it's made me reconsider adding binding posts to a balanced headphone amp I'm working on, I didn't think something this small could work this good with speakers but I was happily proven wrong.
The biggest issue I ran into were the 1 turn pots. It felt like blowing on them was enough to turn them too far. I should have listened to prior comments and gone with multi-turn like I have in my other projects. It took somewhere around 8 hours to dial it in because of how touchy the pots were, but I eventually got it to 11.5V and 305-310mV on both channels.
Until today I only had headphones so the first test was with a pair of Beyerdynamic Tesla T1 2nd gen fed straight from an AMB Gamma 3 DAC. That sounded good but isn't why I built it, so next up was a pair of Energy ESM-4 bookshelf speakers fed from a Starving Student II and AMB Gamma 2 DAC. Now starts the fun of trying it with all my other gear to see what the best combo is.
An ACA or ACA MinMax seemed like a good next project, but for the price I might do a second ACA Mini then my F5m. You really can't beat the price & performance of the mini. After a day of use it's made me reconsider adding binding posts to a balanced headphone amp I'm working on, I didn't think something this small could work this good with speakers but I was happily proven wrong.
Attachments
-
 PXL_20240706_055442201_exported_1083_1720475347908.jpg179 KB · Views: 124
 -
 PXL_20240706_055621085_exported_1617_1720475365682.jpg165.6 KB · Views: 115
 -
 PXL_20240706_055706124_exported_1085_1720475429989.jpg208.3 KB · Views: 126
 -
 PXL_20240706_055726467_exported_925_1720475414829.jpg250 KB · Views: 126
 -
 PXL_20240708_214124170_exported_709_1720475096207.jpg243.7 KB · Views: 129
 -
 PXL_20240708_214312465_exported_292_1720475072760.jpg212 KB · Views: 125
Congrats for your build!
The Mini is an amazing amp as standard and such a great VFM! It is even a fantastic amp slightly modified or in bi-amping mode.
So yes, build 2 Mini... that's Gilles conclusion of the night - it sounded that great vs just one and it wasn't power related as he just needs max 2W!
Indeed, the next stop would probably be the F5m, at least for those needing more power.... I would be really delighted to read how that one does vs 2 Mini, it looks fantastic on the paper...
Last but not least regarding ACA Mini: may I humbly suggest you try Mark's SMPS coil filter and the 2 additional cap tweaks I suggested? This takes trully the Mini to an entirely new level for a total cost of less than additional 10$ IN TOTAL (all 3 tweaks). A must do, all in my biased but humble opinion of course...
Enjoy music very much
Claude
Just wanted to ask the forum's advice...
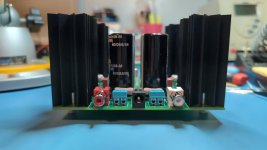
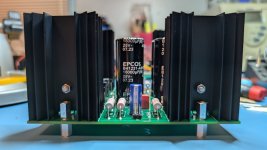
I just finished putting together my ACA Mini - using a double stacked heatsink and biasing at 370mV VB per side.
All was sounding wonderful until, while I was checking bias after it had been running for an hour or two listening to music, the cut off resistor lead I used to place in the VO test point fell out... I think it shorted R9 to the Q4 heat sink. There was a loud crackling sound in both speakers, and possibly a spark at the shorted connection.
I shut the amp off quickly.
I'm feeling a bit spooked, are there any tests I can do to confirm the amp is still working? I can haul out some cheap test speakers.. Really hoping I didn't fry my nice Altec speakers.
Appreciate any help any can give.
@ClaudeG If one used the coil you suggested, what do you think is best way to implement it into the design?
Cutting the SMPS +VDC line and soldering it in series seems to be the simplest, but requires heat shrink and electrical tape and some basic safety knowledge I presume. I'm pondering how one could best add that in easily and safely. I saw Marks SMPS filter cleverly installed vertical on the Mini board in a post. I belive the coil you used provided similar audio performance improvements per the comments from @xhitespirit above.
Cutting the SMPS +VDC line and soldering it in series seems to be the simplest, but requires heat shrink and electrical tape and some basic safety knowledge I presume. I'm pondering how one could best add that in easily and safely. I saw Marks SMPS filter cleverly installed vertical on the Mini board in a post. I belive the coil you used provided similar audio performance improvements per the comments from @xhitespirit above.
Based on the suggestions and opinions of @ClaudeG and @xhitespirit I purchased the components in bulks to try out myself. I have yet to even try them out in my ACA Mini, however, I wanted to offer others the opportunity to buy a "Kit" of those parts and share what they observe as their experience. I have 10 qty of these kits of the suggested parts with included ACA Mini chassis feet for approximately $12 shipped within the US. I don't know exactly what shipping will sum to based on your location, however, if you're interested, it can't be much more than $5 shipping and $7 for the parts. Please reach out via PM if you're interested. Thank you to ClaudG for the inspiration!
https://www.diyaudio.com/community/...ni-upgraded-parts-kits-caps-coil-feet.415024/
https://www.diyaudio.com/community/...ni-upgraded-parts-kits-caps-coil-feet.415024/
Last edited:
................... I think it shorted R9 to the Q4 heat sink. There was a loud crackling sound in both speakers, and possibly a spark at the shorted connection.
I shut the amp off quickly.
I'm feeling a bit spooked, are there any tests I can do to confirm the amp is still working? I can haul out some cheap test speakers.. Really hoping I didn't fry my nice Altec speakers.
Appreciate any help any can give.
Do you have a dim bulb tester (DBT)? If yes, power up with the DBT with no speakers connected and measure the voltage across R8 and R9. Also how bright is the bulb?
On second thought, perhaps a DBT does not work with a SMPS. I do not have a SMPS powered amplifier so I cannot test it.
So the other way to check the amp is turn the adjustment pots to their full counterclockwise position. Power up without speakers and measure the voltage across R8 and R9. The voltage should be zero at the resistors if mosfets are ok.
If the voltage at the resistors is zero, you can proceed with biasing the amplifier.
Last edited:
Quote
"I'm unclear as to why a Panasonic PP cap would be an "upgrade" over the 3.3F Supercap."
Hi,
If this comment is somohow (?) related to the Panasonic PP tweaks I suggested, then these caps are in parallel (bypasses) to the 15000 uF caps at the LS output (blocking DC). It is qite a common trick to bypass at entry or output a big lytic with a small PP cap - even Papa himself did it on my VFET, for sure no harm trying. Just to make sure: I haven't read anyone here suggesting Panasonic PP caps as replacement to C6, but, as far as I am concerned, I did suggest to bypass C2 with Panasonic ECW PP caps. Hope it is not me who triggered some confusion or mistyped anything...
I must confess I didn't play around the Supercap, reason being I lack experience on those and further given their function and papa's paper I assumed - perhaps wrongly - that no gain was to be otained... but always delighted to learn something if an improvement can be achieved there, please share!
Have a nice day
Claude
Hi Claude
Dont overestimate "your" suggestion to bypass caps in the signal path. You are not the first one doing this, nor is it an invention from you.
Another suggestion could be to simply use audio grade electrolytics in this place.
AND: replacing the supercap 3,3mF by another cap quality oder bypassing does absolutely not improve or change something.
Regards
Franz
Hi Birdbox,
Whaoo, nice initiative of yours!
I am sure many will be delighted playing with these tweaks: well done and thanks for the community.
Regarding the coil filter, I found it best and also easiest for testing and permanent installation to leave it outside, in a small box - as the SMPS, or as we do it usualy with Mark's SMPS filters. So in that case the coil sits between the "SMPS power output connector" and the "Mini PS input connector".
To carry out listening tests, you don't even need a casing, it can easily be wired on the fly as Gilles did it. You can decide later whereas you put it in a small non expensive casing as I did it, or integrate it to your Mini frame the way Gilles might do it. If you follow my implementation you will anyway need a female and a male connector (Amazon or else for less than 1$), identical to those provided by the SMPS and on the Mini board. That's the most convenient way IMHO to implement that coil and also to try it as you can very quickly plug it in and out and carry listening tests. Not that you will need much testing to hear its benefits IMHO LOL.
Of course people could also desolder the SMPS connector at the mini, and implement the coil after the said connector and before the Mini / before "R10", without then needing any extra connector, but that's perhaps more advanced although no extra part but short wires would be needed. More for a permanent set up where the coil is integrated into a Mini frame?
Sound long but is very easy if you look at it and even much quicker to implement then say proper LS binding posts.
So to be clearn whatever you do, the + of the SMPS is connected to one pin of the coil, the other pin leading to the usual + way as without any coil in the way. The SMPS ground or minus is not concerned at all and hence untouched. The coil is basicaly just inserted in + path, filtering the power feed the SMPS from HF garbage.
Last but not least, on the conectors, the + is inside whereas the - or ground is on the outside. Again, very easy in fact, longer to post / read than to do.
Any question please just ask, you are very welcome!
Claude
- Home
- Amplifiers
- Pass Labs
- DIY ACA mini