One thing you could consider -
A year or two back I was watching Kevin Scott talking about the bi-radial mid horns he puts in the Vox Olympian. He said hardwood has a much cleaner sound than birch ply - and a richer tone. However , if he applied multiple layers of polyurethane varnish to the birch-ply horns, they sound almost the same as the hardwood ones.
There seems to be a lot of pushback when people say they want to build cabinets out of solid wood or hardwood, so this is pretty interesting. Long term, if I get bored and have expendable income, I'll build these cabinets out of some high end hardwood, though joining 2 6 inch boards to get the 11 and 1//16th planks is gonna be a pain.
For the varnish, would it just be the air cavity and the horn chamber?
I would think the coupling chamber and the first part of the line would be the best areas to concentrate on. The pressures are higher here ; also the coupling chamber sees more HF energy than the rest of the line , where the >400Hz waves have already been attenuated by the CC.
If you take a piece of untreated birch ply, and a piece you've varnished 3 or 4 times, and you rap your knuckles on the two pieces, the varnished wood sounds a lot more 'dead' than the bare wood, with less HF content.
If you take a piece of untreated birch ply, and a piece you've varnished 3 or 4 times, and you rap your knuckles on the two pieces, the varnished wood sounds a lot more 'dead' than the bare wood, with less HF content.
Do I need to secure the speaker wire inside the cabinet somehow? Will the speaker vibrate enough to create any kind of rattle if it hits the cabinet walls?
Do not use anything metal. Plastic clips or hot glue. What wire are you using?
dave
Cat5
You definitely need to make sure it doesn’t hit anything if it moves around, it can make an annoying noise.
dave
dave
You definitely need to make sure it doesn’t hit anything if it moves around, it can make an annoying noise.
dave
Hot glue gun it is. Thanks! Just sanded up the cavities. 50 lbs of sand per speaker. These suckers are going to weigh a ton.
Right so last question. Maybe. Do the driver tabs have a polarity? I’m checking the fostex schematics and I don’t see anything.
Definitely. On the actual driver ( I have 208's ) the mounting area under one of the tags is a red colour.
ps. Worth noting here, depending on how/where you bring the wires through - a comment from Ron about sealing the exit :
"One of the MAJOR problems of ppl building the DallasII is they don't recognize the importance of a TOTAL airtight seal of the driver to the baffle. One builder of the DallasIII did a really beautiful job on the cabs, then had the speaker wires running out the driver hole with NO sealant whatsoever????????
Then builders complain about lack of bass"
Dallas II + 208E = ?
( Still can't find the comment from Ron about how much to reduce the CC volume for the 208Ez - can anyone help ? )
Air cavity is good. I sealed it up. I’m more concerned with small leaked down the line. I sealed up all the twists on one side and in the middle. But when I put the other side on, I have to hope the glue fills all the spaces I can’t reach.
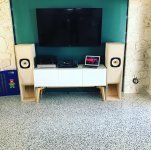
So I finished the cabs and installed the drivers. I’ve been playing them all day. I’ll experiment with batting and see what happens. I don’t think cabinets have any kind of burn in and my amp and drivers have plenty of hours on them so initially the bass feels more balanced and the speakers more sensitive than the fostex designed enclosure - but I’m an amateur at best so who knows. I’m enjoying them so far. Since my floor is terrazo I probably need to soften some things. I put felt feet on the cabinets. Any suggestions are appreciated.
The cabinets aren’t really finished. Once I decide on batting/felt/adjustments I’ll probably put a nice exotic wood veneer on them. But you know. I bet a lot of people say that and never get around to it. The project has been fun. But between work and young children - exhausting.
Dave and All the rest. Thanks so much for the help and pointers! It’s been a fun experience
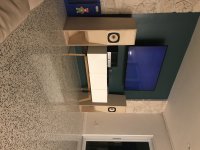
Pictures below. I tried to edit the first picture to be right side up but no matter which way I saved it. No dice.


Wow - quick work !
Good effort.
Thanks. Didn’t feel quick. Took over a month!
Nice work Kyngfish, and congratulations on completing the project successfully. Not the easiest of speakers to build. 🙂
Nice work Kyngfish, and congratulations on completing the project successfully. Not the easiest of speakers to build. 🙂
Thanks!
It was/isn't perfect - and mostly I posted this because there aren't a lot of recent build threads and hopefully someone can see my dumb questions and get the info they need when they try to build them.
Going back I'd do a few things differently, but overall probably repeat 85% of the process. In a year I may build them again in hardwood just for kicks. Some of my bevel angles did need some massaging, and part of it was just learning how to use my miter properly.
Having a track saw AND a table saw AND a sliding miter to handle the 11 - 1/16" bevel cuts made the job more manageable. I could have done it with just the track saw but it would have been harder to be perfect on the widths, and I could have done it with just the table saw, but cutting down the boards and the long angled cut for the sides of the speakers and ripping down the boards would have been a pain. I DEFINITELY wouldn't have wanted to do it without the sliding miter - that tool was the most important of the bunch. Also - the big jointer plane was the only way I found to do the 12 degree shallow cuts. Otherwise I would have had to try to freehand it with a saw or do the job with a belt sander.
Looking forward to the next project (preamp).
I think I'll be using some extra tools or my friend's workshop when I build one of these. I have built similar and more complex stuff recently, but had to jigsaw then hand-plane angled edges - maybe this explains why my typical project time is six months to a year !
I notice your room is quite shiny and empty there Kyngfish, I would expect a bit of trouble with upper mids or HF in a room like that, especially with the FE206e, however well it's modified.
I notice your room is quite shiny and empty there Kyngfish, I would expect a bit of trouble with upper mids or HF in a room like that, especially with the FE206e, however well it's modified.
- Home
- Loudspeakers
- Full Range
- Dallas II Build
