Hi Collin,
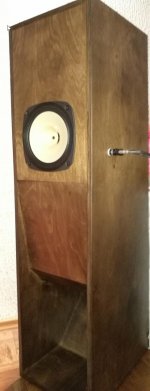
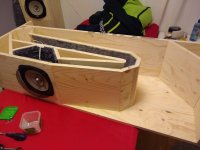
I used felt cover (8mm, very dense wool) only at the back of the speaker (you can see red lines on the picture).
3 empty spaces are filled with sand (bottom one and 2 around the driver).
For top 2 spaces I used foam (the one you use when mounting windows).
Foam was compromise to save some wight. One speaker has 65 kg.
Speaker is made of 18mm Birch Ply.
Internal wiring is made using silver rectangular + platinum wire around.
I'm very content how they sound.
Good luck and enjoy while you're working on them as much as you will enjoy listening.
Attachments
Last edited:
... and there are no electrical corrections
... and of course, wool is also on the left and right side of the speaker (=top & bottom on attached picture)
... and of course, wool is also on the left and right side of the speaker (=top & bottom on attached picture)
FE206En?
Horn uses little damping, you willlikely need to play a bit with the amount in the Air Cavity.
dave
Horn uses little damping, you willlikely need to play a bit with the amount in the Air Cavity.
dave
Hi Dave,
not sure if I correctly understand your comment.
Which part is considered to be Air Cavity?
Do you want to say that:
a) you need even less damping that I used or
b) you may need some additional damping somewhere else
not sure if I correctly understand your comment.
Which part is considered to be Air Cavity?
Do you want to say that:
a) you need even less damping that I used or
b) you may need some additional damping somewhere else
Air cavity = driver chamber.
Dallas II was not designed to use damping anywhere except the driver chamber; as Dave says, you may need / want to adjust the quantity to suit your system.
Dallas II was not designed to use damping anywhere except the driver chamber; as Dave says, you may need / want to adjust the quantity to suit your system.
Ok, so answer is a).
In my case damping on the left and right side are 2 separate pieces of wool and may be easier to remove than the rest.
What kind of sound change may I except if I try this.
Now when everything is closed it's not easy to play with damping and may create more problems than benefits.
In my case damping on the left and right side are 2 separate pieces of wool and may be easier to remove than the rest.
What kind of sound change may I except if I try this.
Now when everything is closed it's not easy to play with damping and may create more problems than benefits.
Ok, so answer is a).
No, the answer is 'you may need / want to adjust the quantity to suit your system'. That means you can add or subtract if desired. However, as Zia says, if you're happy with it at the moment, I'd be inclined to leave it as-is.

I've cut all my plywood according to this plan (for 18mm sheet), but when trying to draw the layout on one of the side pieces I found that nothing quite fitted exactly where it should. Eventually it dawned on me to check the thickness of the sheet and it comes up as 18.8-19mm, I suppose 2 sheets, different thicknesses.
Realistically what are my options from here? To resize everything I'd more or less need to start again? At a minimum it must need different sides, top base and back pieces? I'm not sure that I have the expertise to rework the drawings.
I have a woodworking workshop nearby, who have been helping me with the build so far. They have a big belt sander that could sand everything down to 18mm but it's an extremely manual process, sanding a bit, checking, sand again - and difficult to get consistency on the longer pieces. But actually may not be as expensive and time-consuming as starting again.
Grateful for practical advice.
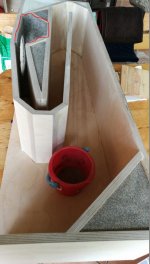
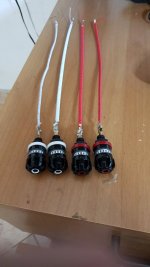
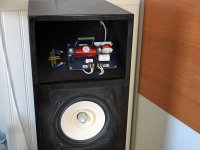
I've put some felt in the chamber behind the driver and some thin felt from the old kind of anti-slide material from ikea in some more parts. See the pictures. It's glued with floor glue that's a bit dampening in itself. I use 206-NV with correktion circuits and replaceable resistors. That's also in some pic. But haven't yet measured them, maybe I will when i get the gear for that. I tried out the dampening with the sides only screw-mounted. And then glued them before paint-spraying.
Attachments

You might considerI've cut all my plywood according to this plan (for 18mm sheet), but when trying to draw the layout on one of the side pieces I found that nothing quite fitted exactly where it should. Eventually it dawned on me to check the thickness of the sheet and it comes up as 18.8-19mm, I suppose 2 sheets, different thicknesses.
Realistically what are my options from here? To resize everything I'd more or less need to start again? At a minimum it must need different sides, top base and back pieces? I'm not sure that I have the expertise to rework the drawings.
I have a woodworking workshop nearby, who have been helping me with the build so far. They have a big belt sander that could sand everything down to 18mm but it's an extremely manual process, sanding a bit, checking, sand again - and difficult to get consistency on the longer pieces. But actually may not be as expensive and time-consuming as starting again.
Grateful for practical advice.
You might consider making up for imperfections using Bondo auto putty. You would want to paint or veneer the horn when done for a nice appearance.I've cut all my plywood according to this plan (for 18mm sheet), but when trying to draw the layout on one of the side pieces I found that nothing quite fitted exactly where it should. Eventually it dawned on me to check the thickness of the sheet and it comes up as 18.8-19mm, I suppose 2 sheets, different thicknesses.
Realistically what are my options from here? To resize everything I'd more or less need to start again? At a minimum it must need different sides, top base and back pieces? I'm not sure that I have the expertise to rework the drawings.
I have a woodworking workshop nearby, who have been helping me with the build so far. They have a big belt sander that could sand everything down to 18mm but it's an extremely manual process, sanding a bit, checking, sand again - and difficult to get consistency on the longer pieces. But actually may not be as expensive and time-consuming as starting again.
Grateful for practical advice.
Sitting listening to my pair I'm curious where You went after Dallas II? I'm very content. I admit they are large. Initially I was a bit disappointed, but after adjusting the chamber dampening to just cover the walls (read it in this thread) and making sure they are 100% air tight they have surpassed my expectations. I drive them with the Pass ACA from a Najda (discontinued) DSP preamplifier. To that I have a pair of subs below 80Hz, from the Ariel project on a Quad 405 II, and even experimenting with tweeters that take over at about 8kHz with their own amplification, a Cavalli-Kan Kumisa III headphone amplifier for now 🙂, contemplating another ACA.When i built mine, (OP here) I only ended up with damping behind the driver, and the cavities filled with sand. It was a good first try, but I’m glad that particular horn is gone 🙂.
- Home
- Loudspeakers
- Full Range
- Dallas II Build