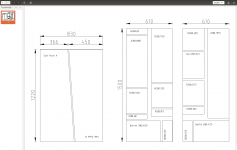
View attachment Dallas2-plans-redraw-251215.pdf
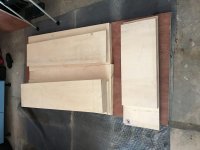
Hi All - I started breaking down some Baltic Birch stock last night and drawing lines for a Dallas II build. I'll post pictures here as I progress - but I had two quick questions:
Thanks!
Hi All - I started breaking down some Baltic Birch stock last night and drawing lines for a Dallas II build. I'll post pictures here as I progress - but I had two quick questions:
- I noticed the plans shared on the forum were made for 1/2" stock, my baltic birch is 3/4" I don't especially want to start redrawing, how big a deal is that 1/4" internal dimension? Should I redo?
- I have a track saw, table saw and sliding miter saw, so I think I'm good with the tools. The miter should easily handle the 11+ inch width for the angled cuts. EXCEPT that 12 degree cut on the 28 inch board. I'm trying to visualize the best way to do it, but the only way I can see is by standing that board up and hoping those 12 degrees clear my miter housing. Anyone else have any clever ideas? Chisel? Handsaw? Sandpaper?
Thanks!
Last edited:
[*]I noticed the plans shared on the forum were made for 1/2" stock, my baltic birch is 3/4" I don't especially want to start redrawing, how big a deal is that 1/4" internal dimension? Should I redo?
Actually an omission in the plans you linked. I did a recently upgraded plan which indicates the material thickness is 18mm.
Do take a micrometer to your material. 18mm is often called ¾”. ¾” is 19.05mm and the extra 1mm will add up. But it can be anywhere from <18mm to >19mm. Plans need to be adjusted for the actual material thinkness.
The easiest fix might be to make the box 19.05/18 x as wide to maintain the path cross-section areas.
dave
Attachments
Actually an omission in the plans you linked. I did a recently upgraded plan which indicates the material thickness is 18mm
Thanks Dave. The plywood is definitely stamped with cyrillic characters so I wouldn’t be surprised if it’s a metric thickness. I’ll double check tonight. So you’re saying that if the material is 18mm then I’m good with the existing plans? If not - I should modify height width and depth by 1mm?
Edit: Sorry. I’m a bit lost. 19mm thickness actually means I’m losing 2mm interior in each of the three dimensions right?
Last edited:
The 12 degree cut...you could make a sled with a tall fence, such as a 4x6, and clamp the panel to it. A bit of work for two cuts. Or a dado. Then there's the hand plane option, where you lay out the edges of the bevel and plane down to the lines. That would be a sharp hand plane. I like the #3 or 4 for these kinds of things. ChrisB knows how it's done...
The 12 degree cut...you could make a sled with a tall fence, such as a 4x6, and clamp the panel to it. A bit of work for two cuts. Or a dado. Then there's the hand plane option, where you lay out the edges of the bevel and plane down to the lines. That would be a sharp hand plane. I like the #3 or 4 for these kinds of things. ChrisB knows how it's done...
I was thinking of the plane. I have a number 7. Not ideal but may work. Thanks!
No. 1mm. half a mm each side… front back, top, bottom extend to the outside of the box.
dave
It’s 18mm stock. Crisis averted.
Don't know if you want to go to this much trouble but a horizontal tilting router table would work Horizontal Tilt-top Router Table Project / Rockler How-to
or even a simple diy hand-held tilting router base.
or even a simple diy hand-held tilting router base.
Hopefully I only have to build these bad boys once. The tilting router table would be awesome but the plane should be able to tear through that wood fairly quickly. Let’s find out!
I have built myself a pair more than a year ago, still enjoyign them as much as in the first day.
18mm all the way, it is a big difference if you use thicker stock. Under NO circumstances I would use thinner stock, as it will certainly be prone to resonances, sound colouring, etc...
The plans you shared, they are made for 18mm stock, you can do the math on the geormetry, and they are what I've used. If somebody is updating the plans (Planet10?) I do have a very efficient cutting arrangement, that allows reducing the material losses by quite a lot.
View attachment 661120
Hi All - I started breaking down some Baltic Birch stock last night and drawing lines for a Dallas II build. I'll post pictures here as I progress - but I had two quick questions:
- I noticed the plans shared on the forum were made for 1/2" stock, my baltic birch is 3/4" I don't especially want to start redrawing, how big a deal is that 1/4" internal dimension? Should I redo?
- I have a track saw, table saw and sliding miter saw, so I think I'm good with the tools. The miter should easily handle the 11+ inch width for the angled cuts. EXCEPT that 12 degree cut on the 28 inch board. I'm trying to visualize the best way to do it, but the only way I can see is by standing that board up and hoping those 12 degrees clear my miter housing. Anyone else have any clever ideas? Chisel? Handsaw? Sandpaper?
Thanks!
If somebody is updating the plans (Planet10?) I do have a very efficient cutting arrangement, that allows reducing the material losses by quite a lot.
Thanx.
Please forward it to me and i will add it to the plans. I have added the reference to 18mm, but need to go over the plans and see if there is anything else i can add to the plans before posting the update so the timing is ideal.
dave
Update and question
Hi all. So. Making progress on the build. I followed the plans here from Planet10 for measurements and applied them to the cutting plans also attached. Fairly easy. I broke it all down with a track saw and it all looks fairly accurate. The interior pieces will be cut down from a series of long pieces all the same width. 11 1/32”. In looking at the pieces I think track saws being what they are and my own human error - over the course of the long cuts I’m off by that 1/32” at times. Should I stick these things on the table saw and true them up or just not bother?
Thanks!

View attachment Dallas2-plans-redraw-251215.pdf

Hi all. So. Making progress on the build. I followed the plans here from Planet10 for measurements and applied them to the cutting plans also attached. Fairly easy. I broke it all down with a track saw and it all looks fairly accurate. The interior pieces will be cut down from a series of long pieces all the same width. 11 1/32”. In looking at the pieces I think track saws being what they are and my own human error - over the course of the long cuts I’m off by that 1/32” at times. Should I stick these things on the table saw and true them up or just not bother?
Thanks!

View attachment Dallas2-plans-redraw-251215.pdf

Last edited:
I'm going to have to start on one of these myself some time this year, been looking at the design and Ron Clarke's posting for ages. Very interested to hear what you think .
True is more important than exact size. Note that the imperial measurement is an approximation of the (to the mm) metric native sizes.
dave
dave
I re-rip everything so that the odd discrepancy will be cleaned up. That said, having all your 90 degree cuts accurate is vital when so many angled panels are involved. No wonder people gravitate to cnc if they can afford it.
I re-rip everything so that the odd discrepancy will be cleaned up. That said, having all your 90 degree cuts accurate is vital when so many angled panels are involved. No wonder people gravitate to cnc if they can afford it.
Lol. I think if I could afford it, I’d still try to do it with a table saw. Using a computer is cheating.
CNC — unless 5-axis won’t help with trimming the ends to the righ angles, and would likely be slower. And it won’t cut any straighter than a CNC panel saw or well setup an doperated table saw. More waste too.
dave
dave
- Home
- Loudspeakers
- Full Range
- Dallas II Build