What seems interesting is that 80% of your posts (which is exactly 70 of your latest posts) is in this particualr thread.
Aren't you limiting yourself in this way? And expecting to find help in this particular thread is not your best bet to get "faster".
I never met self made guru. It's others, that create gurus (and complain about them).😉
Nobody is oblidged to help here. It's up to them if they want, or feel like, or are aware that help was asked for. If you don't get proper response, change the way of asking, maybe you are just too subtle?
You are correct.
And >95% of my posts are an attempt to help others... and this is the only thread in which I feel I am even barely qualified to try... your "tools and techniques" thread was another, to a small degree.
As far as limiting myself by staying here... I have read everything I can find.. everywhere. This is not my only source... but finding any help with the compromises required by miniaturization, leads right back here...To this forum.
Gurus are definately not self created (or more would probably "uncreate" themselves, this minute). I am talking about "gurus". And we both know they outnumber the real thing by a huge margin.
And we both know exactly what their intentions are.
As to my possibly being too subtle? Thanks, Man! Coming from you (unless this is sarcasm, too subtle for me)... I'll call that *D* good advice!
I am acutely aware that nobody is obligated to help. No one should be... unless they put on the uniform.
And I'm not obligated to refrain from checking their credentials, and shouting out when I see a fake.
It's a beautiful thing...
And here's where I take advantage of it all...
What is the smallest working GC out there? The Patek?
When given only one choice, do you separate wires, or cross them at a 90 deg angle?
When all the wiring is forced to be close together, which catagories should have the most separation possible (I'm guessing power and input signal, but all tearing a PS Audio amp open taught me was to twist the DC wires. There is room to keep it all separated, and it is)?
What is the downside to using a D-sub 25 cable for it all, given that, in my case, they are all going to end up too close together anyway?
Has anyone tried potting GCs? If so, what is the prefered compound?
TIA,
E
Patek is still not working, I didn't connect PS yet😉
As to potting, I once created a thread about water cooling the chip. Didn't pursue that idea though http://www.diyaudio.com/forums/showthread.php?s=&threadid=17878&highlight=
I'm not sure about potting. The chip actually is potted already, so additional potting might have unpredicted influence, IMO. I noticed that when things are overdamped, the sound is not that great either, somewhat hollow, lacking highs extention and not much dimentional.
I don't really care much about wires, if they are insulated. When doing p2p, I try to space them nicely, round curves supposed to be better. Recently I was suggested that even amount of shine on wires is quite important to good sound and enameled conductors should be better (as they don't oxide).
I don't think the separation of wires is that important, the chip is so small inside that everything is close anyway (unless you create some unwanted loops, or watever).
There were some threads about potting, and generally people didn't like the effect sonically.
And I still believe that watchmaker's precision is required for that type of work😉
http://www.diyaudio.com/forums/showthread.php?s=&postid=376066#post376066
Thank you, Peter.
You have saved me time, money, and prevented me from second guessing much of what I have learned.
And if you want to compare P2P to watch making, I can't really argue much...
I'm very proud of my final P2P layout, and although it doesn't seem all that hard (with practice), a quick look at the time spent on each module will belie that.
I'm not going to say that PCBs are cheating (they sure are pretty), but I have to agree with your statement that it seems to be overkill on a circuit this simple. And huge, for my purposes.
Also, until I tried different voltages, and settled on 18 or 20 as being plenty (and sounding effortless), I was considering a liquid cooled setup for the 6ch "outdoor party" amp. My potential solution was to put the chips on a plate that is separated from the coolant, at one end, by silicone rubber (RTV). The fluid would be common automatic transmission fluid. Cheap, low viscosity, readily available, and capable of carrying away an enormous amount of heat.
So much fun to be had here...
E
baggystevo82 said:
I guess I do question authority quite a bit more than I ought to, I know I'm only young and only have 5 or 6 years of experience in this field under less than ideal conditions, and I apologise if I appeared a little over stubborn at times.
I wasnt aiming at you or anybody else that asks questions to learn. I aimed exclusively at people that can make a 25 post agument about something as trivial as cutting a thread.
To explain exactly what I mean with this....there are hundreds of ways to cut thread, and mostly amateurs think they have found the vise stones when they have made a thread that looks good. (if it actually is good they have no idea about). The cruel reality is that there is only one (as in 1) way of cutting thread manually correct, (without the help of a drillpress or a millingmachine), and its as simple as that. Anybody with a reasonable level of education and experience will know that. When people begin to argue such a thing, I consider an answer 100% waste of time. If any amateur in his right mind really thinks he have found a better or faster way than the industry is currently using, I can only recommend a quick trip to the patent agency.
So dont get me wrong in that matter 🙂
Magura🙂
Magura...
I never got a chance to study the different classes of threads (I've subbed out to a local one-off automation/ conversion shop, both design and "grind", but never had time for much extra-curricular study), and you are fully immersed.
Can you please explain the reasons/specs for the classifications, and the times and places where it becomes important to passing the final inspection?
All I know is that I can make a million threaded holes that "feel" good down to 0-80 (I was taught well), but I'm not even sure that the guy that taught me understood the rules. I've never dealt with a customer that needed to get that picky, but I have heard of machines that are still owned by their creators, because the threading (or even a random sample) was not up to these specs.
E
Re: Cutting, drilling, mouting etc. for the absolute beginner
Steve
Just had a thought on the initial question, hehe. Im sure many of you know well the Morgan Jones book 'Valve Amplifiers'. This deals with the electronics side mostly, but Im sure I saw somewhere once that there was a companion book by the same author about the physical construction of amps. Could be of some use if it exists.unhinged said:I'm hoping someone can point me to a straight forward guide or book that'll handhold me through what to most people here is probably the easy bit.
Steve
Morgan Jones's Book
Found it...
Building Valve Amplifiers, Morgan Jones, ISBN 0750656956
not a clue where to get it from though
Steve
Found it...
Building Valve Amplifiers, Morgan Jones, ISBN 0750656956
not a clue where to get it from though
Steve
The general grasp of thread inspection is to define what you want. I have the attitude that making it the best possible is usually not slower or harder than making a crappy thread (unless you go completely through the bottom of quality).
To make a perfect thread, you must obtain the cutting recommandations from the manufacturer of the tool....thats very important, and most people forget about that.
Once youve made a thread by the book and need to find out if its any good, there are several factors to look for.
The No. 1 test to show you if youve gone completely out of bounds is a thread tester. Is a tool with thread that should fit in the thread youve cut on one end, while on the other end there is a thread that should be too big, and hence should not be possible to screw in the thread you are testing.
That test gives you a general idea about the quality of the thread you made.
The second test would be to visually inspect the thread, is it neat´, even and shiny (shiny goes for most materials, but not all)??
Does it seem to be damaged in any way?
The third test would be a surface roughness test. Its essentially performed with a pickup and a meter.
The fourth test. If the above tests come out positive, you most likely have a good thread. If you are a little more demanding....there are also tensile strenght testers for such purposes. You will find such in use when making parts for helicopters for instance (thats how Ive seen them in use).
I have just like you seen parts or even entire machines being returned, with bad threads to blame.
All this is though usually not worth the effort, I only do the first and second test generally. For most applications youre just fine with that.
As for the classification of threads. In the international standard you have the different tolerance codes for the respective sizes. Usually you would be asked to make thread conforming to H7, but it frequently happens that people ask for H5 or less. The H7 tolerance is (off the top of my head) -0 +0.015mm for a 5mm thread. This can all be achieved with a regular good quality tap and some craftmanship + some experience.
Did that answer you question?
I can take it further, but I guess its not of much interest to anybody, as its only used for aircrafts and the like usually.
Magura🙂
Since we already know that there is only one (as in 1) way to cut thread manually, here's one (of the ) ways to cut metal.
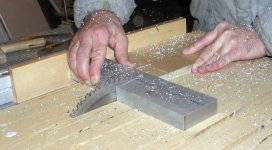
I needed two 1.00 x 2.46 x 5.50 aluminum blocks for today, and only material available at hand was a 3 x 12 bar. So I decided to mill it home style.😉
I needed two 1.00 x 2.46 x 5.50 aluminum blocks for today, and only material available at hand was a 3 x 12 bar. So I decided to mill it home style.😉
Attachments
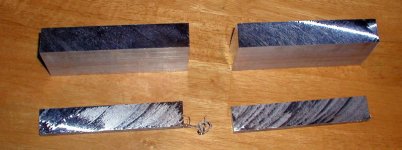
Here's the final look of the blocks, and they are well within the specs. I used Freud Non Ferrous Metals blade (78 teeth, or so).
Small pieces show the surface after first run. The big pieces look better, as I run them few times, to smooth out the surface.
Small pieces show the surface after first run. The big pieces look better, as I run them few times, to smooth out the surface.
Attachments
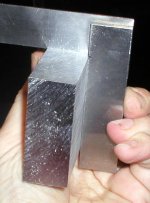
And here how square they are. It took me 20 min to do. I'd say not bad, and once again I managed to accomplish a task that for some seems like unavoidable way to contact proffesionals.
Too bad that those proffesionals can't provide any useful tips and complain all the time😉
Too bad that those proffesionals can't provide any useful tips and complain all the time😉
Attachments
I thought I would offer some advice on sawing aluminum and blade selection.
1. Ideally, you want three (3) teeth in the material. The sawing process is controlled by the gullet area. In a finer tooth blade, the gullet area is reduced geometrically relative to the tooth pitch. As a practical matter, saw blades could have a single tooth and perform nicely if the feed rate was well controlled. (An example of this would be the fly cutter.) Since most shops, home or otherwise, don't have an infinite selection of blades, one may orient the blade or material to reduce the number of teeth in the workpiece. In the case of a table saw, this can be accomplished by raising the blade. This will reduce the distance any one tooth has to travel through the material. In that manner, the "length" of the chip (that has to remain curled up in the gullet) is reduced.
2. Some form of lubricant will greatly reduce the friction experienced by the tooth. Lubricants work at molecular levels so buckets aren't needed. Just a shot before you start, or apply several drops/sprays during the cut. Some suggestions might include WD-40, Boeshield, or wax sticks.
3. Good sawing in aluminum requires POWER. If there isn't sufficient power, then the blade slows down and the inertia is reduced and the blade slows down more, etc. On a table saw, the HP is pretty much set. However, the power requirement can be reduced by using "metal cutting blades". These will typically have more narrow kerfs (requiring less power) and "triple chip" grinds (high tooth and low tooth where the high tooth has both edges chamfered and the low tooth is still square, effectively producing three chips between a pair of teeth). Lastly, many non-ferrous blades will have expansion slots in the rims to reduce noise and prevent the blade from "potato chipping" (cupping).
He SO right!!!
And remember, power means mechanical advantage...
So, if you are never going to cut something too thick, a 7 1/4" blade in a 10"saw (with a fresh plate around it) has more leverage, at the cutting radius, than a 10". Much more.
Peter, you are scaring the he(( out of me! I'm convinced (intellectually) that you will have all of your fingers in 50 yrs, but, all of my training grabs me by tha ba((s when I see anyone's hands anywhere near a workpiece (metal) during cutting.
You can blame flycutters for that. They disappear during use, and if you ever reach into their radius while working, even if your's is the only tool running, NO ONE is gonna hear anything different until you scream...
E
I've also noticed that most non-ferrous blades have a negative rake on their blades. I suppose that's to prevent the blade from taking a bigger bite in the metal than it can handle. I almost bought a "laminate + aluminum" blade the other day, but noticed it had positive rake which seemed like a bad idea for cutting aluminum of any significant thickness.
Peter, I do appreciate you sharing your metal cutting techniques over the years. I am planning to set up my miter saw to cut the metal for my enclosures. However, I have to agree with ekd though - those pictures look kinda scary 😉 I'm going to start with my pieces firmly clamped down and see how it goes from there
Peter, I do appreciate you sharing your metal cutting techniques over the years. I am planning to set up my miter saw to cut the metal for my enclosures. However, I have to agree with ekd though - those pictures look kinda scary 😉 I'm going to start with my pieces firmly clamped down and see how it goes from there
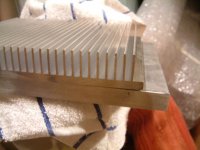
I tried clamping them down for 24 hours, to little effect. The other thing I was thinking about trying was to anneal them before clamping. I read somewhere that 6061 is pretty forgiving of the homebrew technique of heating to 500F in your oven, then quenching with water.
Attachments
Please do, bzo!
It is obvious from all the body of Peter's work, that he has a real "feel" for his tools, and materials. That is only developed by progressing in steps, and paying attention to variables as they appear (not waiting til something gets pulled out of your hand).
I have no fear for his hands. Period. My trepidation is based on fears given (sometimes in less than subtle fashion) to me by people that cared.
There is also nothing I could see in any pics that would suggest any possible outcome, but the one he desires. Look at his hands...
He is not commiting any of his balance to the cut. He can be out of there in a nano-second. Even if something gave way (the floor?), he'd leave intact. Can you do that?
I can't pretend to say I could... every time...100%...
I'm going to build a clamp setup for my table saw, as soon as I start needing compond cuts. Till then, my chop saw (w/vises) will have to do.
E
Was still poking out this when your last 2 came in...Chipco is the guy to ask...
Re: Please do, bzo!
For 6061 you are almost right....but its not F but 500C...and its 525C 🙂
Its is true that you can easily do a T6 on a 6061 with kitchen table technology. Even the industry does not put a whole lot of effort into hight tech in this matter. (unless we are talking tool aluminium or the like)
What PD is doing here is not safe. There must be a guard over the blade to catch the workpiece if the blade decides to throw it after him....any workshop with a saw without the guard would be in serious trouble in europe....dont know about the american work safety law, but here we are talking fines in the level of 10,000 USD.
You should sit back and take 5 if you are not 100% sure you are 100% safe no matter what happens.....else you have quite a risk to end up needing 2 hands when ordering 5 beers 😉
When machining metal there are very few occasions where clamping isnt obligatoric....
Magura🙂
bzo said:I tried clamping them down for 24 hours, to little effect. The other thing I was thinking about trying was to anneal them before clamping. I read somewhere that 6061 is pretty forgiving of the homebrew technique of heating to 500F in your oven, then quenching with water.
For 6061 you are almost right....but its not F but 500C...and its 525C 🙂
Its is true that you can easily do a T6 on a 6061 with kitchen table technology. Even the industry does not put a whole lot of effort into hight tech in this matter. (unless we are talking tool aluminium or the like)
ekd said:He is not commiting any of his balance to the cut. He can be out of there in a nano-second. Even if something gave way (the floor?), he'd leave intact. Can you do that?
I can't pretend to say I could... every time...100%...
What PD is doing here is not safe. There must be a guard over the blade to catch the workpiece if the blade decides to throw it after him....any workshop with a saw without the guard would be in serious trouble in europe....dont know about the american work safety law, but here we are talking fines in the level of 10,000 USD.
You should sit back and take 5 if you are not 100% sure you are 100% safe no matter what happens.....else you have quite a risk to end up needing 2 hands when ordering 5 beers 😉
When machining metal there are very few occasions where clamping isnt obligatoric....
Magura🙂
- Status
- Not open for further replies.
- Home
- General Interest
- Everything Else
- Cutting, drilling, mounting etc. for the absolute beginner