I should also mention that the actual ports on all of these have a very high aspect ratio (Scott says inspired by the Fonken) which is also a factor in the domination of the enclosure over the driver.
dave
dave
Quick update on the build!
Disaterous weekend, having a lot of hassle with water based finishes and the size. With more traditional paints the drying time is much slower and brush strokes flow out, with water based I am getting area's drying out before I can get back to them and I am getting horrendus brush marks, going to try different ways of applicating the stuff. Seems I'm just putting paint on and sanding it back of at the moment. Also started working on the bracing for the rear of the cabinet, which should be interesting, (well worked on the bracing twice, first time I made so many stupid mistakes, I had to start again).
Then got roped in to domestic duties, so apart from more layers of grey undercoat, there's not been much progress.
I used water based finishes cos I thought they'd be quicker (ie reduced drying times), i think on the CC's it was a mistake, due to the size.
I did a pair of inverted BIB's for a buddy for fe127 drivers and he wanted them to be orange, so I used a water based stain since that was all I could find in the orange stain department. Due to it doing everything so quickly it was harder to work with and liked to make blotches if my timing was not perfect on wiping off excess. I will avoid water based stains in the future.
Ed Robinson
Ed Robinson
marce,
The trick with water based paint is to pre-dampen the surface. Apply a wad of paint in one direction of brush stroke and then go back into it with a pretty well drained brush, at a 90 degree angle to the first stroke pattern. The damp surface and deliberate cross hatch of brush strokes will get you large smooth areas of water based paint. Experiment and learn on junk wood first, of course.
Bud
marce said:with water based I am getting area's drying out before I can get back to them and I am getting horrendus brush marks,
Hi marce,
Have you tried a roller? A small one (4") would put the paint on quicker (and thicker) and smoother. Cut in the rest with the brush.
Hi MJL,
I've tried that, I am slowly getting use to the paint, its the shadow lines that seem to cause the problem, if I dont get back over an area soon enough it drags, and creates a plowed field effect. With oil based I didn't have that problem. I'm going to try some paint pads, I used them on some T&G planks with water based satin and got a reasonable finish, so bought a set to try.
Tried some floor paint, not the same brand as yours, impressed with how hard it gets and how it sands up.
I think with prctice I'll get there, and I've got plenty of practice coming up, just have to open a jar of elbow grease.
On a more cheerful note, I destroyed a router bit and my dust extracter, so was once more dancing round the garden like a deranged gorilla, BUT I managed to get my rear braces fabricated.
Try thinning the paint. Also if your brush drags, don't go back over the area. More thin coats are always preferred to thick coats.
Personally speaking, I always forget that the build is only 50% of the work.
Personally speaking, I always forget that the build is only 50% of the work.
I'll give that a go, thanks Staggerlee.
The early water based paints I tried a few years ago were terrible, realy thin, no build up, these newer ones seem to be nearer oil based with the amount of solids and build up, but with the faster drying time.
The early water based paints I tried a few years ago were terrible, realy thin, no build up, these newer ones seem to be nearer oil based with the amount of solids and build up, but with the faster drying time.
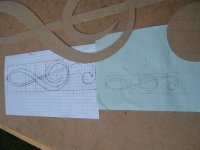
Rear wall bracing, the rear panel requires some bracing, though by using the foam in the voids behind the deflector the area is only (!) 930mm x 240mm (37" x 9.45"). Dave at Planet10 recommended forming to I beams verticaly down the back at odd spacing. I origionaly was going to do this but mock ups didn't look that brilliant, so I decieded to use a bit of poetic license, and started sketching out more curved designs, to go along with the spirit of the CC. Any way I though the best way is to split it up into odd shaped panels with curved braces. Anyway as I was merrily drawing away I had some inspiration (which was strange as it was a teetotal night (I think)) and decieded to do a brace that had some referance to music and would look OK on the rear of the CC's.
Sooooo, I came up with this.
The origional sketches and initial template.
Sooooo, I came up with this.
The origional sketches and initial template.
Attachments
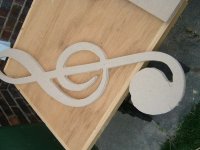
After I'd calmed down I re-made my jig using 6mm MDF and used my 1/2" router with a decent (and now deceased) bit and ended up with my first finished rear brace, its resting against a 240mm wide strip of MDF to sort of show how it will afix to the back of the cabinet.
Attachments

Another shot sans flash, should indicate depth more. Currently 2 18mm MDF sheets, but this may change as at the moment I cant face machinig any more MDF co of the dust and no extraction.
Scott, I never thought to ask before but do you now a supplier of BB ply around the Hull area, cos here in Scarborough they look at you strange when you ask for it.
The brace is being sanded etc cos its still a bit rough ( the problem with 1.75 flute cutters, used to be 2, but bouncing of floor tiles didn't do it a lot of good).
Attachments
Oh the new improved jig in action, the waste bits are to help stop the router tipping over, I always try to minimise that happening when routing by hand instead of on a table cos I get a bit peeved with myself when it happens (about every time I pick the router up, and loose concentration for a couple of seconds)
Attachments

Quick update.
Build still progressing slowly, but apart from painting construction should be completed in next couple of days, expected to be much further on, but a weekend waiting for AA relay in Doncaster sort of messed things up a bit.
Build still progressing slowly, but apart from painting construction should be completed in next couple of days, expected to be much further on, but a weekend waiting for AA relay in Doncaster sort of messed things up a bit.
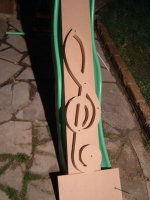
Got the rear bracing finaly done (Curvy Brace), binding posts etc, so apart from the paint job and a bit of gluing, there ready for the drivers.
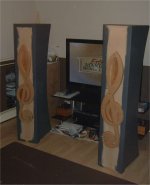
Here's an exciting picture of the binding posts, and my crossover box (I am going to make a cover), I dont want to be yarking drivers in and out to try different cap values so its gonna go in here.
Here's an exciting picture of the binding posts, and my crossover box (I am going to make a cover), I dont want to be yarking drivers in and out to try different cap values so its gonna go in here.
Attachments
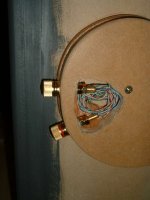
Oh the binding posts face towars the amp, instead of straight out the back, thought it would be easier to wire up if I didn't have to try and reach round the back.
Here is one Curvy Brace, it was gonna be two pieces of MDF to give more depth but I got sick of machining it, so its mdf and ply.
the ply is offset slightely, the idea being I'm gonna paint the mdf clef black like the cabinet, the outer edge of the ply will be a in "titanium gold", as these will generaly only be viewed from the side the gold line should give a drop shadow effect and accentuate the pattern.
Thge idea of a curvy brace is to upset the panel modes even more, though any comments on that would be appreciated.
Attachments

Thanks Scott,
must admit the curvy braces seemed like a good idea 2 weeks ago, I have a pile of treble clef mishapes and jigs floating round the house, and considereing my problems paint what is already there, I must be a glutten for punishment.
They are only dry fitted I bought a load of cans of paint for these bits and for inside the horn mouths, I'm slowly learning.
marce said:must admit the curvy braces seemed like a good idea 2 weeks ago,
They are only dry fitted I bought a load of cans of paint for these bits and for inside the horn mouths, I'm slowly learning.
I think this one is going to be the reference, what I would like to call a Picasso Chang.
Looking good, I know u r meticulous and exact. Final product will be a good one I am sure.
gychang
- Status
- Not open for further replies.
- Home
- Loudspeakers
- Full Range
- Curvy Chang thread