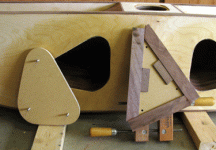
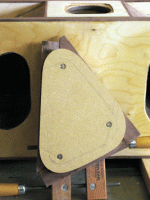
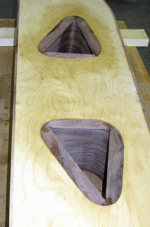
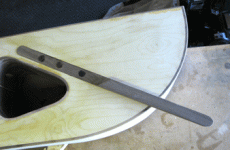
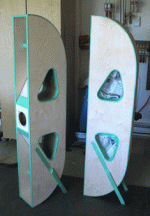
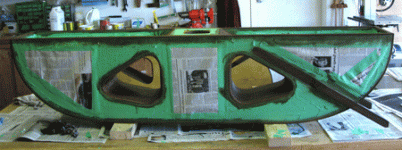
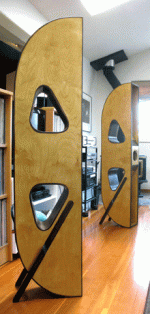
This photo shows the cutouts with their edges rabbeted in the shape of the template; and the sandwich of the two pieces that fit into that shape. The two pieces can be clamped together using the three screws visible in the left piece, which go into T-nuts installed on the outside of the right piece. The two scraps of walnut on the right piece are glued there to act as location blocks.
Attachments
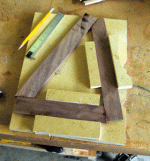
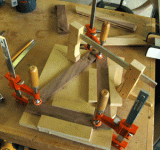
Using a jig made of MDF scraps, I glued walnut strips into triangles. Normally you wouldn't want to glue on end-grain like this, since the joint will be very weak. In this case, all it had to do was hold together for one shaping operation before being glued into the rabbet, which would support and reinforce the joints.
Attachments
The insides of the triangles are trimmed flush with the insides of the cutouts (no prizes for guessing what I used).
The final step before finishing was to put some legs on. I thought for some time about what would work aesthetically that was also within my capabilities.
But my wife tells me I'm going shopping now, so I hope none of you are waiting with bated breath for the final installment. More later.
Regards.
Aengus
P.S.
DaveCan, I didn't mean to ignore you -sorry.
Note that even from what I've posted here, my woodworking mojo includes many, many mistakes en route - and I haven't even talked about, for example, having to make extra walnut inlay triangles because of breaking some when routing the outer shape. I was told that what distinguishes a good carpenter is that s/he know how to fix mistakes, not avoid them.
Repeat after me: thickened epoxy fills voids.
Regards.
Aengus
DaveCan, I didn't mean to ignore you -sorry.
Note that even from what I've posted here, my woodworking mojo includes many, many mistakes en route - and I haven't even talked about, for example, having to make extra walnut inlay triangles because of breaking some when routing the outer shape. I was told that what distinguishes a good carpenter is that s/he know how to fix mistakes, not avoid them.
Repeat after me: thickened epoxy fills voids.

Regards.
Aengus
Ah heck, ain't no worry, I've been getting ignored ever since I popped out into this world 43 years ago Anyhow mistakes along the way and all, your doing a fine job, and I'm sure making the creator's of those cab's proud parents... Dave🙂
 Anyhow mistakes along the way and all, your doing a fine job, and I'm sure making the creator's of those cab's proud parents... Dave🙂
All I can say is WHOA! What a process. Thanks for the details. I'm more than sufficiently impressed by your patience, determination, and yes, craftsmanship. You've inspired me to take more time on my real build of my (simple) BD Pipes, my first foray into speaker building.
Again, beautiful work.
Again, beautiful work.
Carlp, thank you. I'm not sure, though, that I'm the best model for time to build. You probably want a compromise between rushing the job, and taking forever, which is what I seem to do. But yes, patience is a virtue for woodbutchers.
Weekend is over, shopping is over, I'd better finish this thread up.
Final step was to to do the legs. I thought for some time about how to do these, and finally decided on inset legs angled to match the angle of the cutouts.
To do the inset, I built a jig to guide a pattern-following router bit. Here it is clamped on to the speaker.
Attachments
Here it is with a leg glued in place. The curved step in the leg was made with a belt sander, so there are slight variations from leg to leg. Luckily, when they're glued in it's impossible to compare them directly. 😀
The dark spots on the legs are clamp marks, which will disappear in the final sanding.
The dark spots on the legs are clamp marks, which will disappear in the final sanding.
Attachments
Finishing
Just a note on finishing to, um, finish. The decisions were:
1. Because the birch had got somewhat battered in spots over the months I had these kicking around the shop, and because I had (this is embarrassing) managed to sand through the paper-backed veneer in places, exposing the yellowish paper underneath, I thought that tinting the birch to a honey colour might smooth out some of these discrepancies.
2. The walnut would also need to be stained, since it contained quite a bit of sapwood.
3. Everything would then be finished with clear urethane.
I decided to use a combined urethane and stain on the birch. I wouldn't do that again, at least not on complicated shapes like these. Next time I would use a water-based stain to get the colour I wanted, followed by a clear finish. Oh, well.
First, I masked off all the walnut, a tedious job.
[edit] Actually, first I sanded everything down to 320 grit - an even more tedious job. [/edit]
Attachments
I would like to say that then I cleaned it all up with sandpaper, slapped on a couple of coats of clear urethane, and was done. But in fact there were places that I had sanded the veneer so thin that it wouldn't take the stain properly, so I remasked and repainted; cleaned up mistakes; repainted; resanded; and went through various combinations of these acts over and over.
Finally, I wasn't so much finished with the finishing as finished with my patience. So a final sanding (to 400 grit, IIRC), a coat of automotive paste wax, and I declared them done.
Thank you all for your comments. If there are any questions (aside from "Are you crazy?", to which the answer should be obvious) I'd be glad to answer them.
Regards.
Aengus
Attachments
Thank you all for your comments. If there are any questions (aside from "Are you crazy?", to which the answer should be obvious) I'd be glad to answer them.
Regards.
Aengus [/B]
Ok question, how do they sound?


Dave🙂
- Status
- Not open for further replies.
- Home
- Loudspeakers
- Full Range
- Curved Harveys

